Katie's Summer Blog 2015
On this page... (hide)
1. Week 9
August 21
This morning I found out that we were presenting at the lab meeting! We spent the morning making quick figures and pulling together a brief overview of the paper. In the afternoon, I worked on the SRI microbots. I spent some time learning blender. Although I could make the figure out of cubes, it was not letting me export the whole figure, but it only exported whatever cube was selected at the time of the export. To fix it, I had to merge all cubes into one "object". When I made a simple step figure, the program didn't let it through and errored on the distance between the edges. I just commented out that error to see what would happen and it went through! This probably isn't a valid way to fix the error but it seems to temporarily work? I made a very small parabola figure with blender and made the figure from matlab, and sent it to Dave so that he could let SRI know about the temporary progress.
August 20
SRI is going to a conference at St Louis to present on the microbots, and they wanted a model of the St Louis arch made by the microbots. We first had to learn how to use blender so that it can generate the ply file for the arch, and finding out whether this will work or not. I temporarily made a ply file that had three blocks, with the middle one on the higher z axis, so that the figure was not filled. It was really complicated to input all the numbers and it also didn't seem to work...
We spent a bit of time organizing the figures throughout the paper, and I spent the rest of the day making scripts to clean up the matlab figures into a nicer, more readable figure.
August 19
I made booleans for the diagonals so that the user can specify which diagonals they want to place on the structure and whether they want the diagonals to exist inside as well as outside. Maybe the next step is to get access to Hayk's github and push it onto the repo?
We realized that the problem of having the jogging perform worse than running might be because we changed the voltage while testing it. We instead decided to vary the weight on top of the robot and do our best to hold our current constant. When we set our power supplies to constant current, it didn't perform very well because the voltage surges was causing the robots to suddenly stop and then leap forward. By manually controlling the current, we got them to look more like running and walking robots. One robot was giving us a lot of trouble so we decided to just go to Target and buy some more robots. After, we ran the tests and ended with some really good data!
August 18
This morning we looked at some figures and made one that compared a second of the impulsive robots and a second of the walking robot. It was pretty clear that the walking robot generated less pull force, but the peaks were much wider, whereas the impulsive robots had very narrow and momentary peaks. While we were playing with our figures, we came across the idea of using our scarabs to generate walking, jogging, and running speeds! We got more power supplies so that we could tune each hexbug to its lowest current. After performing all 3 tests, we found that the jogging speed was actually worse than the running case for 1 robot : 5 robot force ratio, because although there was a lot of variation in the running case, the running case still generated a lot more force, so the ratio ended up being much higher. We talked about solving this with more robots (because this curve is most likely to be logarithmic rather than linear) or analyzing it differently. We are currently using the top 5%, 10%, etc. of the data and then getting the median of those peaks.
August 17
I spent most of my day cleaning up the data we've collected recently. The results are pretty good! Here's the slope of the median of the top 5% of each number of robot slot:
series = 0.0467 parallel = 0.1808 phase = 0.1070 walking = 0.3499
The only troubling number is the phase - it should be at least or higher than the slope in parallel, but it was also difficult for us to tune the frequency in phase. Otherwise, it shows that the walking robots are indeed much better at load sharing. However, it's still 0.3499. Approximately, the first robot pulls about 1N and 5 robots pull 2.5N.
2. Week 8
August 15
Dave explained to me why the first robot kept running backwards. The motors in each robot acted as an inductor, which were all connected with a single switch that turned on and off. This switch can't be instantaneous, so during the time it is turning off, the current through all the inductors are pushed towards the lowest current. The first robot has the lowest voltage, so it has the lowest current and now the current from the other robots pushed it to run backwards! Now, there are independent wires that turn off each robot separately. It was a really unexpected problem!
For the rest of the day, we set up and tested the scarabs. We replaced the tubes with rubber bottoms because the tubes were too thick and the scarabs kept tripping on its own legs. After setting everything up, we tested it first using the usual 1.5V batteries. However, when we got to taking the third robot off, the batteries had started to die already! We tried using the batteries we had originally purchased to use for our microtugs. Since these were so much stronger, the scarabs were running too fast! We decided to just run it all with a power supply. Although setting up the wires took a bit of time, the test of so much smoother. Since we could control the voltage, we could set the robots to be closest to walking, and get the maximum pull. The data seemed pretty clean too - the load sharing was much better than the nano hexbugs but was still not linearly increasing with number of robots. Running them individually was also constant across all 5 scarabs!
August 14
Today we hosted the MERL bbq! We had to work on this as soon as we got here because there was a lot of preparation. I helped prepare the veggies and the watermelon. Overall, I think it was pretty successful except there was a lot of food left! The watermelons were really popular. When I finally started working, I helped Dave tune all seven power supplies to calculate their maximum voltage before they slipped, and then adjusted it to be exactly 90% of this voltage. We tried to run this setup so we can get the maximum load sharing for these robots, but we kept running into the problem where the first robot (which had the lowest voltage) kept running backwards! We tried putting a resistor to run everything to ground when there was a difference between the current within these seven robots, but it got too confusing. After I left, Dave decided to just go and buy more supplies to make them all independent. After fixing them to be completely independent, he got them to pull 72 pounds!
August 13
I fixed a small bug in the diagonals code. I had assumed that the base was the largest face, but the cylinder.yml file seemed to have a structure that flared larger than the base, so I had to check for the horizontals behind each horizontal when looking for yz diagonals. They should all be working now! The last step would be to add booleans to allow for the option of turning each diagonal on and off so that it'll be easy to use by the people making the actual physical setup.
I added nuts to make the screws more stable on the ATI and fixed a microtug that had a little piece come off last night. We talked about the outline of the paper, and what kind of graphs/figures would be necessary to get. Then, we had to finish getting the hexbug data, so we set up the parallels test. The data seemed to come out really great! Instead of trying to count the seconds from the video, we tapped the ATI with a screwdriver before and after we took off the hexbug. We spent quite a lot of time adjusting the frequency/wave shape to match the actual hexbug performance when we put them in phase. It was almost impossible to adjust it similarly, but we got it pretty close! So after a pretty long day, we finally finished collecting all the data we needed from these hexbugs!
August 12
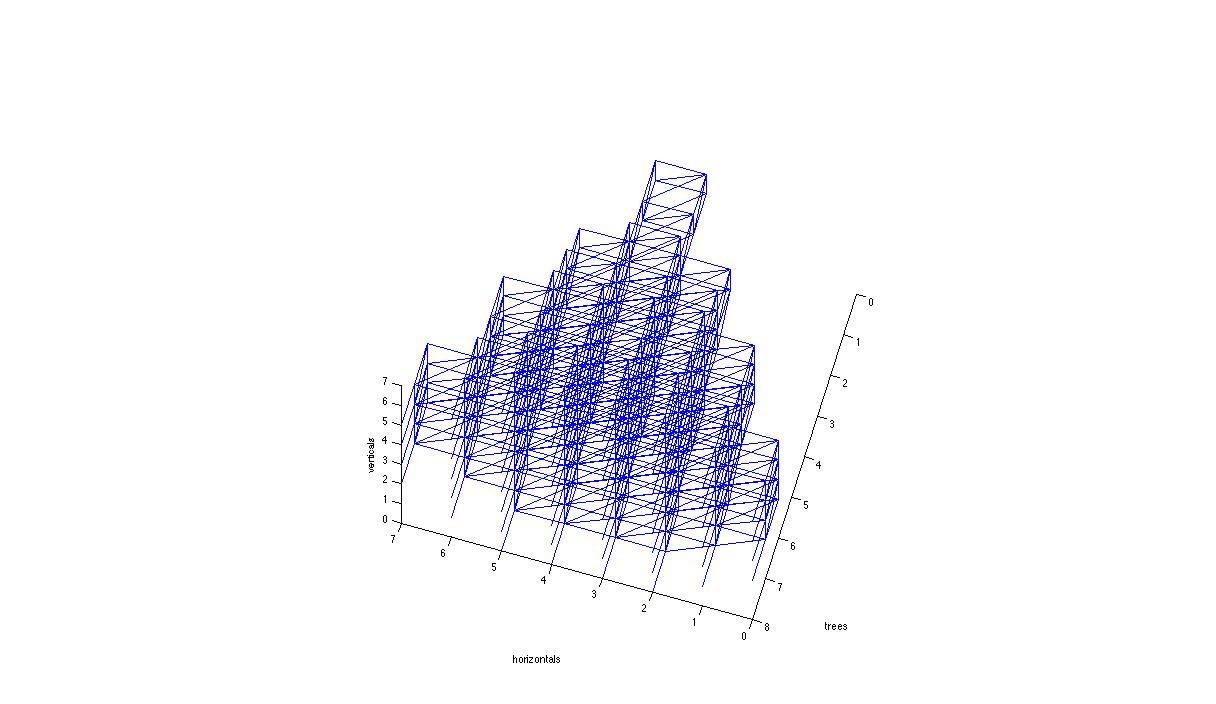
I finally finished the external diagonals!!! I chaged the method that I checked the yz diagonals and I also changed my way of checking xy diagonals. The xz diagonals are easy because we know there has to be only two in a row - one in the very left and one in the very right. The yz was tricky because I had to check every row for a possible yz, and the checking part was the most challenging. I used many different ways to check, but at the end I figured out an easy way for the code to check. It would just calculate the two horizontals that would potentially be infront of the yz surface, and if either of those contain an invalid point in space, then that means it's an external yz surface. Similarly, I checked for xy surfaces by calculating two horizontals above and two horizontals below, and seeing if any of those contained an invalid point. It seems like it's working on all the structures, but I can't be sure there isn't an edge case that wasn't covered by these structures. Here's the pyramid:
For the rest of the day, we got some wires and put connectors onto them so that each microtug had their own wire to connect it to the power supplies. I also set up the hexbugs testing for the parallels testing with the ATI.
August 11
We spent most of our day figuring out the test set up and running some tests on the microtugs. They seemed to have a peak and then have some kind of exponential decay. When they all turned on, there was a slight voltage sag which caused them to not pull as strong when all turned on. We made the current into more of a sawtooth form, which helped the data a little. We also put a wire in the switches that connected the inlet with the last switch because it seemed to decrease as the switches got further away from the inlet. We also put in a larger wire.
August 10
The diagonals are still not workin gin the xy direction - the approach became more and more complicated as I figured out more edge cases, and I'm trying to stand back and think of another approach that may be more appropriate. We got the new batteries today for the microtugs, so I cut the ridges in the connectors to make them more smooth. Since they shipped us 3 chargers and an extra battery, things worked out really well beacuse we accidentally short circuited our first battery. We charged all 18 of our batteries.
For the rest of the day, we worked on setting up our experiment for the microtugs. I drilled some holes into the bar that holds the sensors, and after some experimentation, we figured out how to best set up our experiment, and we set up the basic stage for it.
3. Week 7
August 7
I'm holding off on the yz diagonals for now since it seems to work on all the other structures except the pyramid. For some reason, the xy diagonals are skipping the end of some rows and other times there are too many of them, so I was working on this. For the rest of the day, I switched the batteries on the hexbugs and set up the test for them in parallel.
August 6
This morning I tried to fix the diagonals and the code is now getting a KeyError again. This is the notorious error from right when I first started this project... I think it has something to do with my yz diagonals calculating the wrong x value. Getting the external diagonals is much harder than getting all diagonals so far!
For the rest of the day I worked on making more of these robots come together. Dave showed me how a battery can have different numbers in series, capacity, and voltage. It turns out the batteries they used for the previous microtug had huge capacity! The ones we bought are bigger but also has pretty good capacity.
I then worked on removing the wires from some connectors Dave bought so that we can use them to connect to the battery. After, I learned how to use the solder sucker to clean up the solder left over from the previous wires. Then I tried to test one of our tugs and it seemed like it couldn't transfer the energy from the battery from the battery through other boards. Then I realized the motor connectors weren't working very well, and when we looked at it from under a microscope, the tabs that are used to connect the two were really bent, so I spent the rest of the day fixing it using a blade under the microscope. We have all 6 microtugs now!
August 5
After progressing a little more on the code this morning, we made progress on the electronics. Our first test with the two motors seemed to work until the processor started smoking. We think we fixed it, but still aren't sure what caused the problem. We tested the microtug again with all four motors, and they all seemed to work! We spent the rest of the day modifying the batteries to make them the right connectors. The Arduino code ended up erroring at the end when we wanted to test the second microtug, so I need to work on that tomorrow.
August 4
This morning I tried to put the external diagonals in the code. I decided to use a different approach and insert the yz diagonals after filling in all the other diagonals. I'm currently erroring on some indices. Later, we tried to test a motor controller but we might have ruined it, so we decided to look online and order as many tinycircuits motors as we could find. We ended up ordering 6 of them, and hoped that they don't run out of stock while the order is being processed. We also ordered 18 batteries and battery chargers. Dave's brother came today and helped us get a lot of things done! We found the plastic springy washers, and since the screws we found were a little thicker in head we didn't need the metal washers. We used the connectors to fix the ends of the motors and fit them onto the motor boards. We glued the connectors on and now the microtugs started to look like the final version!
August 3
This morning I worked on analyzing the data again. I used the peakfinding algorithm and filtered it to only get the peaks above the noise. When we zoomed in, it seemed to look much better than last time, but there were a some peaks that seemed like it was signal + noise. We decided to work on this later when we need a break.
We mainly worked on the servo arm today. Dave found the right drill size, because our original 0.25 was too exact and the plastic would slightly deform around it, causing the resulting hole to be slightly less than 0.25. I worked on deburring the small pipes I cut out so that they would fit. Next, I found the correct sized screw to fit into the servo arm, and drilled the holes for them. I found the metal washer, but I couldn't find the plastic washer, so I'll be working on that tomorrow.
4. Week 6
July 31
Today we spent the majority of the day going to the hobby shop to find some servos arms and connectors. After a while, we couldn't find one that was exactly the one we wanted, even though it seemed to be ok at the store. We digged through the servo box in the cabinets and we found just 6 that could work, so we plan to modify those later.
July 30
We moved onto working on the string winding. After a lot of sanding and cutting, we got a good area for the string to wind up with the washer on the side. We had to tie the bowline knot to keep the string from slipping. After, Dave showed me how to use the dremel to cut up the steel pipe into smaller pipes for the drive motors to go into. We used the drill press to spin the pipe and put the dremel up to the side to cut it more evenly. After, I had to clean up the ends of each pipe because they were slightly caving in. After fixing that, the drivers seem to fit! Later in the day, I added the holes for the ends of the motors to go through.
Our next step would be to start testing the motors, since we didn't exactly buy them properly. I'm planning to work on that tomorrow, in addition to fixing up the final tile which we couldn't do because some of the servos didn't work.
July 29
We spent a good part of the first half of the day building the tubes, putting pieces of paperclips over them, and adjusting them until they were almost touching the ground. We attached smaller pieces of toothpicks at the end of the string and attached it to the other side of the tiles to test the strength of the string. We repeated until all the tiles pulled around 50N.
We sanded both the top of the tile and one side of the servos. We used the special superglue to glue the servos onto the tiles and left them overnight with weights on top.
July 28
We realized that the data peaks varied depending on how many robots were pulling - 20 robots had much more peaks than having 1 robot. Therefore, the peak finding algorithm was skipping quite a few peaks during the phases when there were a lot of robots. I tried to implement the function findpeaks from matlab, but it seems like the functions isn't really supported anymore, so other people were using it a different way. However, this different way doesn't let me skip the peaks in the noise, so I need to loop through the peaks one more time and delete the unnecessary ones from noise.
We started building today! We polished up the tiles and picked the best performing 6. Dave made the slots for both strings to form the loop and for the part of the wheels to fit. We attached one end of the strings, added pieces of toothpicks on top and sanded the toothpick to make it flat on top. Dave showed me how to make the tubes for the other end of the string so that I can start on that tomorrow.
July 27
I fixed the xy diagonals, but the yz diagonals are a harder problem because it requires a lot of complication with the way I was initially thinking of placing them. I was thinking to check for every horizontal, check if there's a lower horizontal, and if either horizontals have trees on both. It's a lot to check so the code started looking a little ridiculous. I talked with Dave and he suggested keeping track of how many trees will be on the whole structure because we know the base and it will never expand from the base. I started coding this method, but left it there to think about how to store the information from the base.
I also started analyzing the data from our hexbugs testing. After taking out the noise in the beginning, I graphed the more significant peaks and found the average force of each number of hexbugs. The graph was pretty clearly decreasing, except that the magnitudes weren't enough. This is pretty much what we wanted!
5. Week 5
July 24
I spent most of my day working on the external diagonals. The logic is more complicated to make these diagonals, and there seems to be an infinite loop somewhere that I can't seem to find. Cubic1x1 runs for a really long time until I have to just quit it. I also tried to work on figuring out the strongest diagonal structure for a cubic lattice, but the software requires so many variables that I can't measure so I might hold off on that.
I figured out why it kept running for so long - it was because the variables were rewriting themselves at the wrong place! After fixing a few other bugs, I printed out the result. It seemed that most of the diagonals were working, except that there were too many xy diagonals. Also, on the pyramid, the yz diagonals weren't appearing except for the very front and very back of the structure.
July 23
Today we had a spontaneous visit to SRI because the whole team, including Ron, was at the meeting which is pretty rare. We made it to the last 10 minutes of the meeting, so we updated them with the processing order and our matlab simulated structures. We talked a little about possible next steps, such as thinking about how to minimize the thickness of joints since as of right now there are about 8 members on each joint, which can amount to a substantial amount of carbon fiber on the joints. We also talked about possibly having diagonals only on the outside portion of the structure, since that would help with both the diagonals and putting the faces on the outsides. We stayed for lunch and headed back to lab.
Once we got back to lab, I played around with Mastan to see if I could roughly calculate which truss structure was more stable, or if there was a significant difference at all between having the diagonals on the outside versus having diagonals everywhere. I made a cubic 2x2 in Mastan and I'm trying to figure out how sections work on the software. After that, I worked a little bit on setting the option for having either external diagonals or just all diagonals, and the algorithm behind making those. I also helped Dave with putting the gecko adhesives on the glove, and putting a tube on the gecko adhesive to test out how it reacts when sucked into vacuum.
July 22
This morning, we set up the next experiment with the 20 hexbugs in series on the vibrating fiberglass/balsa wood board. We realized that the screws weren't very tightly screwed onto the force sensor, so it wasn't recording accurate data! To make sure our previous data was correct, we tried to redo the all in series test except we only did the last part where there was one robot. We screwed it down all the way to make sure the screw was on tight, and it thankfully didn't seem to make much of a difference. For our final test, we still wanted to screw them down so we put a nut in the screw so that it was really stable but was still protruding enough for the string to loop onto. We mounted the force sensor on the huge slab of wax! The data we collected seemed pretty good - these robots still didn't load share well. One robot approximately pulled at 0.5N but 20 was pulling at 1.2N. Vibrating the board did seem to prevent random spikes and made the data more consistent, but still didn't help in load sharing. For the rest of the day, I went to the TLT and helped Arul and Dave with the casting.
July 21
I spent half the day finishing off the balsa wood comb, and when I finished it the pieces were pretty stable! I had to think a little about how the strings would be attached in parallel because we have to cut it while they are running and the cutting should get rid of all the string of the hexbug that was just cut. Otherwise, the leftover strings would interfere with the force sensor.
I ended up putting 4 nails on the force sensor instead of one because it would spread out the strings a little more. One of the robots have a leg that fell off, but it should work! The data was less straightforward for this test - the data looked mostly constant, and when Arul filtered it, it looked a lot like the data from the series test because it was linearly decreasing but the magnitudes were still very similar from the 20 robots to 1 robot. We prepared for the test with the vibrating platform, and it took a really long time to untangle the strings... But the next test should work!
July 20
Since we finished the series test last Friday, we are now preparing to test for the hexbugs in parallel. There are two tests we plan to do of them in parallel - one with them just on the desk to compare to them in series, and one on the vibrating platform. For the first test, we will use the acrylic comb to restrict the hexbugs. The acrylic comb wasn't very strong when I found it, because a few on the side were just taped in place, so I spent most of my morning taking it apart and gluing/taping them again. I'm not sure if they're still strong enough, but we can see when we test it. I also changed the batteries on all the robots because we had just finished the series test.
In the afternoon, I started making the comb made out of balsa wood because it would have to be light to maximize the vibration on the platform. Most of the balsa pieces I found were very flat, so I had to layer a lot of them to make them taller.
6. Week 4
July 17
We had the first MERL bbq today and it was really fun! After, we decided that the small tests weren't really working out and we just wanted a small dataset to prove one point. We replaced the batteries on all 20 hexbugs, put them infront of one another, and used soldering iron to cut the strings while we recorded the data using the force sensor. A lot of people helped to make it easier and we got some really clear data! I also helped Dave and Arul at the TLT while they used epoxy to make the body of the new microtugs.
July 16
This morning I finished off the testing on the different lengths, and we ordered some weights and battery chargers from Amazon. We decided to test the hexbug scarabs with 100g weights on them in series, and it turned out that the weight was too much so they didn't really move. We decided to just test one bot at a time and tried 50g, 70g, and 80g on them, and they seemed to perform better with the lesser weights. We decided to have them carry about 50g each instead of the 100g.
We realized that the string might be affecting its pull strength because the string was hitting the acrylic as the hexbugs were pulling. I tried to put the force sensor on a small stage and have the string slightly sloped up.
July 15
I spent the morning fixing the bug that the pyramid showed - it turns out that if the layer closer to the base is wider than the following layer, it creates extra diagonals because it used to only use its current layer to determine its diagonals. The new pyramid seems to have no errors:
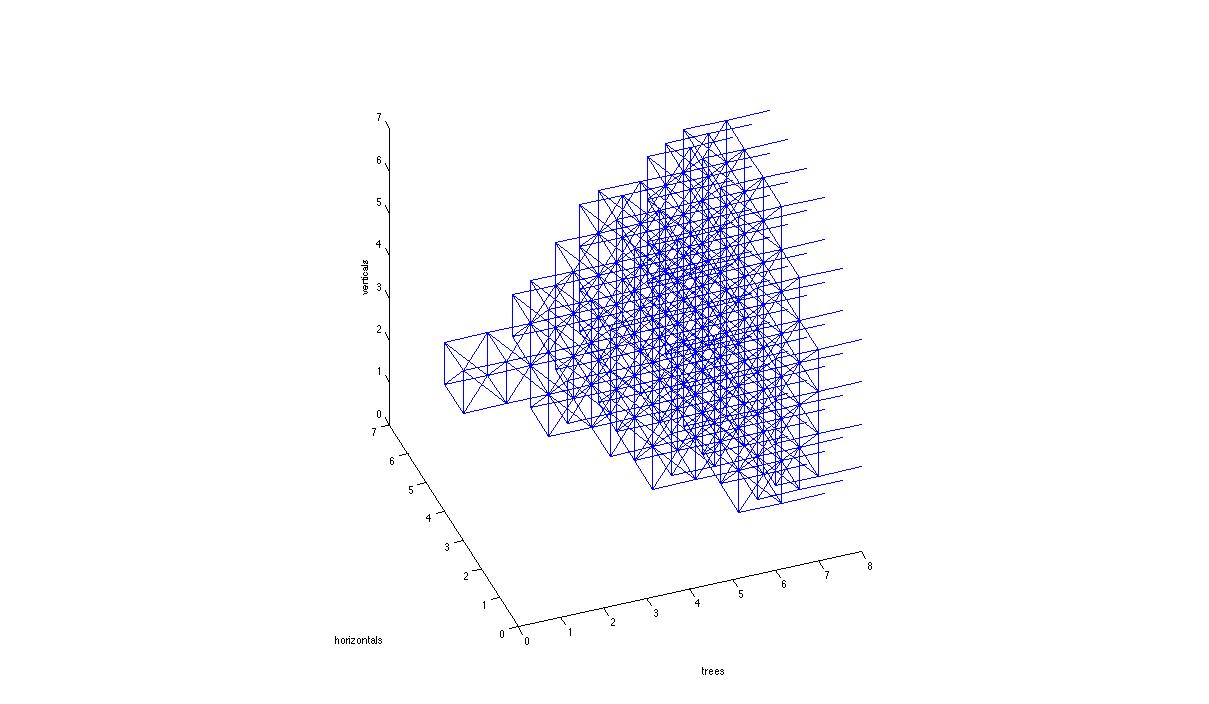
The current code works with cube1x1, cube2x2, pyramid, and cylinder.
Later in the day, we got darpa_demo simulation to work too! The problem seemed to be that the dual_build was on True, which messed up the build. Darpa_demo was a structure with a plus sign and two cubes sticking out from the center of the plus. So far, the code seems to work on all the simulation files we have.
We needed some weights for the scarab hexbugs because they would behave more steadily and jump less if there were weights on them. Using tungsten powder and epoxy, we made some weights (shaped like leaves!) that weighted about 60 grams.
For the rest of the day, I tested the hexbug nanos on their performance with different string lengths, performing 5 trials for each of the three lengths.
July 14
I got all the diagonals working on the cubic structures! The next steps include figuring out the processing array that accounts for parallels, rewritting the _yzd_to_tlap etc. functions, and getting it to work on more complicated structures. Since I can't visualize the complicated ones, I can't trace them. For some reason, pyramid errors on it not finding one of its own vertices, which is strange. Maybe the next step would be to get the blender simulation to work because it would be helpful in this step.
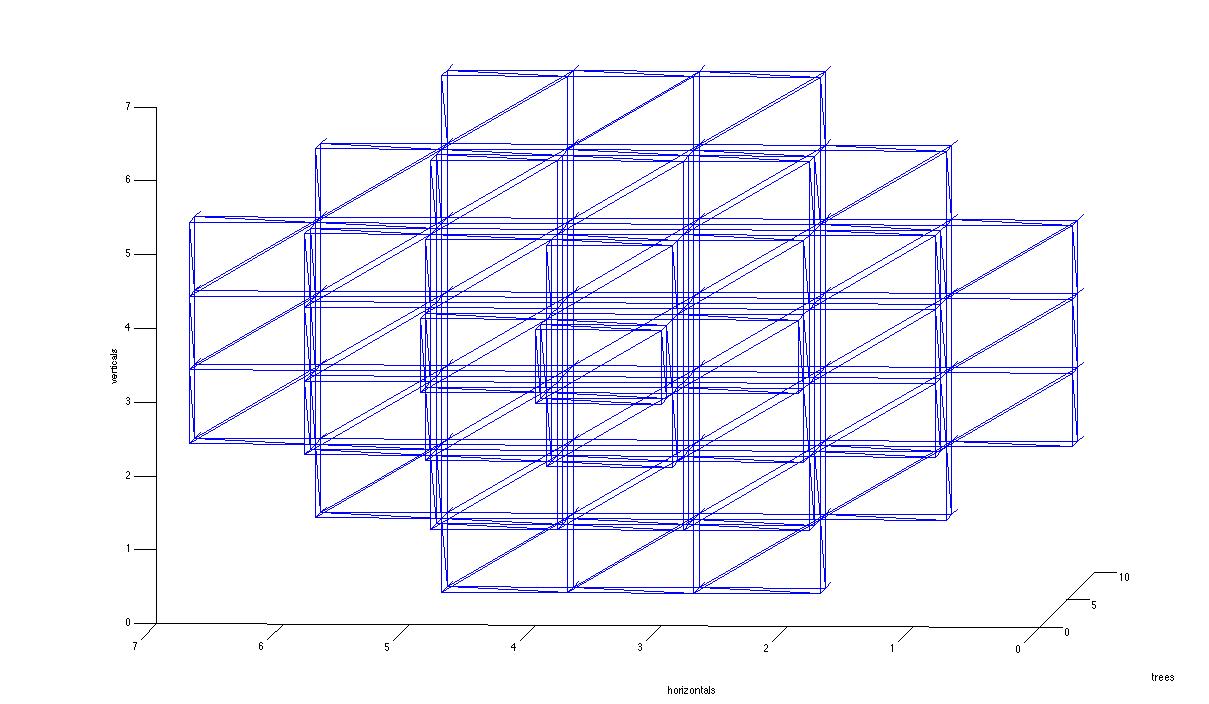
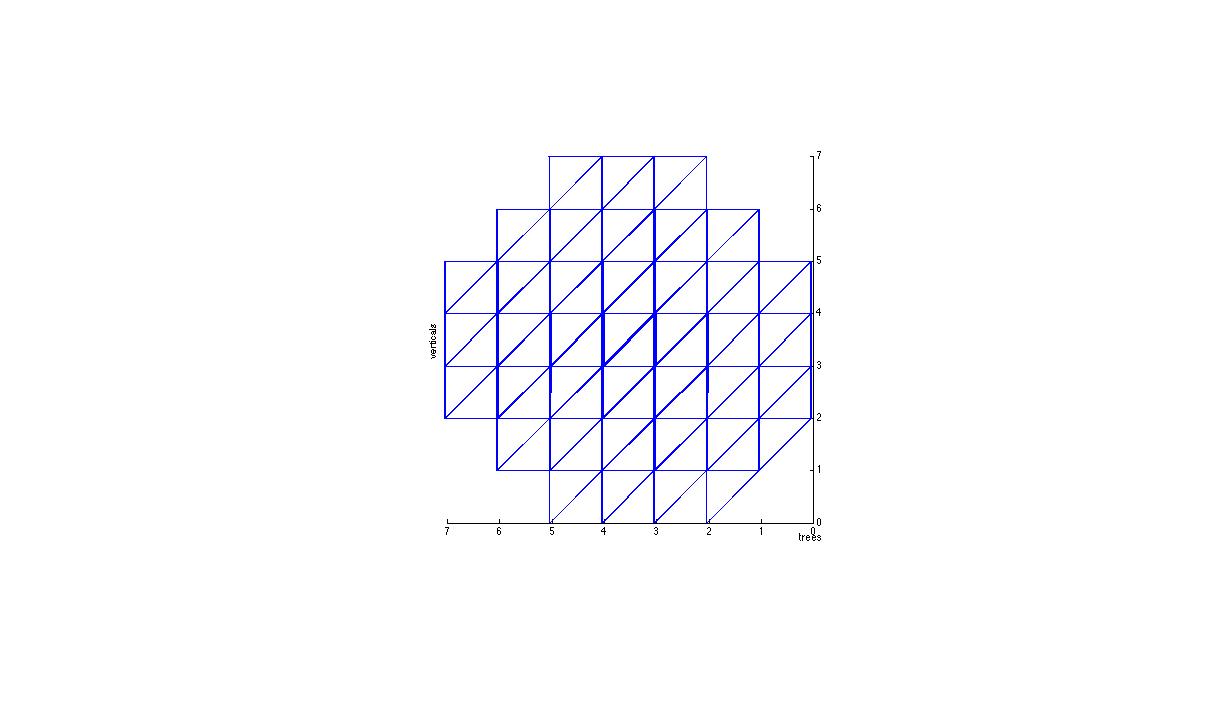
So it turns out that all the _tlap, _vert, etc. functions have almost the same code in them, except for the script name and some stagerel commands that are more hardware oriented problems. I temporarily used the same content for all of the diagonal _xyd etc. functions. Also, some structures didn't necessarily have as many trees as the number of trees above it, so that's why it was erroring on pyramid and others. After fixing this, the algorithm now runs on all the structures (but we can't verify that they're correct)! To verify them, I wrote a matlab script to graph all the lines, which helped visualize everything. Darpa demo seems like a weird structure so it's behaving differently... It has a random horizontal rod floating off from the stage that's apart from the others. Here's what the cube1x1 looks like:
The pyramid at first looks fine, but there seems to be a few diagonals hanging out at the end. I'm planning on starting with debugging that tomorrow.
July 13
I spent most of my day placing the first layer of yz-plane diagonals. They're working now for cube structures! There were some hardware problems like identifying the stage movement, so we're planning to talk about it during the weekly meeting on Thursday. Since I've gotten the hang of it, I'm hoping to finish the other layer of diagonals tomorrow!
We also took a look at the data from hexbugs. Using the repeated data, we found that the spread between them was about 2-3%, which is great. Now that we know that the tests are repeatable, we made a list of future tests we need to perform.
7. Week 3
July 10
Today I finished implementing the code to generate all averages and plots for the peak finding of our hexbug data. I also roamed around to see exactly how the queue was translated into code that detailed the planting. I think the best method would just be to take a loop and insert the diagonals after the complete queue is made, but it's a pretty long process. Hopefully in the future, we might come up with a better and more foolproof way of inserting diagonals.
July 9
We visited SRI today! It really helped to see the physical microbots in action, and to see how the code was translating to the motions. Dave and Allen gave me a brief (really cool!) tour of the SRI facility, and then we met with Annjoe. They actually got the blender simulation running, so we took a look at that. After having lunch, Allen showed us the physical set up, which was really helpful to see how the code made them move. We then carefully discussed the processing order of the microbots if we were to put diagonals in. We decided that putting diagonals on every cube would be easiest because it would simplify the process into segments of unit cubes. It was difficult to fit some cubes in because the microbots would not be able to reach some rods given that other rods were already glued. After working out a solid list of steps, we each had a good idea of what we had to work on.
After the visit, I worked on the peak finding algorithm on matlab for the hexbug data outputs. Dave showed me the quantiles function, which calculates the x% likely highest value. It works like a CDF function.
July 8
Today we spent most of our time testing and figuring out how the hexbugs behave. We cut the rubber bands and used their c-shape as the compressed spring form, and we also tried using the rubber bands in the original circle forms. So far, the c-shaped springs work better to produce a higher pull force, but we can't really be conclusive yet because we can't tell how much our data varies with each trial.
Also, I tested with 1 spring versus 5 springs and it seems that they're similar in performance. When we tested with two hexbugs with a c spring in each of their strings, they actually performed worse than one hexbug with a c spring. Testing them for long periods of time was also yielding surprising results because there seemed to be a single spike towards the beginning.
After a long day, and after a lot of tests, the data seemed a bit hard to understand since there was so much going on. Alice forwarded us the k-means algorithm she had, so we might try running our data on that to see if that yields more understandable results. We tested with our new scarabs, and they didn't seem much better either! We put Tygon on each feet to help them slip less since they were plastic ends when we got them. All five of them pulled approximately 4N, but one fo them pulled about 2N, so even though these don't seem like impulse robots, they still don't increase their pull load more linearly. Dave showed me how to solder which was really cool! We wanted to see if these robots pulled any better if their legs weren't moving so fast, but it didn't seem to help much. Tomorrow we'll be visiting SRI to finally get a concrete idea of how the diagonals will be built!
July 7
We received most of the parts for our microtugs! We also ordered 5 hexbugs that actually used legs so that we can test with those after trying to get nano hexbugs to work together. Today we planned some experiments we want to perform later. First, we want to test whether the length of the string matters in the pull force. We also want to use a few of these in parallel (but in front of each other) to see how they work together. We also want to try vibrating the floor under the hexbugs to see whether that helps them pull at the same time. Lastly, we talked about putting rubber bands in the strings to see how this affects the pull of the robot because the force may be of smaller magnitude but the duration of the force may be longer.
For the rest of the day, I did some testing. We used the sensor to see whether the string length had an effect on the pull force. I tested the same microbot with three different lengths, and the results showed that they were pretty similiar, but since we couldn't tell if there were other things affecting the tests, I plan to pick a length in the middle and test the same length multiple times to see the variation to help us determine whether the variation in the three different lengths were significant. I also put some rubber bands in the string and testing with them, and so far they seem to dramatically reduce the pull force but seem to have less of a dramatic peak.
July 6
Since we finally got to run the code, we started to think about how the diagonals would be put in. I spent most of the day learning how the vertices and faces were parsed into a dictionary of vertices and a list of edges. There's a lot of sorting going on, and the code seems to first put down a base "tree" of 4 trees that are always built, then it builds horizontals (y axis), verticals (x axis), then more trees. To force some diagonals, I worked on trying to put in some diagonals in a cube1x1 structure in the structure_to_ply file, and really studied the lattice_builder to see how that worked. These files (and the ply_to_graph) seems to be the main ones that deal with sorting and making the queue for the bots to build, which is most of what we need to fix.
While we work on that, we plan to visit SRI on Wednesday to talk to them about the details. We don't know where/what orientation they want the diagonals so we can't really move forward. We also want to talk to them about how far they want us to get to the hardware since they are in charge of that part.
The last part we ordered for the microtugs arrived, so after picking it up tomorrow we can start building them!
8. Week 2
July 1 & 2
I've been out pretty sick with a cold, but meanwhile Dave helped me order the parts for the new microtugs we plan to build. I'm also in the process of understanding how any structure is built (horizontal/vertical) and the calculation behind it to find the vertices. Hopefully we can visit SRI sometime next week to fully understand the code holistically, and hopefully I'll be able to work properly next week!
June 30
SRI sent us a version of their stage.gpickle and it seems that our version was outdated because it now runs! The original simulation files seem to enter a really long loop. I also started measuring the dimensions for the microtugs using spines, and made a solidworks draft of it to see how it would come together. Hao helped me measure the pull strength and the weight required - about 100g on the spines pulls about 15-20N on asphalt. Building about 3 to 4 of these should be able to pull a car if they're working together.
June 29
This morning I worked on the code from where we left off. I realized that we can't really import bpy, we have to do it in the blender python console. It took me a while to figure out how to run terminal commands from a python console. It turns out I have to import os, then use os.popen("python command ").read() in the python console to run the files. It still doesn't run stage_reader.py though, because it's seemingly getting stuck at import bpy even though it doesn't display any error message (it's not printing any print statements after that line, and the gpickle file isn't being made).
We realized that the simulation files (.yml) had bot starting positions which weren't on the stage.gpickle map. Dave emailed SRI if we can come in and try out the simulation and to compare our gpickle files. We'll probably be visiting sometime this week.
After, Dave introduced me to a new project. It would be to make a microtug using the surface designed for rough surfaces. This would be helpful because we would be able to grip the concrete if anything had to move outside. Tomorrow I will be performing some tests to get the data for different weights on the microtug. It would involve slightly different design than the original microtug because the gripper works slightly differently.
9. Week 1
June 25
TODO: (list for future reference)
- g.pickle file generation + figure out sorting of XYZ map
- order new parts for microbots
- testing microrobot chorale --> better sensor, long distance, compare long vs. short, look at processing data (peak), fresh batteries,
ORDERING:
- Servos (Winch): http://www.mksservosusa.com/product.php?productid=106&cat=6&page=1
- Wheels: https://www.pololu.com/product/2356
- Drive Motor: https://solarbotics.com/product/gm15a/
- Processors with lithium battery support: https://tiny-circuits.com/tinyduino-processor-board.html
- Motor Driver Boards: https://tiny-circuits.com/tiny-shield-motor-x-4.html
- 2 Accelerometer :https://tiny-circuits.com/tiny-shield-accelerometer.html
- 2 serial board: https://tiny-circuits.com/tinyshield-usb.html
- Make new adhesive tiles modified for tendons
We had the lab cleanup today! After lunch, we made some progress with the code. When we printed out self.graph in bot.py, it gave out:
/usr/lib/blender/blender -P /usr/lib/blender/reset_excepthook.py --background stage.blend --python utils/stage_reader.py -- /home/hayk/.virtualenvs/gridbots/lib/python3.4/site-packages/networkx.
After tracking down what was passed down as graph, we realized that nothing explicit is passed in except the stage.gpickle file. That file won't open - it just contains a lot of numbers. We are suspecting that the stage_reader.py file was used to convert stage.blend to stage.gpickle, and somewhere in the process Hayk's path was hardcoded. We are hoping to rerun stage_reader.py to generate a new stage.gpickle for my computer and see if that fixes the problem. In the process, we had to import bpy, which became a problem, so we decided to leave it at that for today.
From the comb-like gate we laser cutted, we glued the necessary parts together to complete it, and we tested on some microrobots. They seemed to be pretty weak even when grouped together, but we didn't test accurately yet. The testing setting at least seems to be working after adding a little more height to the sides of the robots. After, Dave explained to me some brief parts of his new microrobot, and we planned to order the necessary parts (above) later after confirming with some people.
June 24
Dave and I got through a lot of problems! We fixed the python 3/2.7 problem, and set up a blenderplayer path in my bash. We got the older version of the gridbots to play blenderplayer! Now, the problem is that the newer version crashes, and when we debugged, we got that self.graph returns something with /home/hayk/.virtualenvs/gridbots/lib/python3.4/site-packages/networkx. It's weird because the word "hayk" isn't hardcoded anywhere, so we think there's some variable in there. We left it there for today.
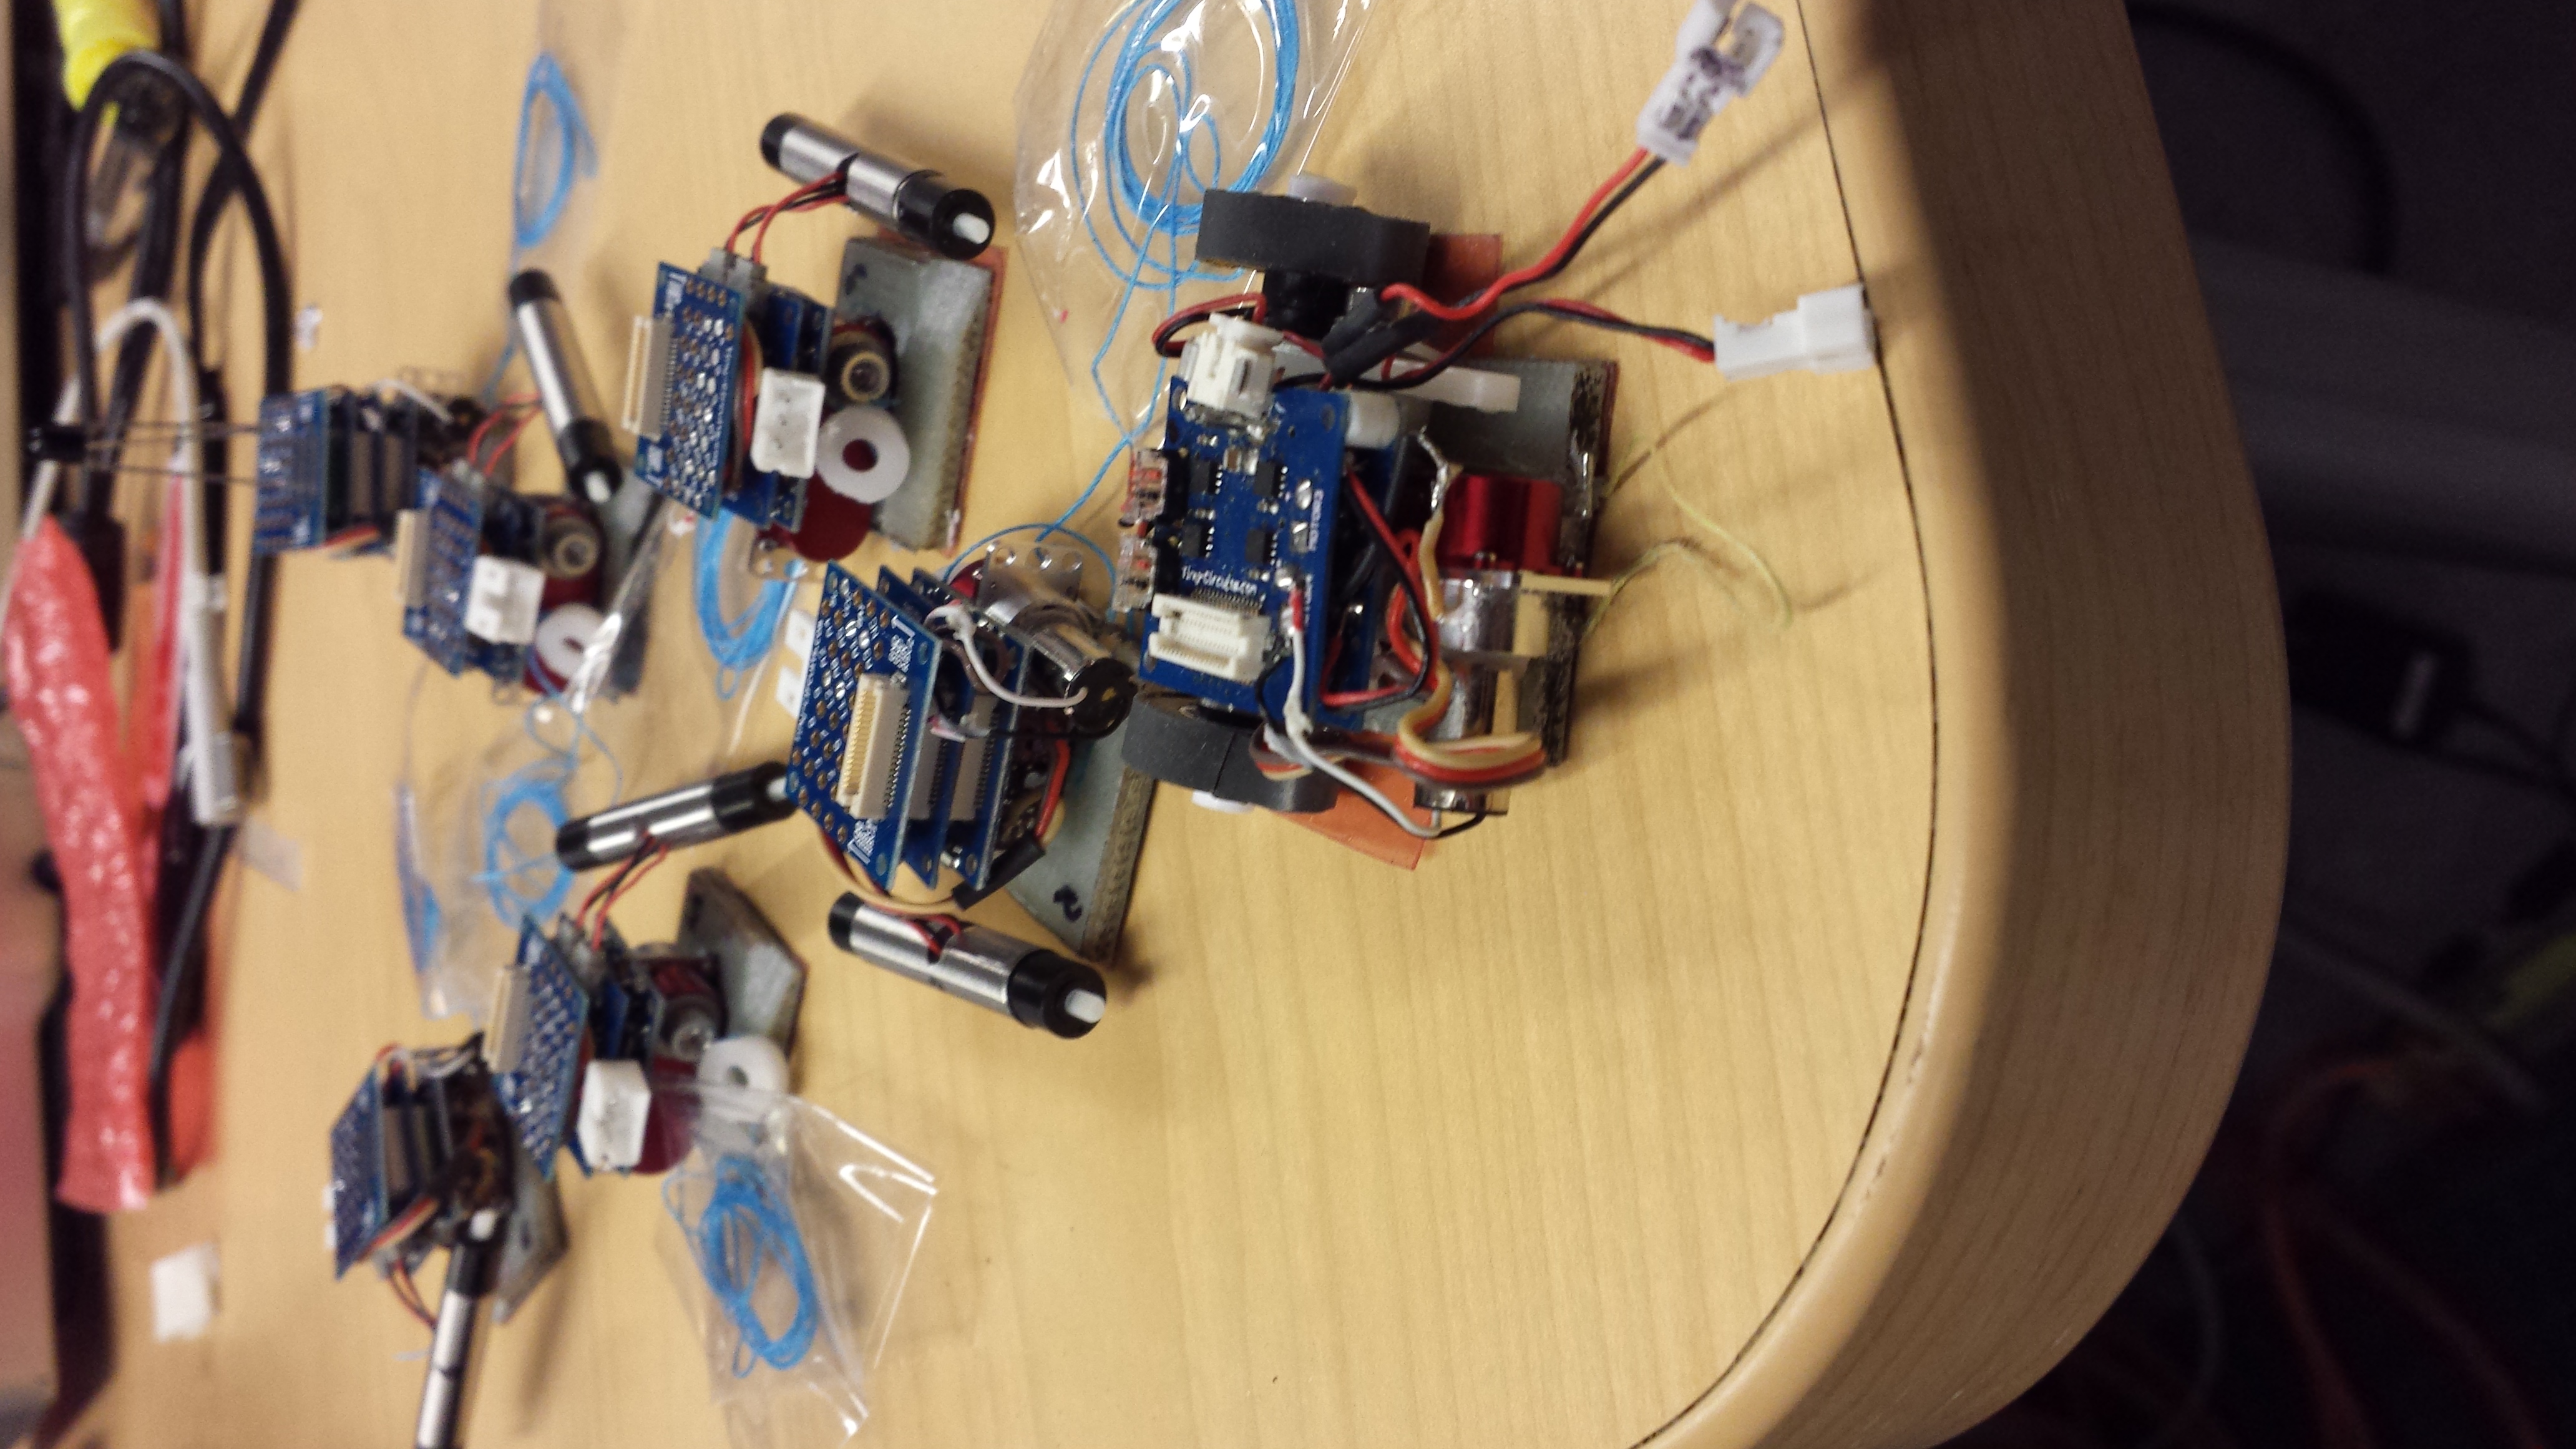
After, we talked about the other small robots he was working on. He wanted to measure their strength when they worked together, especially when they were in different orientations. I worked out the dimensions and then used solidworks to make the slots for each robot to stay straight while we measure their pull with a force sensor. Dave also taught me about screws and standoffs and their measurements. With the top view of the solidworks, we went to the laser cutter and cut a shorter piece of the stage in acrylic. Here's a picture:

June 23
Fixed the python3 bug from yesterday, and finally set up Spyder/Anaconda properly! I'm trying to track how the files are interpreted, so I'm reading ply_to_graph, etc. Some key is off though, and I can't really figure it out because it errors at the conversion from node to position vector at Z09.P.029.2078 (this key changes each time I run it). There's a mysterious *24 when converting it...
LatticeBuilder is confusing... Towards the end of the day I got to meet with Dave and he explained to me a lot! I was confused on how the hardware connects to the software but I'm starting to understand it more now. He also explained the mysterious 24! It's the distance between nodes, and the * 24 is scaling the units up from counting the nodes to actual mm. He also showed me how the code interacts with blender. Tomorrow I hope to understand more concretly the files I can touch and where the actual commands are being made. (I also need to figure out how to set up git since I don't have permission to Hayk's git repo). First, I need to decide with Dave what/where really are "diagonals" on the truss structure.
June 22
Last week I took a brief look at the gridbots folder. I read the README, looked at the functions in the core classes, and downloaded python & blender. I'm still not familiar with some of the import files the code uses, and I can't really visualize how the classes come together yet. It'll be great if I can connect to an actual microbot and play around with it to help me understand it more.
After the SURI orientation today, I came into the lab for the first time and got to meet the people here and visit the wind tunnels with Aimy. We took some time to complete the safety training and set up our wiki pages. We saw and learned about the different projects happening at this lab over the summer - they're all really cool!
I tried to run a simulation but I came across some KeyError. Tomorrow I'll try to understand why each time I run run.py the KeyError is at a different node. Also, requirements.txt isn't installing properly because it's still saying it's missing import modules, so I had to install a few modules like networkx and yaml. I can't seem to install mathutils. Although the terminal said it completed installation, it still says that it's missing the module. I think it might have something to do with me not downloading requirements.txt in a python 3 environment, because I wouldn't have had to download networkx, etc. The system seems to keep running 2.7. Another thing to figure out soon.