new web: http://bdml.stanford.edu/pmwiki
TWiki > Rise Web>ClimbingRobot > LegDesign > StanfordTestTrack>RiseLegTestInstructions (21 Jul 2004, YongLaePark)
New RiSE Leg Test Instructions
Running the Test Track
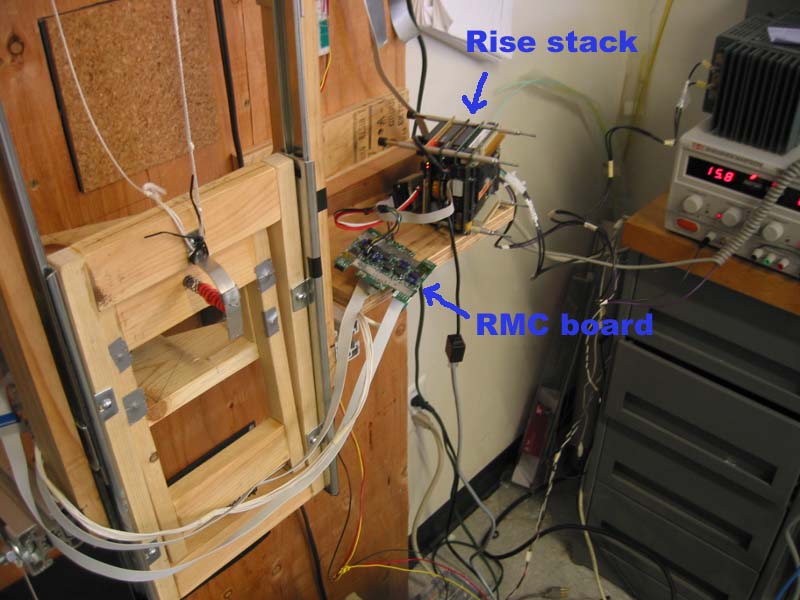
(At some point, it may be necessary to power the "counter-balance" servo motor, if so see the section below)- Unplug the RMC board power connector
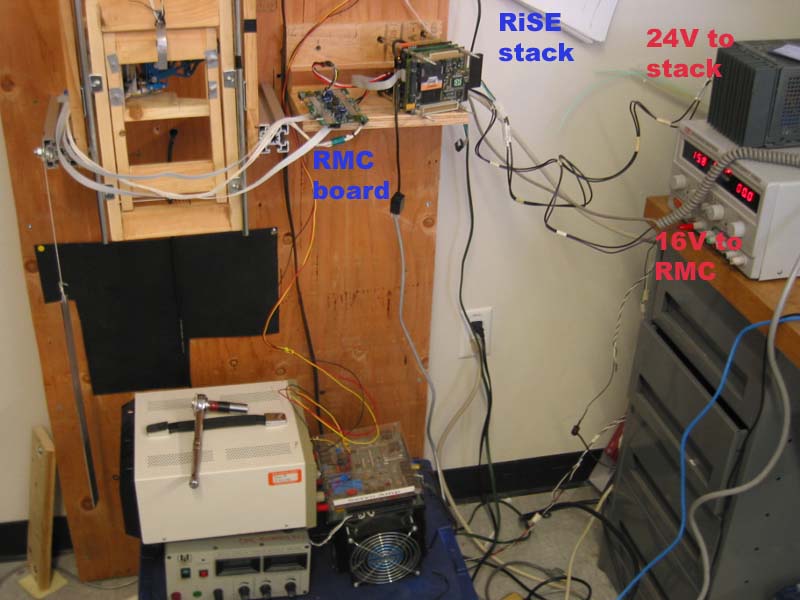
- Turn on the power supply and check the output voltage: 16V
- Turn off the power extension (not power supply) and plug the RMC board connector
- Turn on the power extension to power up everything together at the same time
- Wait until LINUX machine (RiSE stack) boots up
- Log onto LINUX laptop and type the following on the LINUX terminal
- $ ssh rise@bailorgana.stanford.edu
- Password: (See the Post-It near the power supply for the RiSE stack)
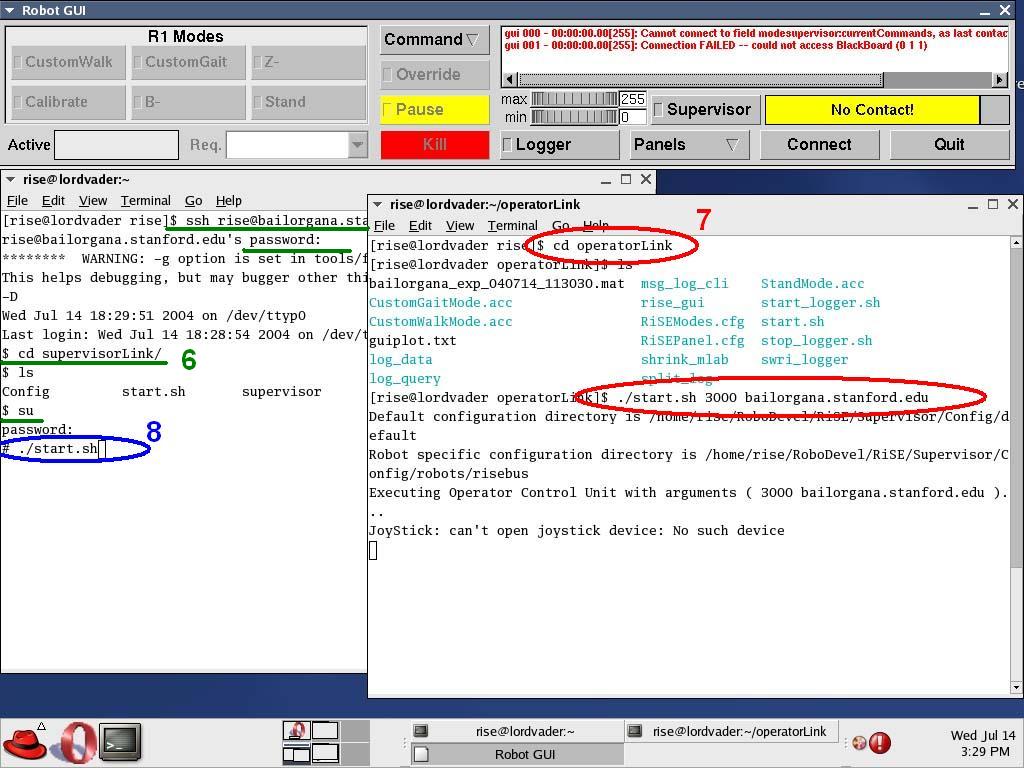
- $ cd supervisorLink/
- $ su
- Password: (BDML password)
- Open a new terminal window and type the following
- $ cd operatorLink/
- $ ./start.sh 3000 bailorgana.stanford.edu (This will bring the GUI up on the screen)
- Go back to the first terminal window and type the following (Keep your finger on the power button of the power supply for emergency)
- # ./start.sh (to start the program on the stack)
- see picture (6~8)
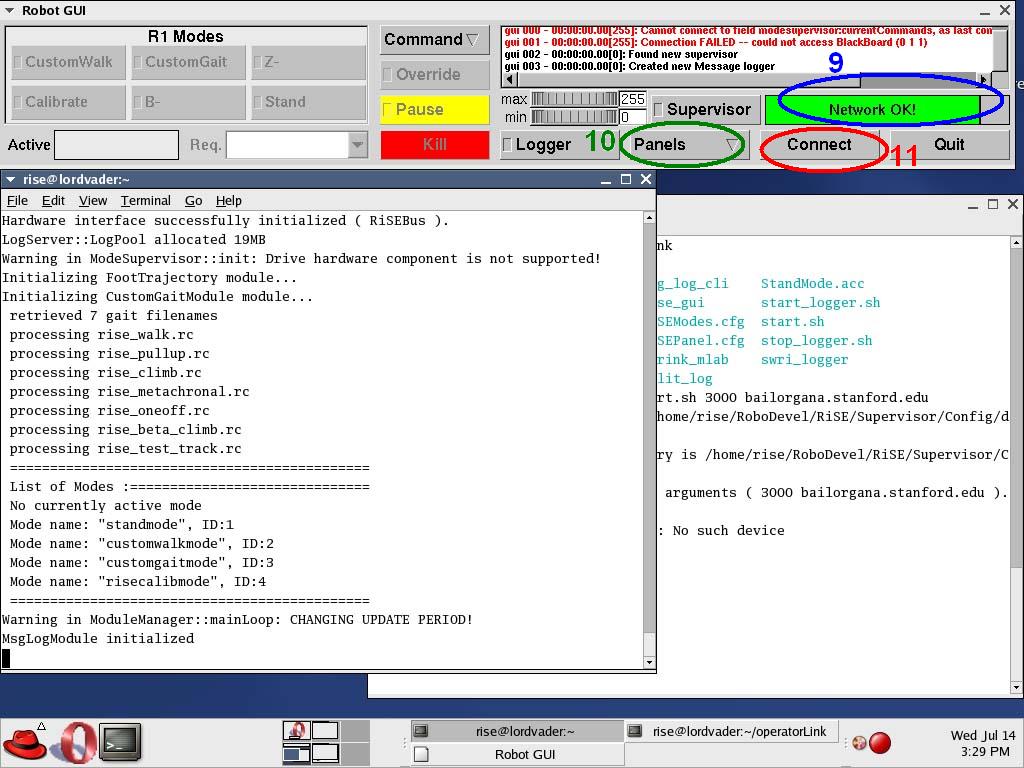
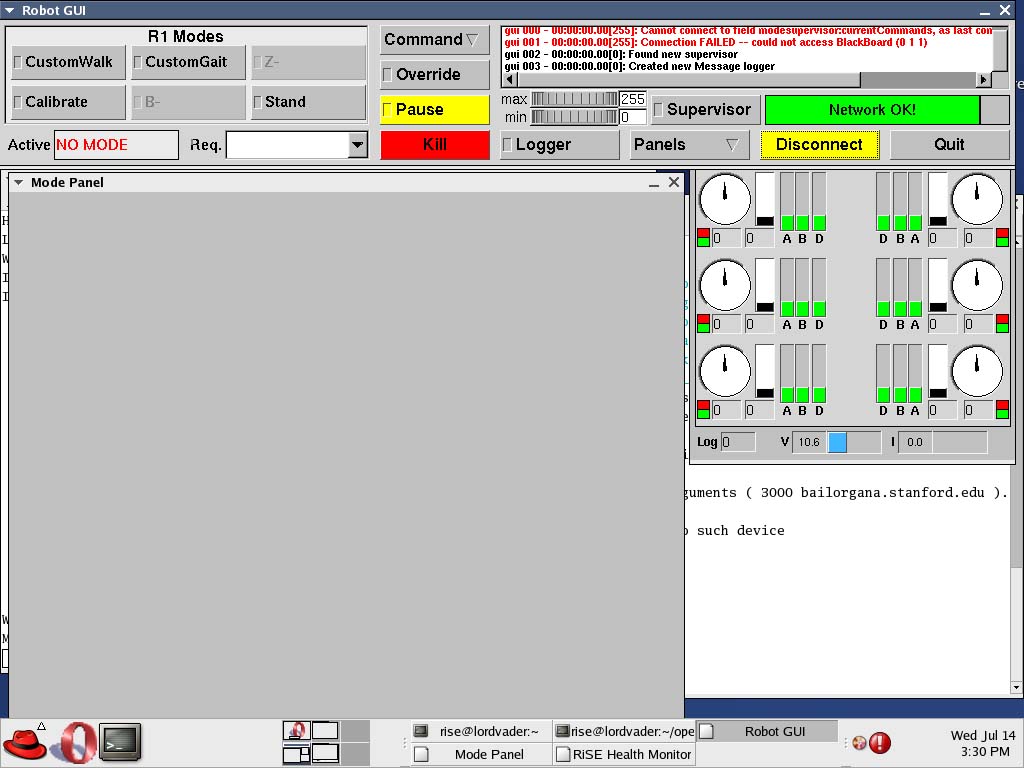
- Go back to GUI and check green [Network OK] sign is on.
- If it is on, click [Panels] to open Msg Log Panel
- Click [Connect] (This will bring up RiSE health Monitor)
- On the RiSE health Monitor, disply 4 (right upper most one) shows the condition of the test leg.
- Bar: condition of Wing angle
- Dial: condition of Crank angle
- Move the leg carefully and check if the monitor is working (if the leg moves, the bar and dial should change their values)
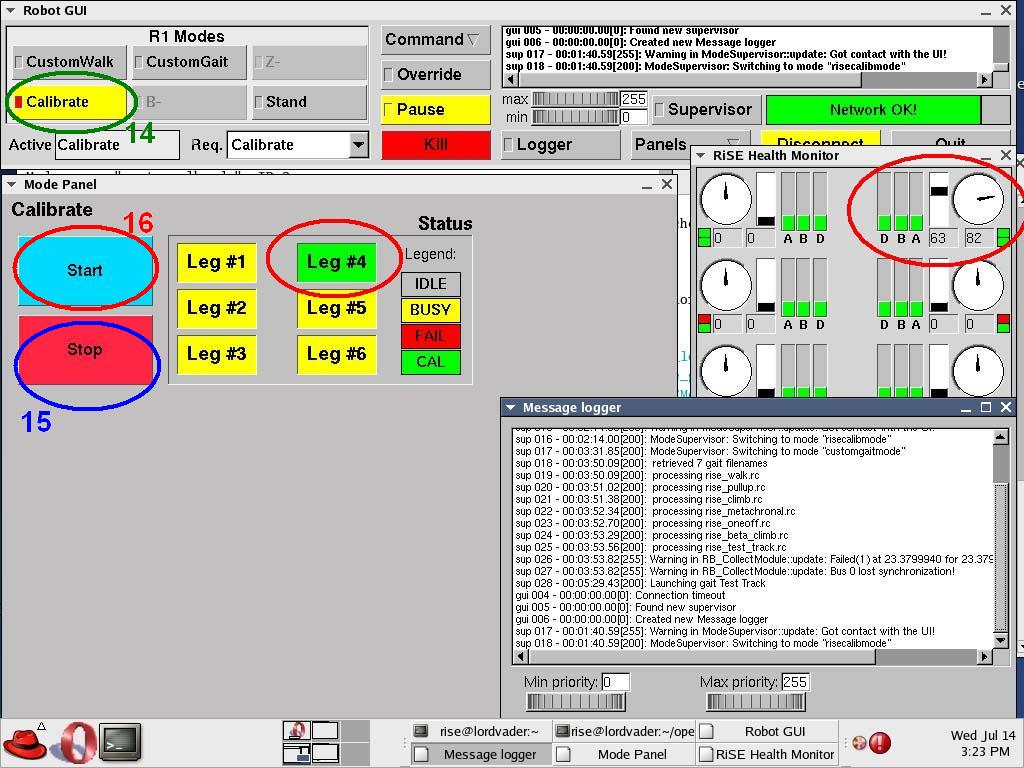
- Click [Calibrate]
- Click [Stop]
- Click [Start]
- Check if [Leg #4] has green light on it (If it is not, you can't proceed further.)
- Usually health monitor shows approx "63" for wing and approx "82" for crank at this stage)
- see picture (14~16)
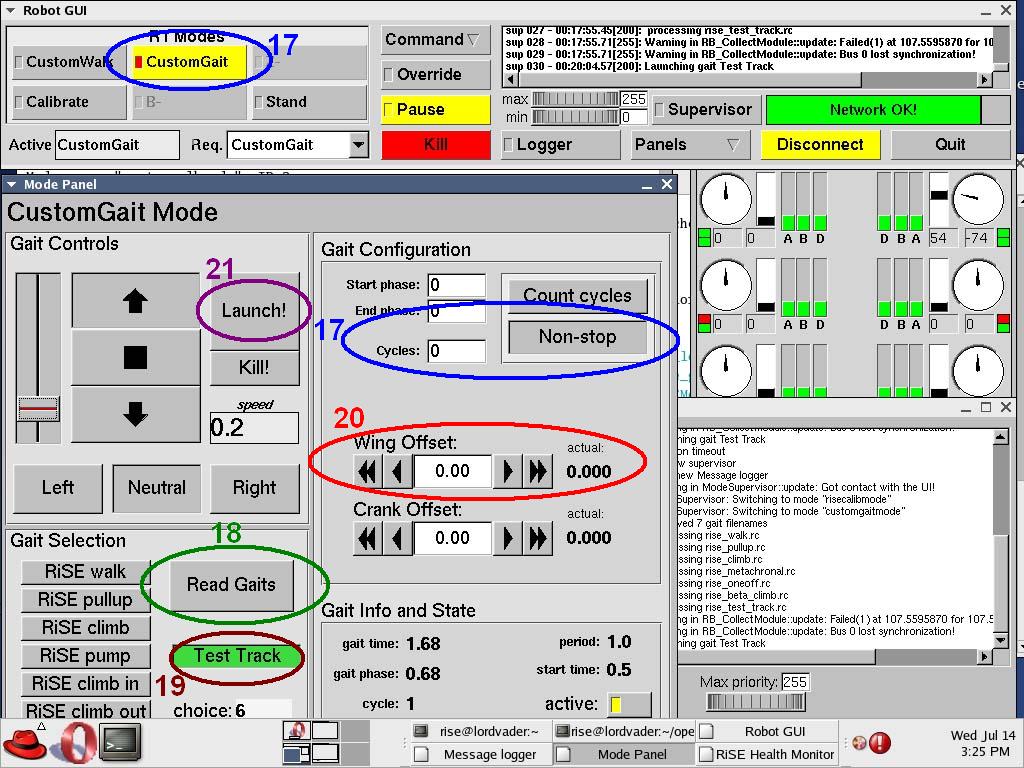
- Click [Custom Gate]
- Either change cycles(non-zero value) or click [Non Stop]
- Click [Read Gait] and check if it reads all the gaits on the Msg window ("rise_test_track.rc" is important.)
- Click [Test Track]
- Change "Wing Offset" (This number depends on your foot. Try 0 or 0.1 first)
- Click [Launch!] (This will move the leg to the initial position.)
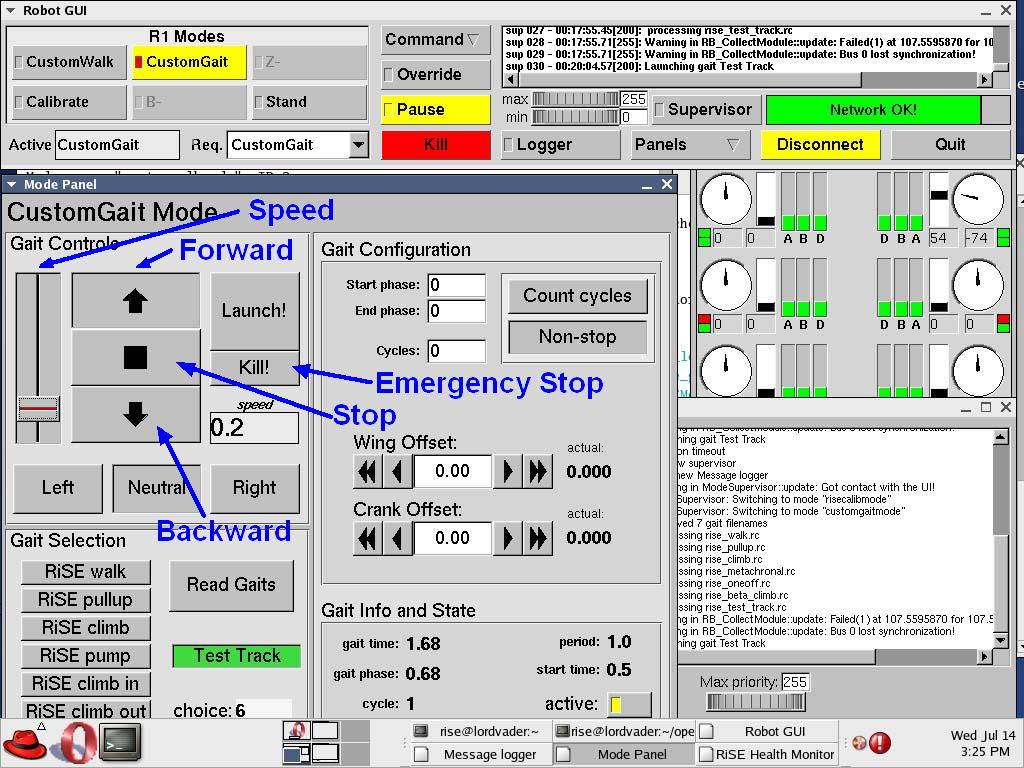
- Now, control the leg movement using the "Gait Controls"
- Vertical slider bar: Change the speed of the leg (it is zero when you first start.)
- Up and down arrow buttons: Change the direction of the leg movement (forward or backward)
- Stop button (black rectangle between two arrow buttons): Stop on the next stop position (This leg has one preset stop position in the gait.)
- "Kill!" button: Stop immediately
- see picture (22)
- When you are done your testing, go back to the first terminal window and push [Ctrl]+[c]
- Click [Disconnect]
- Click [Quit]
Powering the "counter-balance" servo motor
- Make sure the support string from the servo amg is connected to the track
- Make sure the servo amp (with the clear acrylic cover) is OFF
- Turn ON the power supply (APS-305d labeled DML-Biomimetics in RED ink) that provides voltage to the servo amp
- Use the FINE dial to adjust the voltage to ~0.9V and turn it off
- Plug in the servo amp
- Remove the hard stop (ie. ruler or other stop) from track and FIRMLY hold track
- Turn ON the APS-305d power supply
-
 NOTE: The servo motor will yank the string and try to pull the track up after completing this step
-
- Adjust the voltage with the FINE knob (on the APS-305d) so that the track moves freely when vertical forces are applied to the track.
- Conduct experiments
- Either FIRMLY hold the track or re-attach the hard stop
- Turn OFF the APS-305d power supply
- NOTE: The servo motor will release the track after this step, then recoil and slightly yank the string
-
- Secure the test track
- Unplug the servo amp
Changing trajectories for testing
(To be performed on a Unix machine (preferably the laptop - LORDVADER))- Start Matlab (enter the following commands in a terminal window)
-
cd ~/RoboDevel/RiSE/Tools/Matlab/GaitBuiler -
/usr/local/matlab/etc/lmstart- (to start the license manager)
-
matlab &- (to start matlab and return a prompt for this window)
-
- Change the working directory to the GaitBuilder directory (if not already there)
-
RoboDevel/RiSE/Tools/Matlab/GaitBuileron LORDVADER
-
- Edit
climbing2.mto change the trajectory, using the 14 paramters described in RiseLegClimbingParameters- See RiseLegTestSoftware for description of GaitBuilder
- Make a note of your parameters as other users may change this file
- Run
climbing2in Matlab to generaterise_test_track.rc- This file will hold the gait defined in
climbing2.m
- This file will hold the gait defined in
- Type
./copy2testtrack.shin the terminal window used above - Enter the password for the "rise" account on the laptop
- The file rise_test_track.rc will be copied to the proper location on the stack
- If you are currently running the Operator on the laptop, you need to click [Read Gaits] from the CustomGait Mode
- This will read in the new gait that was just copied
- Run the track with the new trajectory and repeat these steps as necessary
Warning: Be Careful!
Email excerpt between Stanford and CMU regarding shutdown procedures
...> Is there a common procedure to stop/shutdown the robot? (I've just been
> aborting the Supervisor with Ctrl-C, and more recently using Kill 1st. I
> was and still am a bit paranoid about damaging the leg - one time I think
> I hit disconnect and it did some weird things, could have been a cabling
> issue, but I just want to be clear.)
We get crazy stuff all the time, when we lose various RMCs, and usually,
a leg spazzes out. Not good. For that reason, one person usually has
their hands on the external battery power. Sometimes, even killing the
supervisor won't stop it. But yes, CTRL-C is the normal way to exit the
supervisor.
... Watch where you put your hands and remember where the motor power supply switch is, in case of emergency. -- YongLaePark - 14 Jul 2004
Ideas, requests, problems regarding TWiki? Send feedback