new web: http://bdml.stanford.edu/pmwiki
TWiki > Rise Web>ClimbingRobot > StickyBot > StickyBotIII>SB3Instructions (13 May 2010, SanjayDastoor)
Power-up
The H-bridges and diodes draw directly from the battery power and are not reverse-polarity tolerant. They will instantaneously fry. There are currently two power spots, on the main board and on the underside. The long Li-Po battery snuggly fit under the robot. The main board is simply for easily access during programming.
Quick-start
Apply power to the robot. Tap A to start-up. Tap B to start walking. Tap C to stop. Tap C again to return to main menu.Modes of operation
| Main Menu Stickybot starts in this mode which leads to all other modes. Holding A, B and C from any mode will cause an instant return to the main menu. |
 |
||
Updated Instructions
Dump servo angles to telemetry
* Connect to bluetooth (key 1234) * In terminal,screen /dev/tty.StickybotIII-SPP - Each 4 columns represents a leg (LF/RF/LB/RB), each column is individual servo angle (wing/stroke/elbow/ankle)
Pull-ups
* From main menu, Hold A to get into pull-up mode. Sends servos to home position. Tap A to re-home servos. B starts. C stops. Second C returns to main menu. * Once in pull-up mode, Hold B to access manual control of servo offset. A and C adjust each servo offset. B cycles. Holding B returns to pull-up mode. These offsets are saved as pull-up mode until a hard reset (power cycle) occurs. * While pull-ups are going on, holding A and B at the same time cycles through 3 different speeds. Blinking green light on eight-pack shows speed. * While pull-ups are going on, holding B and C cycles between all fours, diagonal pair 1, diagonal pair 2, front only.Executing a simple walk
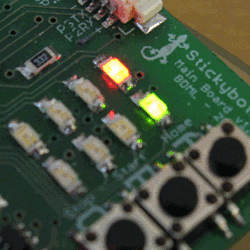
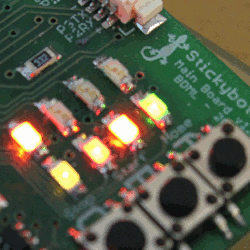
| Setup to walk On the main menu, tap the A button to prepare the robot for walking/climbing. All four right LEDs will illuminate and the red LED on the left will turn on while the robot is setting up. Upon completion, the robot will switch to Prepared to walk |
 |
||
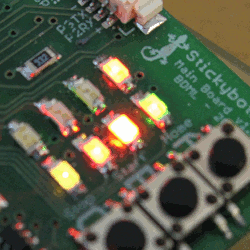
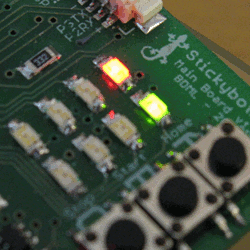
| Prepared to walk After the robot is in position, the yellow LED on the left will illuminate. From this mode, you can tap B to start walking and tap C to return to the main menu. |
 |
||
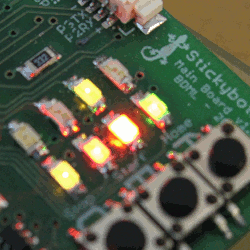
| Walking The B button starts walking. The robot will not walk unless it has finished setup. While the robot is walking the green LED on the left will illuminate. In this mode, tap C to pause. |
 |
||
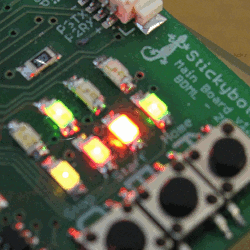
| Paused The C button pauses the robot if it was walking. Pressing C a second time returns you to the main menu. You can press B to resume walking without having to re-setup the robot. |
 |
||
Manual servo control
| Manual servo control From the main menu, hold B to access the manual servo mode. The two lights will illuminate to indicate the manual mode. Hold A or C to move the motor in either direction. |
 |
||
| The lights on the left indicate which quadrant is active and the lights on the right indicate which motor is being driven. Tap the B button to cycle through the motors. | 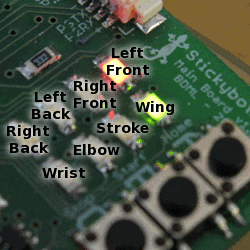 |
||
| Hold down A and C together to toggle a virtual spring. If the two lights flash, the virtual spring is active and the joint's impedance drops. (Note: currently the stiffness is dependent on motor voltage.) |  |
||
Ideas, requests, problems regarding TWiki? Send feedback