Category: AdhesiveManufacturing, Manufacturing
(WIP)
1. Machine Master Mold in Wax
| Time Estimate:
| 1.5 hr.
3�4 hours to dry mold, or can be vacuumed when casting.
|
- If the wax block does not already have runners machined into the top surface, machine runners using the following procedure:
- Clamp the block in the wedge machining pallet.
- Install a 1/16" ball end mill in the spindle.
- Bring the tool into contact with the top surface of the wax block. Use
PART ZERO SET to set only the Z coordinate of G154 P55.
- Turn off the main coolant valve, and turn on the main air valve. Set up one of the Loc-Line nozzles to point directly at the tip of the too from fairly close.
- Run
O04444 "Cut Runners" to cut runners into the mold.
- Machine wedges using a toolpath that defines reference flats in the wax mold, without needing tape pillars. The procedure for full setup and machining of a mold is detailed on the wedge machining page
|
|
2. Prepare Fiberglass Backing for Master Adhesive
| Time Estimate:
| 1 hr followed by 24 hour cure.
15 min followed by 2 hr cure.
|
Fiberglass backing may be prepared without the solder mask and aluminum foam components. In this case, skip Steps 3, 4 and 5 and proceed directly to Step 6.
- Locate a flat, clean glass 12x12" plate, Chemask water soluble solder mask, and the aluminum foam backing plate.
- Cut a piece of fiberglass which is approximately 8x6", and at least 0.010" thick. The piece should fully cover the aluminum foam when placed onto it. This is to prevent silicone from seeping into the aluminum foam when casting later.
- Wipe the glass and fiberglass clean, and then place the fiberglass clean-side down onto the glass plate.
- Trace the edges of the foam backing plate, and liberally fill the interior with the solder mask.
- Place the aluminum foam backing plate onto the solder mask, apply weights to the back, and allow to fully dry. This typically takes 24 hours at room temperature.
- Once cured, lightly sand the exposed surface of the fiberglass with approx. 600 grit paper, wipe clean, and then prime with PR-1200 primer. This will need to dry for a further 2 hours.
|
|
3. Cast Master Adhesive with Silicone
| Time Estimate:
| 1 hr followed by overnight cure.
30 min.
|
- Take the machined wax mold and fiberglass backing to the TLTL.
- Seal the edges of the mold with tape to hold silicone in the runners while casting the master adhesive.
- Optionally, add tape pillars on the very edges of the mold to leave a defined layer of silicone above all reference flats. This helps in maintaining flatness of the final reference flats in the daughter mold, as they will be defined entirely by the wax mold surface.
- Mix approximately 25g total of Sylgard 170, degas, and pour over the mold, taking care to fill all of the runners with silicone.
- Briefly pull a vacuum to ensure there are no bubbles in the runners.
- From one end, slowly roll down the fiberglass backing, and then press firmly until the backing seats on the reference flats in the mold.
- Place the two approx. 6x2x1" weights on the back to apply pressure while the mold cures. Leave overnight at room temperature.
- Before attempting to demold, make sure to peel off the tape used to seal the runners, as well as any silicone adhered to the sides of the wax block.
- Clamp the wax block in a vise, and using a piece of acrylic to spread the pressure, gently pry up one edge of the backing until the master adhesive releases from the wax mold.
|
|
4. Build Support Structure
| Time Estimate:
| 30 min.
The inner support structure may be omitted, as it can sometimes float within the mold and cause unevenness.
|
|
The first epoxy mold we made was found to warp over time, losing flatness of the reference surface.
To mitigate this, later revisions have incorporated an internal stiffener structure, most recently using waterjet carbon fiber parts from Big Blue Saw.
- Collect three spars and two end plates from the bag containing the waterjet carbon fiber parts.
- Set up a clean 12x12" glass plate to work on, super glue, and at least two small binder clips.
- Using the binder clips to hold the carbon fiber parts perpendicular to the glass plate, glue a spar to one of the end plates. When gluing, there is extra lateral wiggle room; bias the parts to either side, just make sure the joints are perpendicular and the spars are pushed in all the way along their length.
- Glue the remaining spars to the same end plate.
- Glue all three spars to the final end plate.
|
|
5. Create Mold from Master Adhesive
| Time Estimate:
| 1 hr
Add time for laser cutting if acrylic/ PLA mold walls are not already prepared.
|
- Each mold needs a set of acrylic sidewalls, two long ones measuring 150mm in length, and two short ones measuring 103mm in length. All walls should measure 0.625" in height, and be cut from 1/4" acrylic sheet. Update: Instead of acrylic walls, Bambu 3D-printed PLA walls with the same dimensions are recommended, as they are easier to peel off after epoxy casting.
- Begin mold preparation by carefully trimming away excess silicone from the molding process. To preserve flatness and backing thickness defined by the wax mold, any silicone which cured in between the fiberglass and the wax mold reference flats should be left in place, and not scraped away.
- Start with the long edges of the silicone on the fiberglass+carrier backing , trimming them in straight, parallel lines, 100mm apart. All silicone outside these parallel edges should be scraped away, leaving a clean fiberglass surface.
- Repeat the trim and scraping process for the short edges, keeping the edges 150mm apart.
- Ensure that the silicone ridges created by the runners in the mold reach the trimmed edges; if they do not, use a small amount of modeling clay to extend the runners to the trimmed edges.
- Glue the outer mold walls
- Option 1: Acrylic side walls
- Tack down one of the long acrylic sidewalls with superglue. To allow ease of removal later, glue these by initially holding them firmly in place, and using a toothpick, wetting the outside corner where the wall meets the fiberglass with superglue. The result should look like this.
- Repeat with the opposite side, ensuring the acrylic wall is parallel to the first, and that the ends are aligned. Use the carbon fiber support structure as a guide, as it should eventually be a slip fit into the mold.
- Glue the end walls on, using the ends of the long walls as a guide.
- Seal any gaps at the corners with superglue.
- Option 2: 3D-printed walls
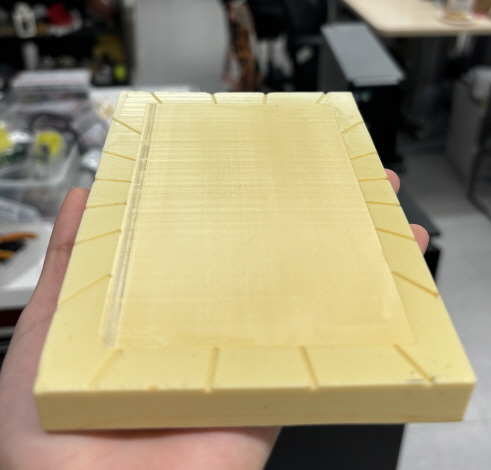
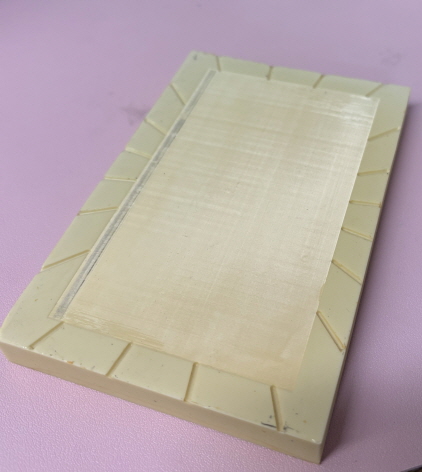
- Bond the 3D-printed rectangular structure to the fiberglass using superglue. The result should look like this.
- Apply weight after to ensure the walls are firmly adhered.
- Using red tape, carefully apply pieces of tape to cover just the wedge features in the mold. This will protect them from mold release.
- Apply Mann EZ-Release 200 or equivalent mold release agent to the mold, taking care to cover all exposed acrylic surfaces or 3D printed wall surfaces.
|
|
6. Cast Daughter Mold with Epoxy
| Time Estimate:
| 1.5 hr.
24 hours to cure mold.
|
- Locate the Epoxacast 670HT
- Use the jiffy mixer (located in the back right corner of the hood in TLTL) to mix part A of the epoxy (2min).
- Mix the epoxy you're using in the tall disposable beaker (3min).
- The daughter mold requires about 300 g of EpoxACast 670HT.
- The tall beaker makes sure that the epoxy doesn't overflow its container during de-gassing
- Vacuum-degas the epoxy in the beaker.
- Degas until the epoxy rises, then falls, then give it about 10 more seconds. Unlike many other epoxies, this epoxy has key components that are volatile, and so cannot be vacuumed indefinitely.
- Remove the red tape protecting the wedges.
- Place the assembled stiffener structure into the mold.
- Put the master mold in the vacuum chamber, and carefully pour in enough epoxy to cover the wedges to about 3/16" depth (approximate).
- Degas the beaker and the mold, to ensure any air trapped in the wedges is released.
- This one is more of a judgment call on when to stop; wait about as long as for the first degassing, but not several times as long.
- Pour the remaining epoxy from the beaker gently into the mold.
- Ensure that eventually, the entire support structure is covered.
- The epoxy is moderately viscous, so you may need to pour at different locations in the mold. This is fine, just make sure to pour gently and smoothly enough to avoid entraining air. The result with the 3D-printed walls should look like this.
- Allow the epoxy to cure overnight.
|
|
7. Finish Processing Daughter Mold
|
Time Estimate:
| 3-4 hr to release backing
|
|
| 2+3 hours for mold post-cure schedule.
|
- Carefully pry off the acrylic side plates or 3D printed walls used to contain the epoxy; a sharp tap on a chisel-like object at the corners is usually sufficient to then pry off with pliers.
- Soak the mold/fiberglass assembly in water for a few hours, with the aluminum foam down. This is to release the fiberglass from the epoxy mold.
- When the foam shears off from the fiberglass easily, remove it. Then, beginning at one corner, carefully peel the silicone master out of the daughter mold.
- Post cure the daughter mold in oven at 80C for 2 hr followed by 150C for 3 hr. Allow to cool slowly.
- Carefully, with a file or sandpaper, break external corners of the mold to remove flash and sharp corners.
- Lap the back side of the mold until it sits flat.
- Thoroughly wash mold with soapy water, water, then an isopropanol rinse. Make sure not to touch the wedge features, but simply run water across them.
- Pass on mold for parylene treating (Details regarding the parylene coater are provided in the Resources tab).
|
|
8. Final Result (Post-Parylene treating)
9. Materials and Vendors