new web: http://bdml.stanford.edu/pmwiki
TWiki > RisePrivate Web>ClimbingAdhesion>MicroIndenting (10 May 2011, EricEason)
Micro Indenting
used to be "nanoindenting" but I changed name for accuracy -mrcTheoretical
There is an old paper that discusses indenting with wedges and the type of behavior expected. In our case we want to minimize elastic rebound and have a more plastic deformation as our resultant behavior. The paper provides a table that illustrates the different types of deformation with respect to indenter angle and material properties (Young's Modulus/Yield Strength). Here is the figure from the paper the summarizes the behavior: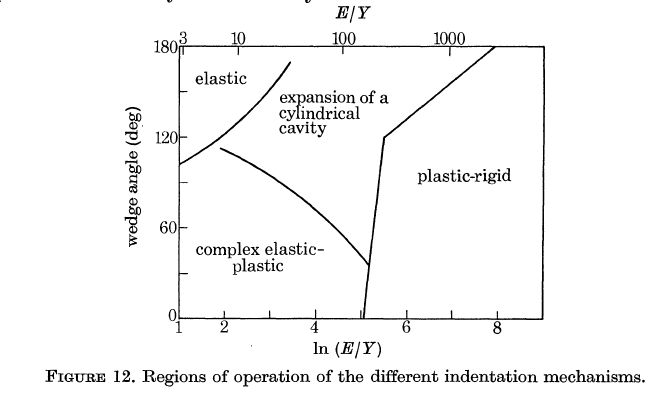 Looking at common materials we may think about here is a general subset of data:
| Material | Young's Modulus (E - GPa) |
Yield Strength (Y - MPa) |
E/Y | Friction on Steel (Static) |
| Aluminium | 70 | 15-20 | 3500 | 0.61 |
| Copper | 130 | 33 | 3939 | 0.53 |
| Gold | 79 | 205* | 385 | ? |
| Iron | 211 | 80-100 | 2110 | 0.4 |
| Lead | 16 | 10 | 1600 | 0.95 |
| Nickel | 170 | 14-35 | 4857 | 0.64 |
| Silicon | 107 | 5000-9000 | 12 | ? |
| Silver | 83 | 6.9* | 12000 | ? |
| Tin | 47 | 9-14 | 3357 | ? |
| Titanium | 120 | 100-225 | 533 | ? |
| Tungsten | 411 | 550 | 747 | 0.5 |
Other Indenting work
- Metin Sitti and Ron Fearing nano-indenting with AFM probe
- Commercial hardness testing (Brinell hardness) and pileup analysis http://nanoscan.info/eng/modes/
- there should be some Whitesides paper..
- Microindenting for injection mold surface preparation http://sciencelinks.jp/j-east/article/200318/000020031803A0226036.php
- modeling http://cat.inist.fr/?aModele=afficheN&cpsidt=17618538 , FEM model http://iopscience.iop.org/0022-3727/27/6/030
- http://pubs.acs.org/doi/abs/10.1021/ma0704358
Meeting Notes
2010 October 28
Elliot, Eric, Kim, Mark, Paul and Noe met in the lab conference room to discuss the issues surrounding indenting and getting better results. Images of the notes on the white board are in the this zip file:- IndentingBrainStorm__2010Oct28.zip: Images of the whiteboard
Indenting Materials:
Machinist's wax
Molds
We were able to produce molds from machinist's wax using purposefully dulled indenters. They produced the appropriate shapes, but the wax is brittle and the indentations were rough and prone to burrs. This can be seen in the below SEMS.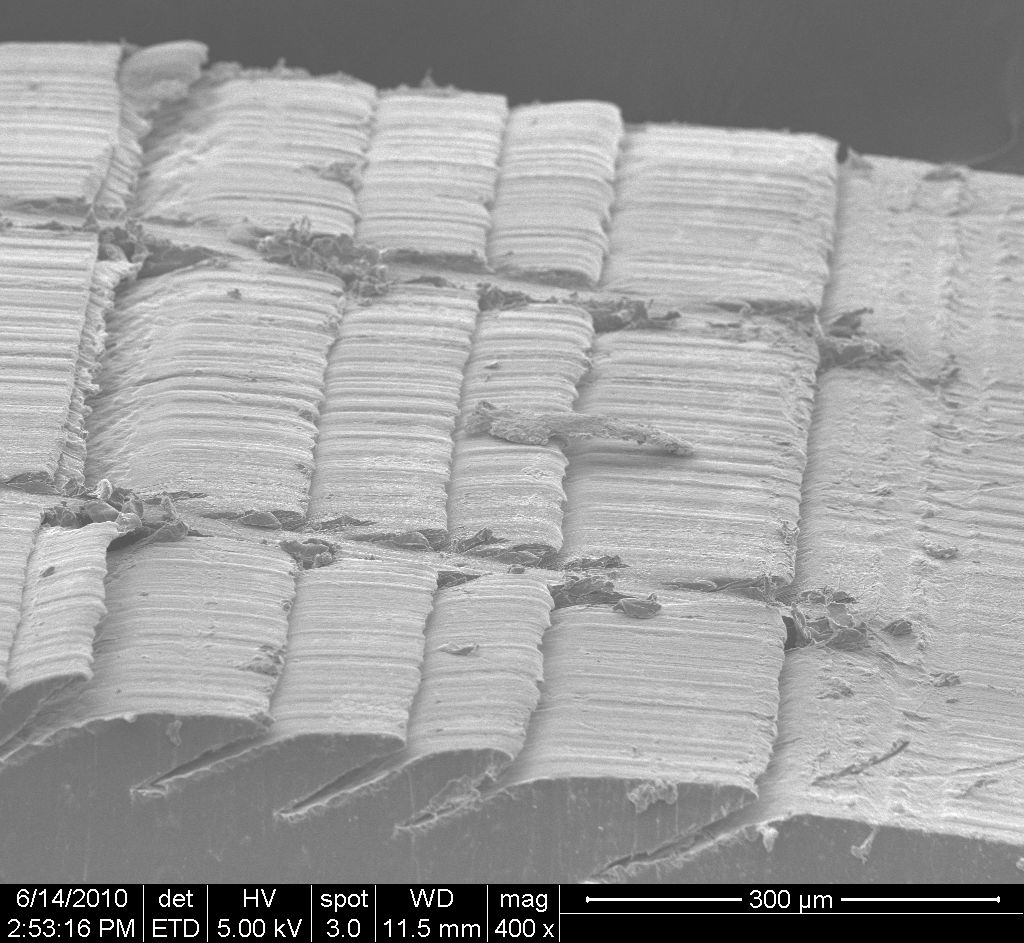
Pours from machinist's wax molds
The first attempt at actually pouring molds created by indenting in hard machinists wax are shown below. It can be seen that the roughness caused by indenting in to such a hard material has made for a very rough surface on the wedges. The tips are uneven across the length of the squeegees and the sides of the squeegees are poorly formed. This is likely due to unpredictable edge effects at the 'slot' in the indenters. Tapered slots (growing wider as they approach the indenter tip) may alleviate this problem. Overall, it seems that a less brittle material would be best in order to minimize the surface roughness of the molded features.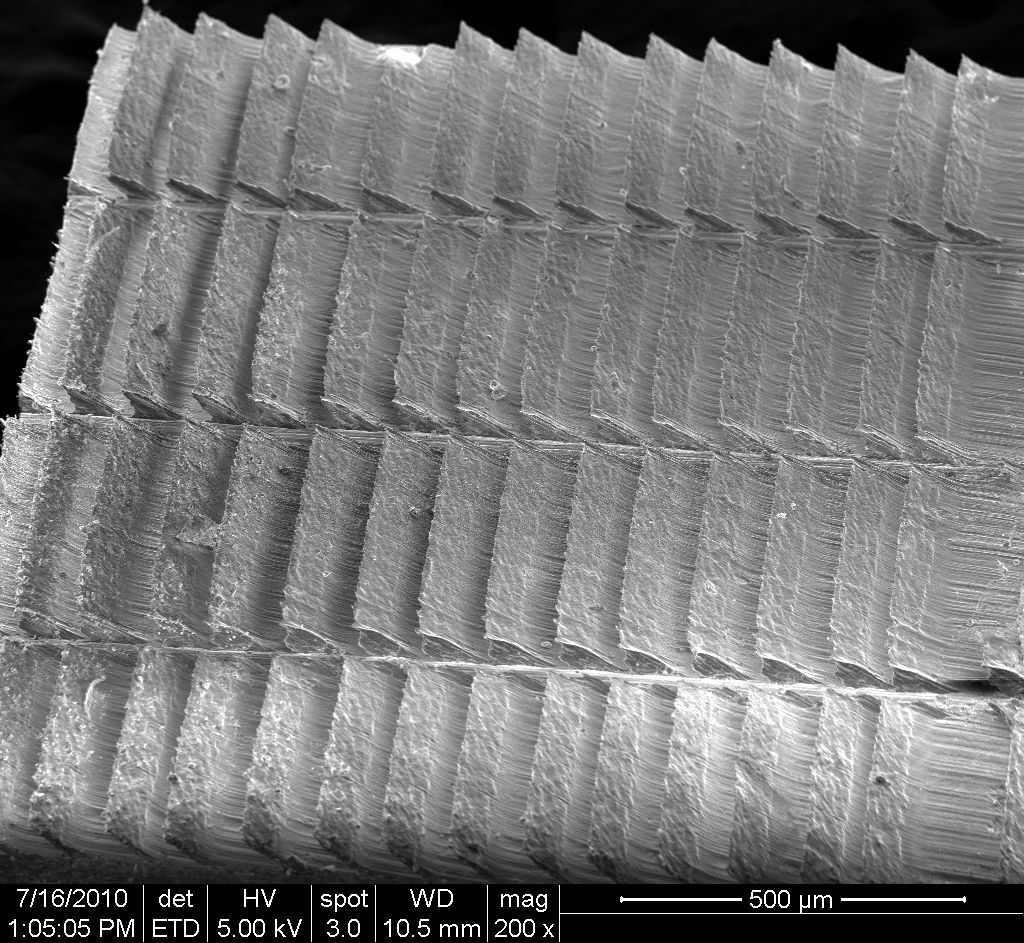
Modelling Wax (softer)
Main.PaulDay July 2010 at Los AlamosMolds made with Razors
I just took these images a few minutes ago and wanted to share. I've had some luck getting good feature shape with a much softer wax. You can see in the images that it doesn't really form any burrs like the harder stuff. It is, however, a bit sticky. I think this could be a bit problematic when we try to squeeze smaller features closer together. I tried a lubricant (read hand soap from the bathroom) and it actually lowered to forces quite significantly, all but eliminating pull-out force, which I think was causing some distortion in other trials. These features are about 110um tall in the vertical direction. My next step is to see how closely I can squeeze them in and how small I can get the features. You'll be the first to know of any more progress. Also, I'd like to get some SEMs of these molds to look at the surface quality of the indentation. As you'll see from the SEMs I'll be posting to the wiki shortly, the harder wax produces a much rougher features because of the jagged nature of the indentation in the hard wax. I'll let you know when they're posted.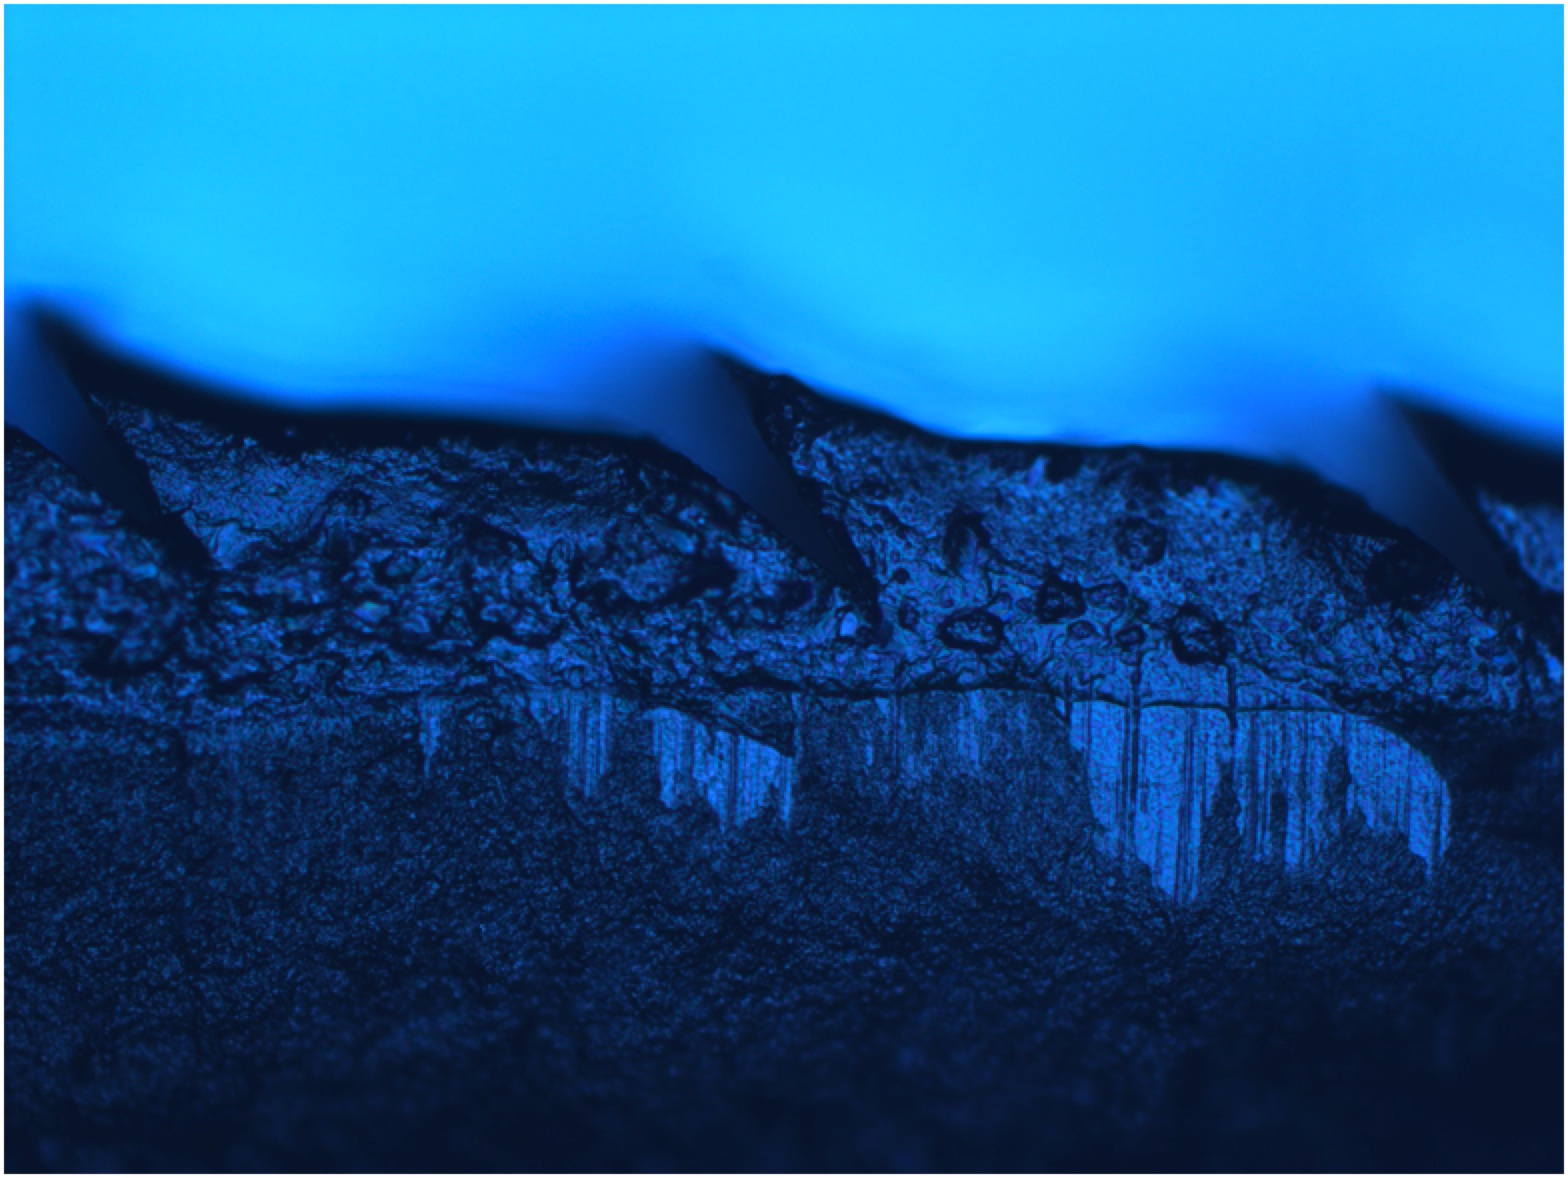
Without lubrication
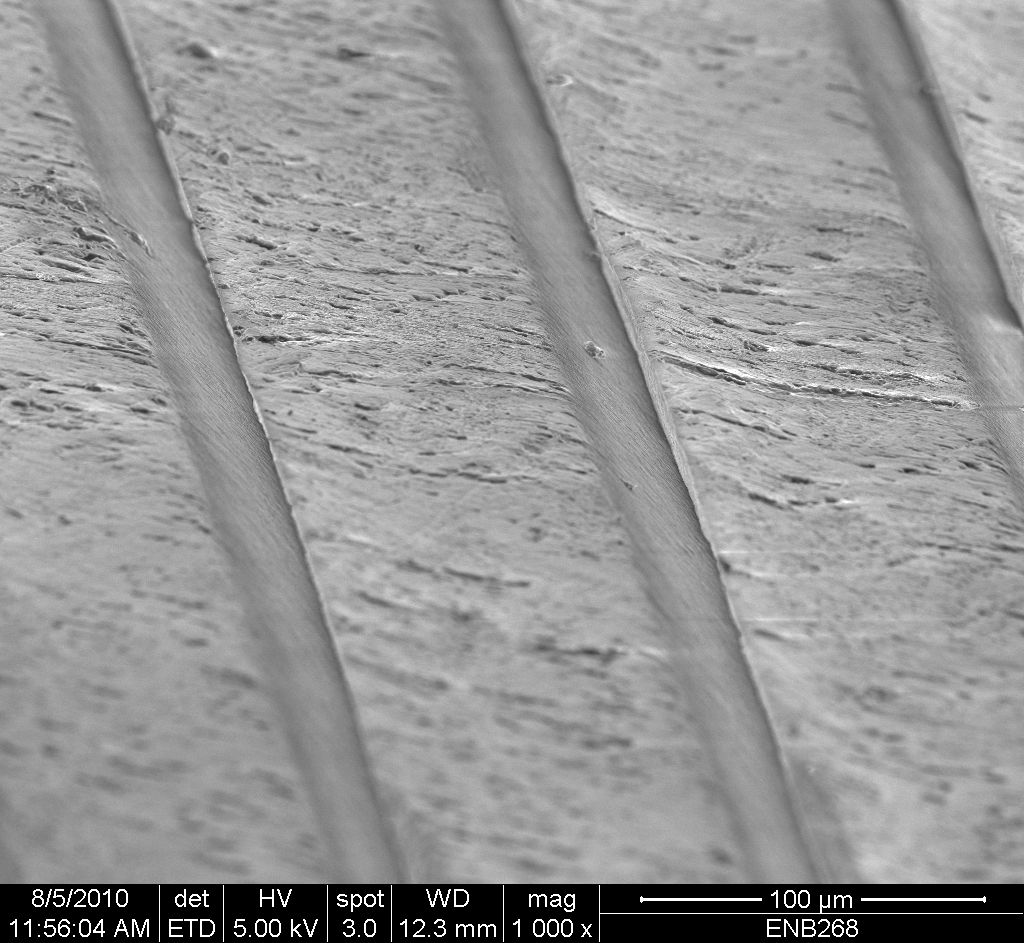
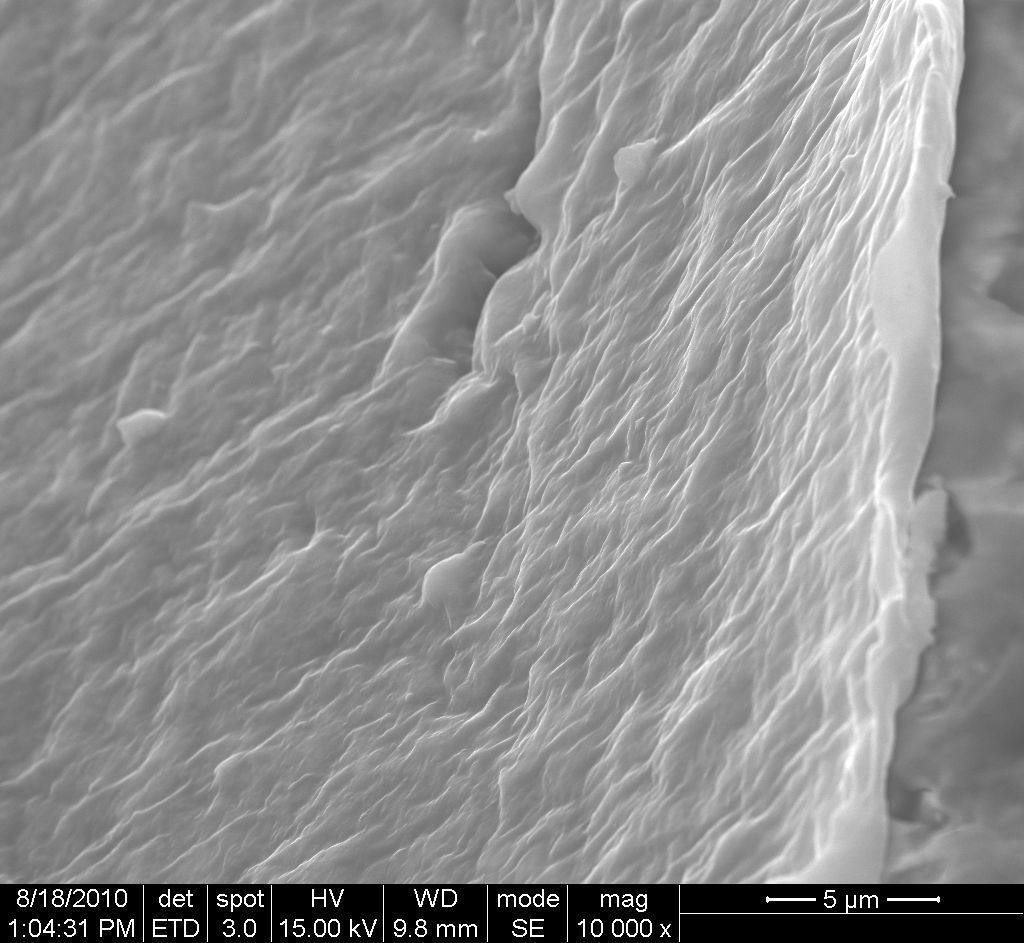
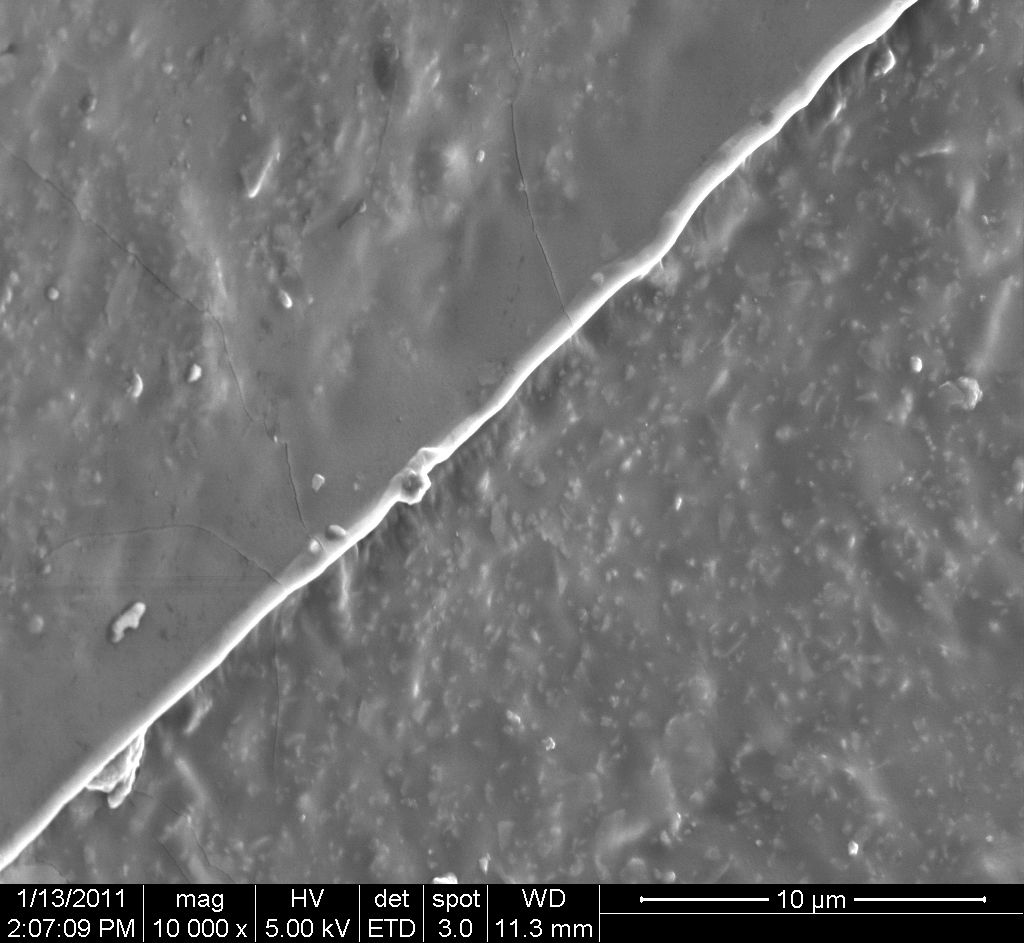
SEM images of the same molds show more about the improvements that can be made by indenting in softer materials. First is an SEM showing a number of indentations made in a softer wax with a brand new, sharp indenter. It can be seen that the indentations have fewer burrs than those made with harder waxes. Also, the surfaces inside the indentations are noticeably smoother than their hard wax counterparts.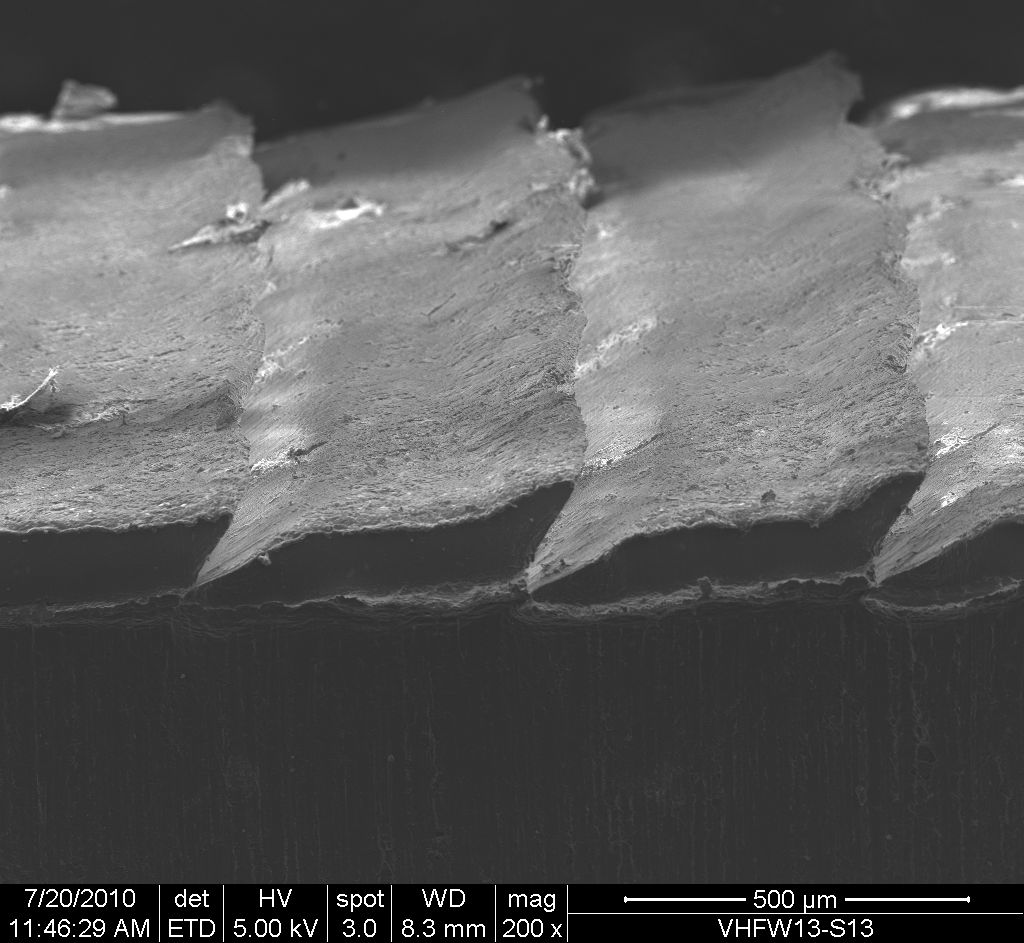
With lubrication
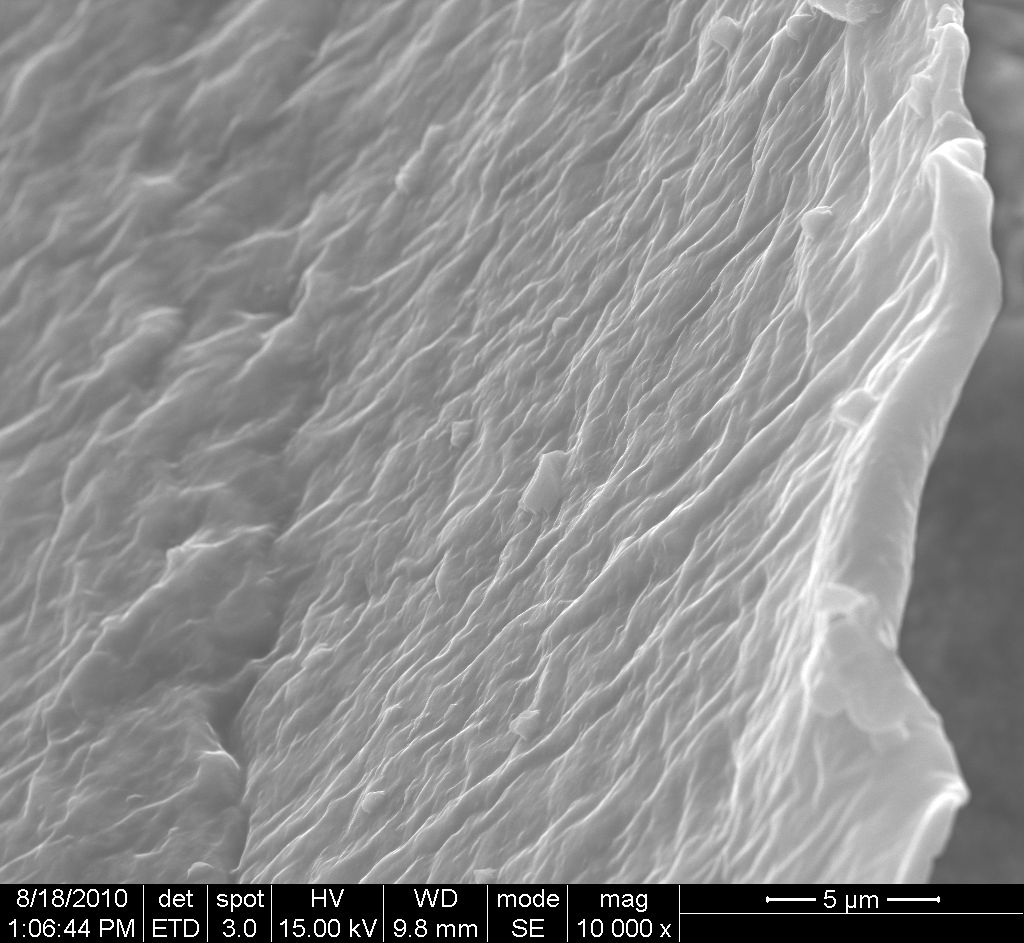
The softer wax is significantly stickier than the previous waxes and this caused significant pull-out forces when withdrawing the indenter from the wax. The indenter was pulling at the wax and is the likely cause of the extended, horn-shaped upper 'lip' of the indentation. To try to reduce this effect, as well as the roughness seen on the interior of the indentations, experiments were performed with a lubricant (liquid soap). During the experiment, it could be observed that the magnitude of the forces seen during indentation were reduced significantly and the pull-out forces were all but eliminated. This resulted in less deformation of the indentation 'lip' as well as improved surface characteristics on the interior of the indentation. Ignore the deformation on the far end, which I caused when cutting this section of the mold free to image it.
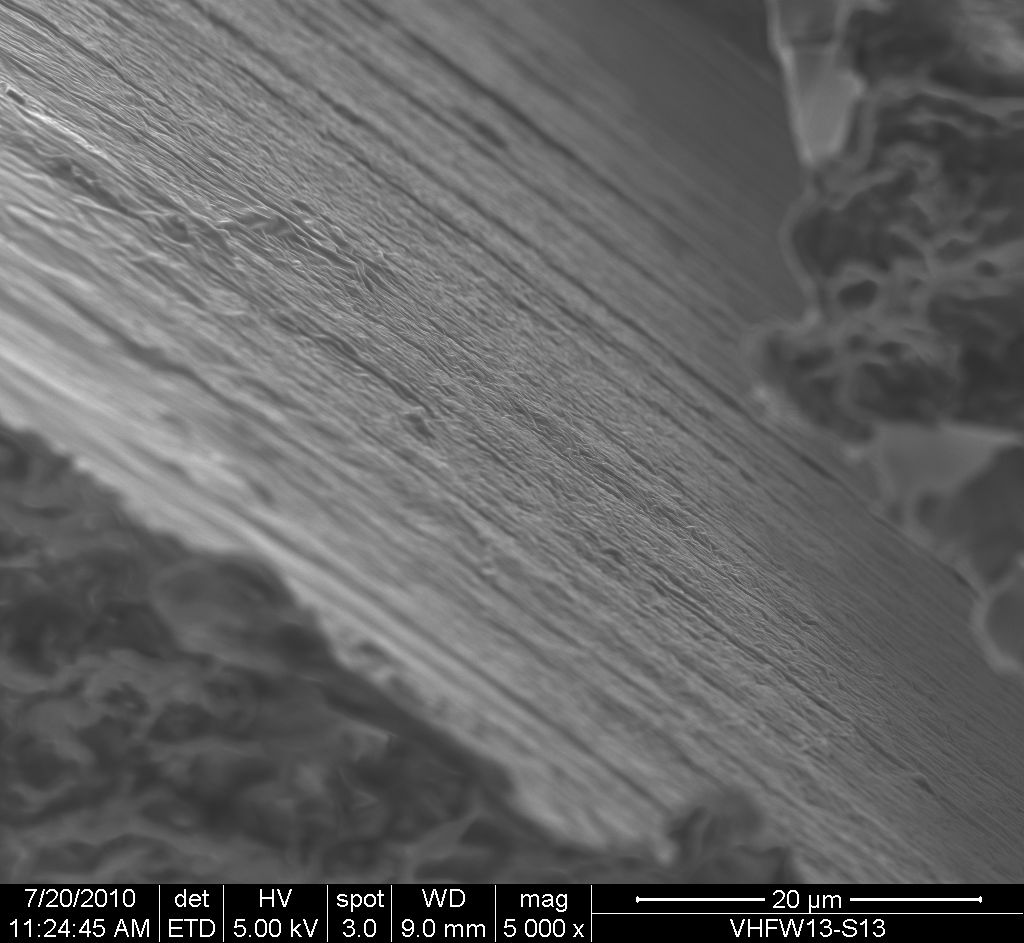
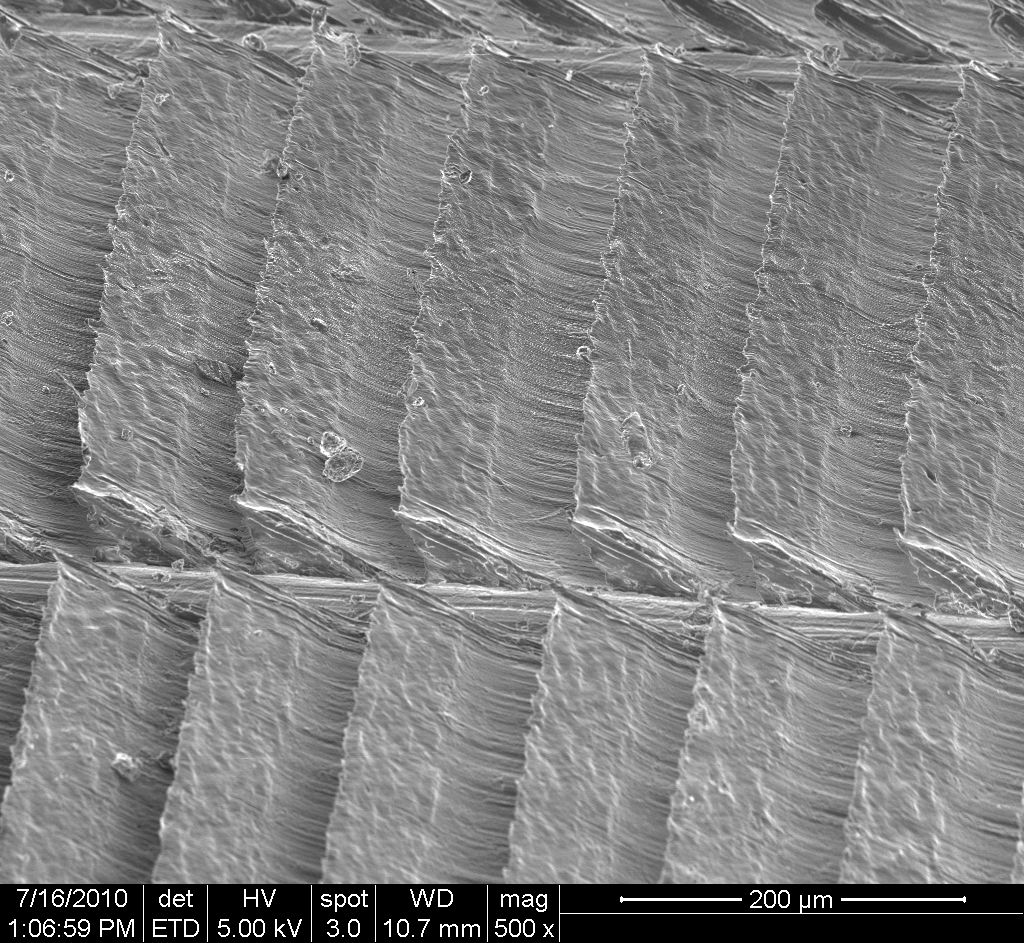
Molds made with Microtome Blades
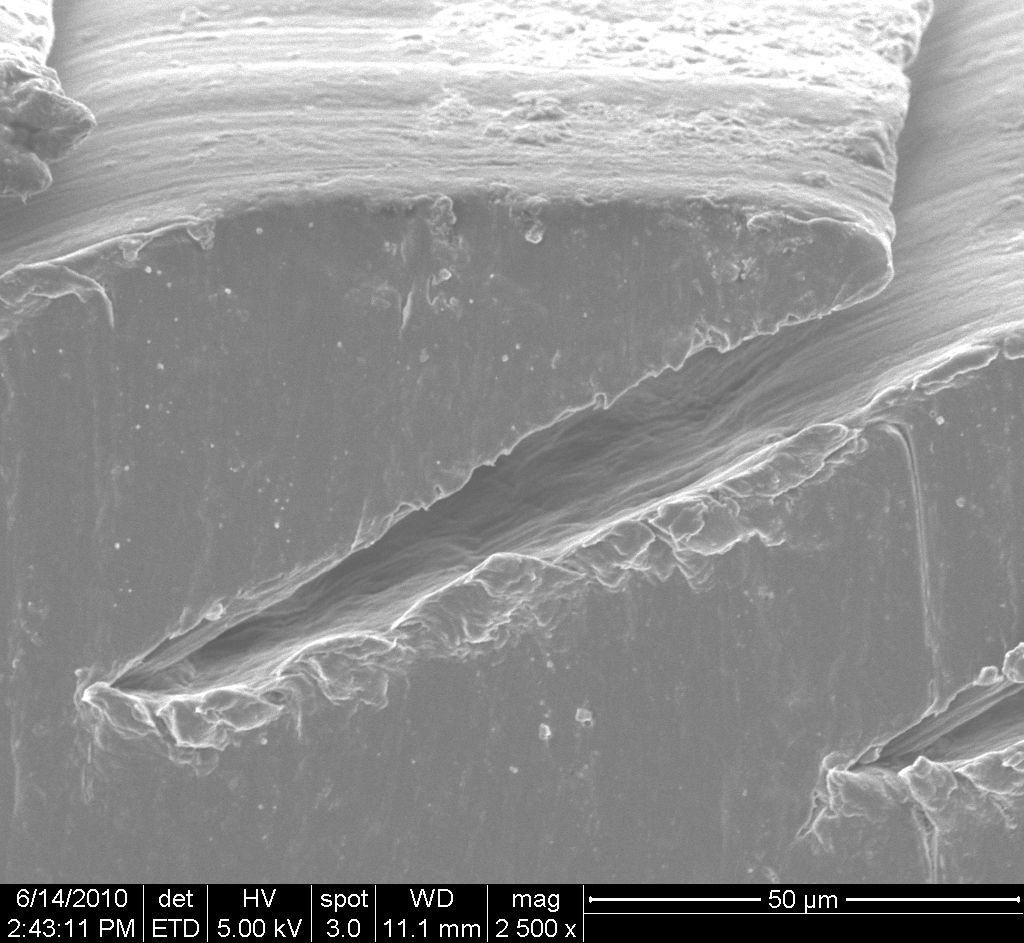
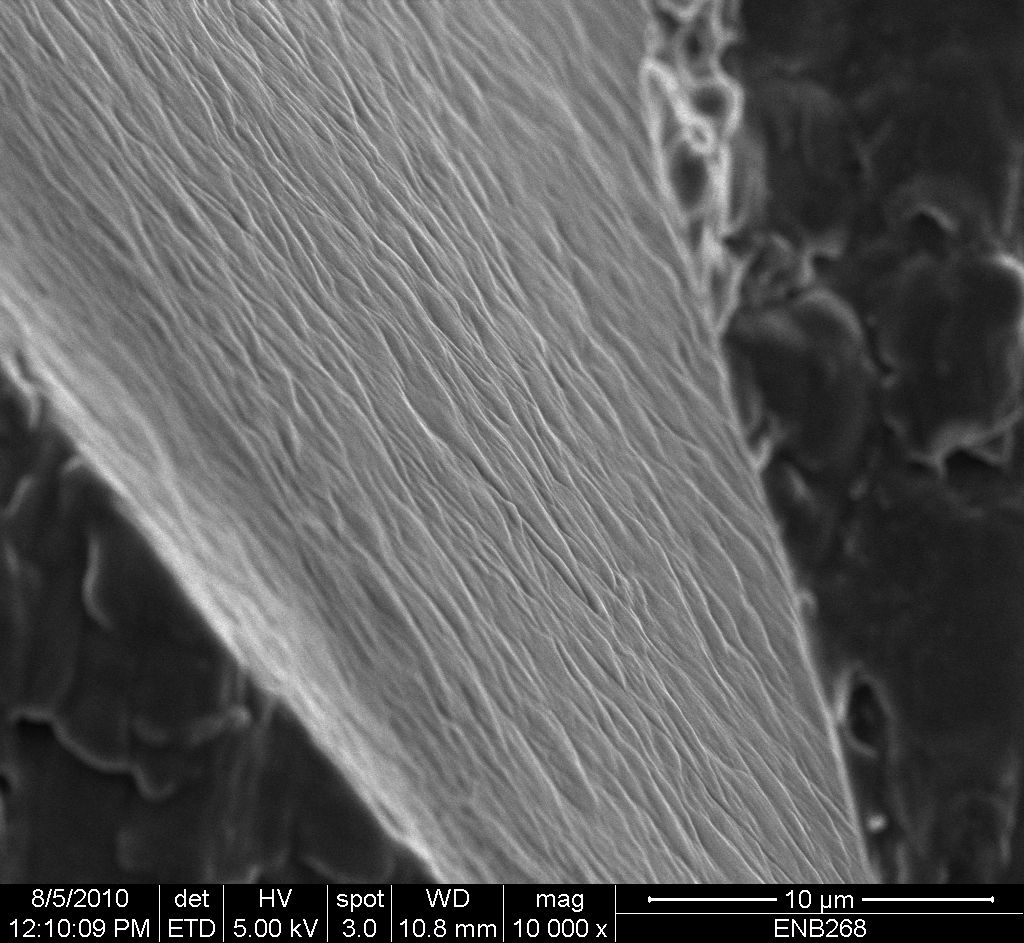
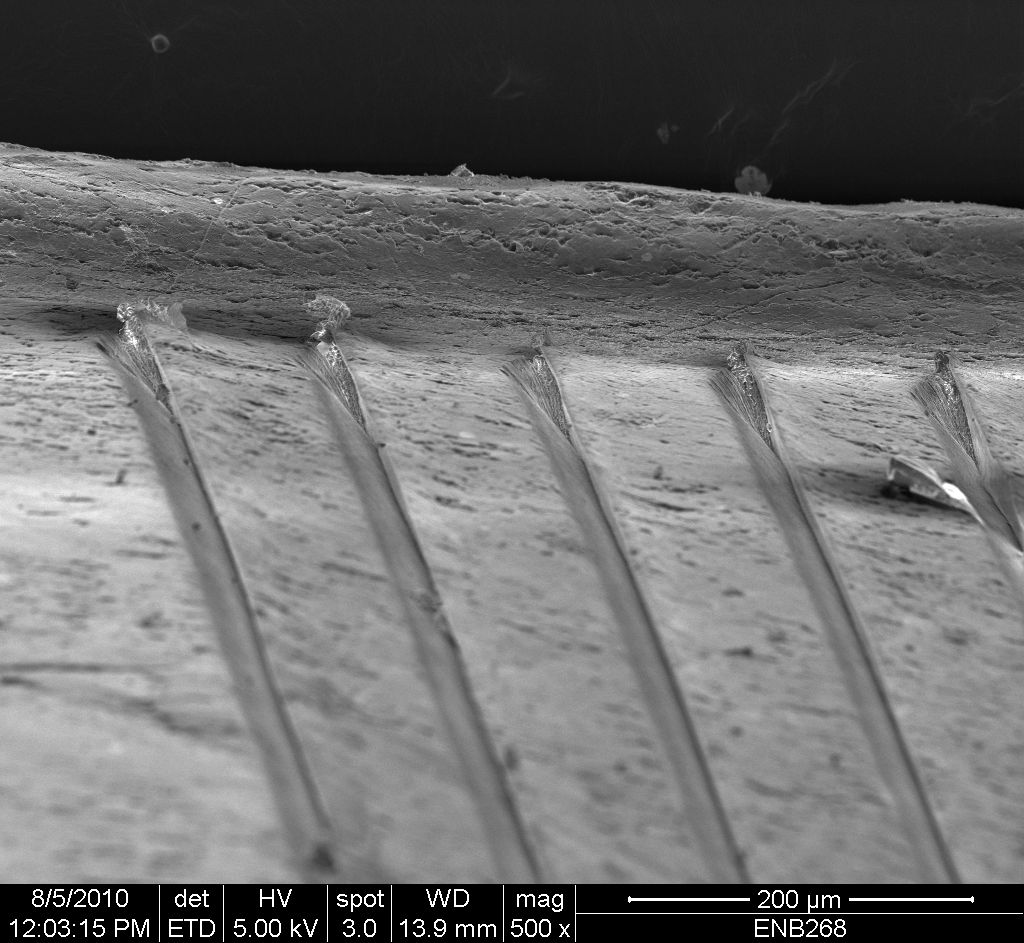
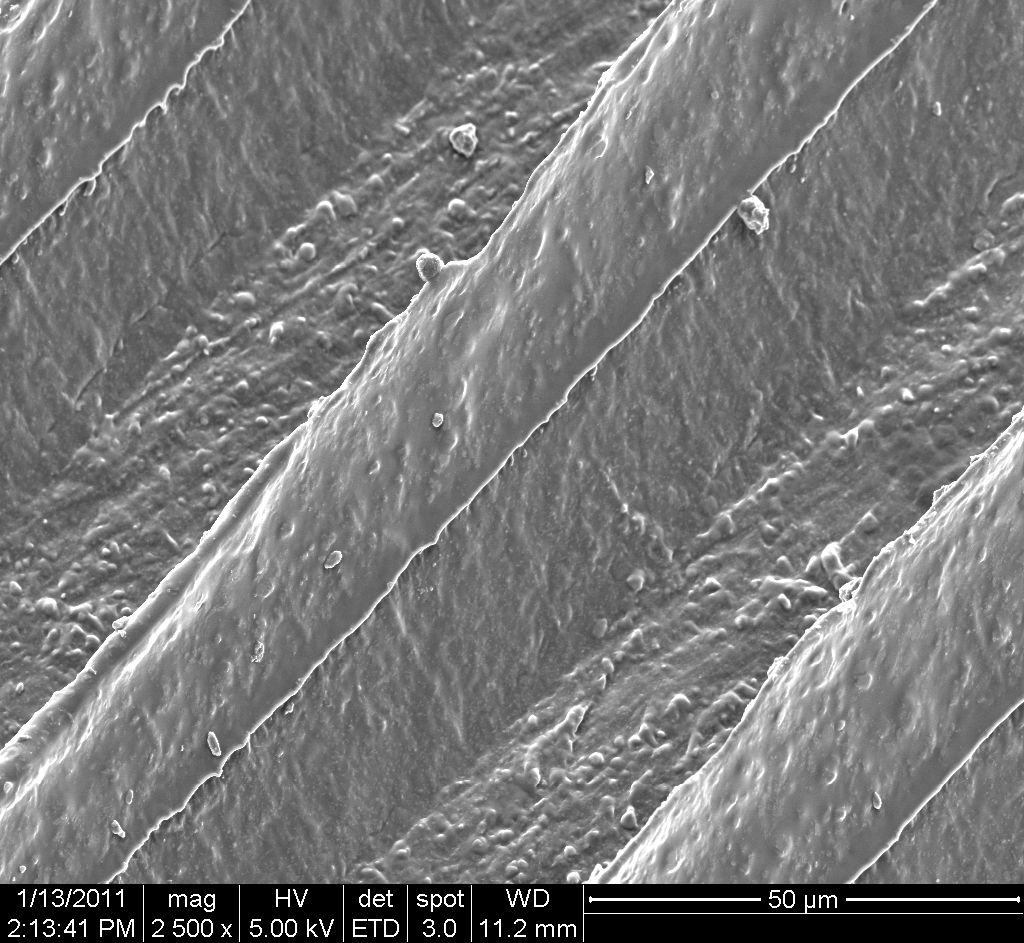
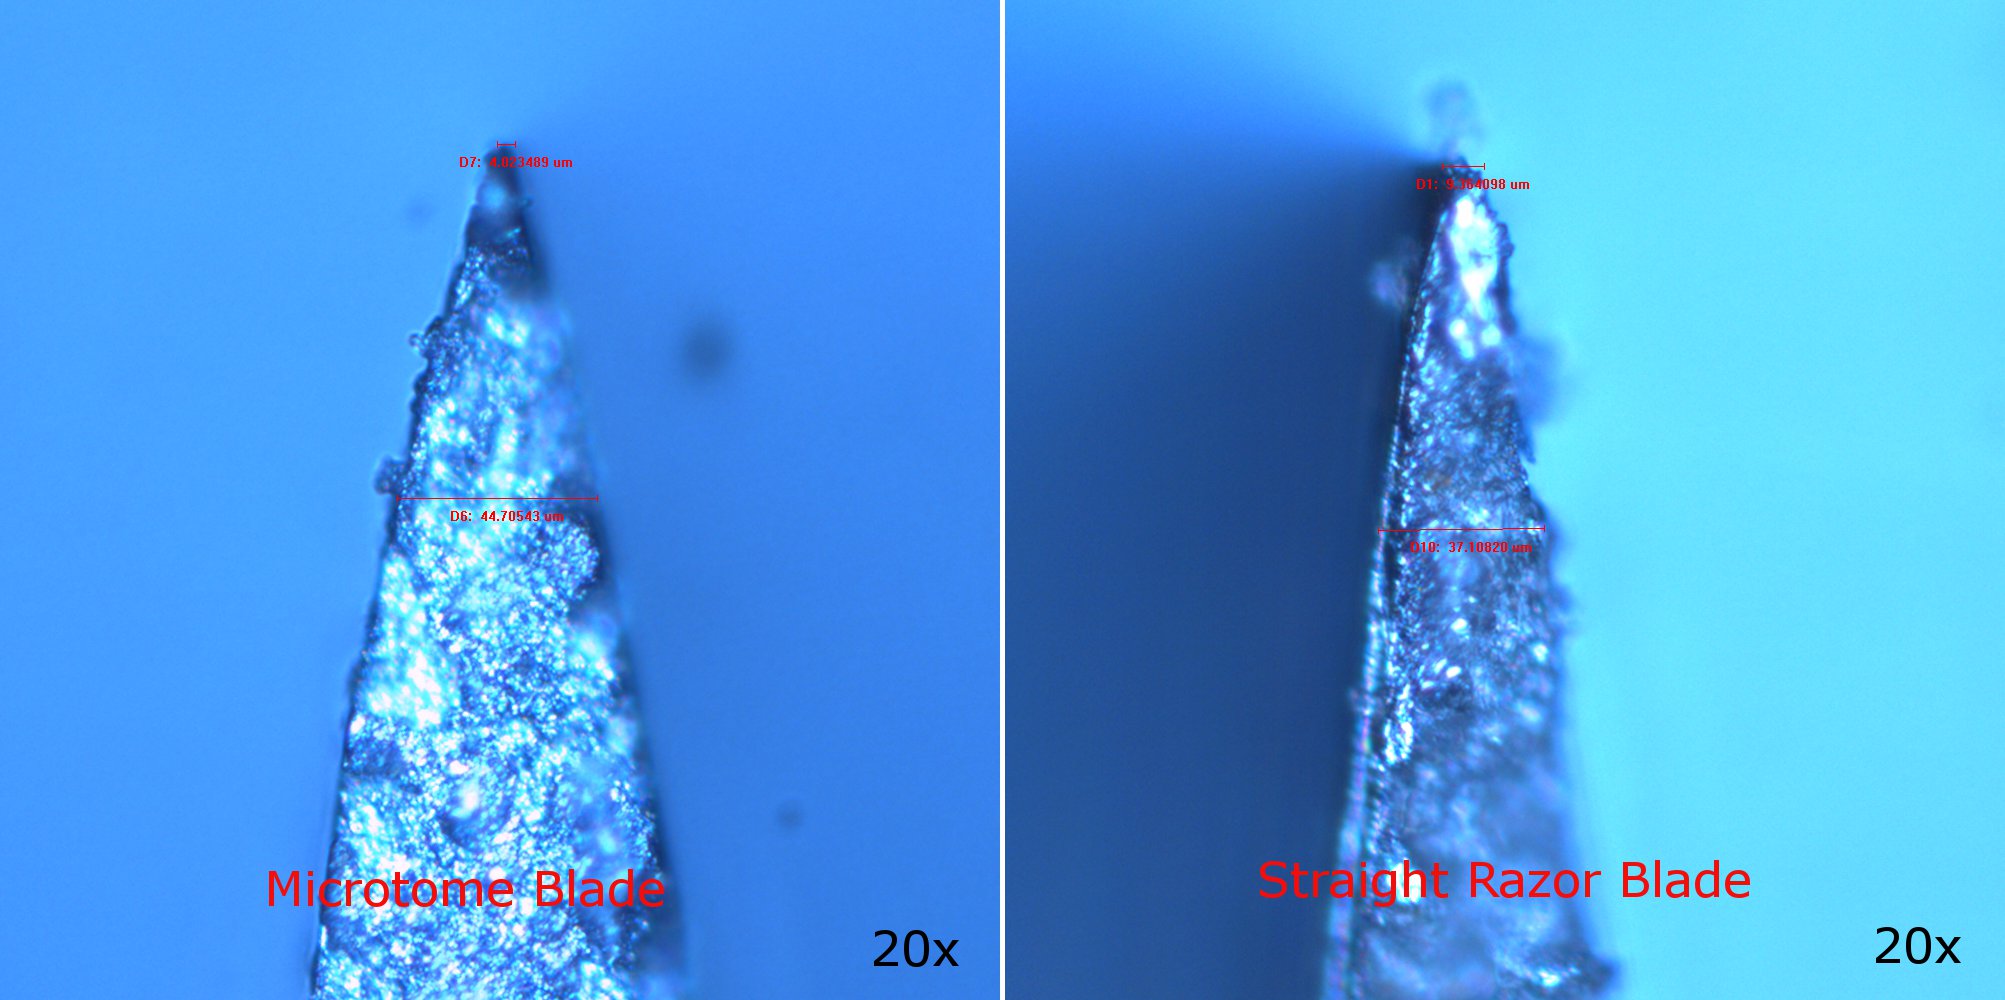
Because of the coarse nature of the edge of the razor blades, we looked in to using microtome blades due to their fine edge. Also, we began performing the indentations at an angle of 30 degree with respect to the vertical and using water as a lubricant. It can be seen in the following SEMs that the microtome blades produce indentations with a better surface finish than the razor blades.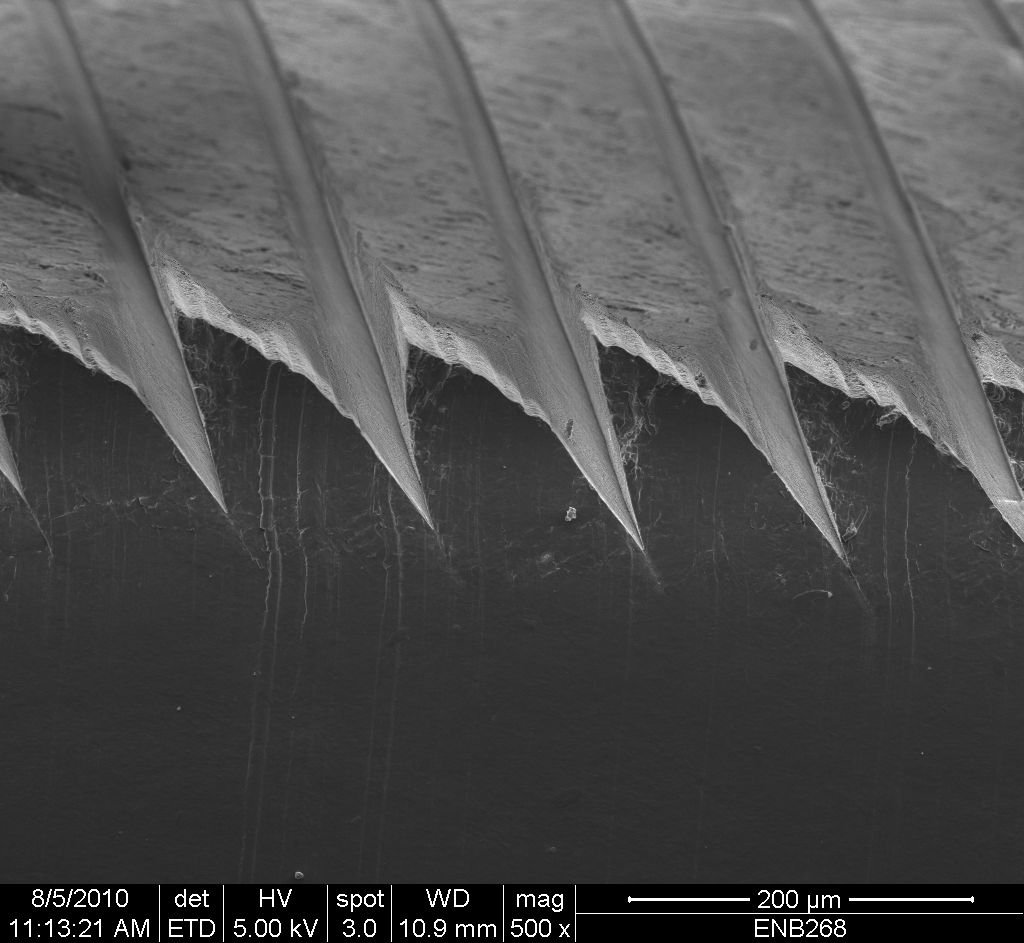
 It is interesting to note that the perceived profile of the indentation from the very edge of the mold is not consistent along the length of the indentation. The indentations appear wider at the edge, while they narrow to a consistent mouth width as they go back in to the mold. I think this may be caused by excess deflection of the right lip of the indentation (when looking at the below images) due to lack of constraint. If this is the case, it should not be problematic when producing actual molds.
The width of the mouth of the indentation, once it becomes consistent, is about 20um. This may mean that the 'fat' CL Sturkey microtome blades (used to create this mold) may be appropriate. Thinner blades from Delaware Diamond Knives are available if necessary.
It is interesting to note that the perceived profile of the indentation from the very edge of the mold is not consistent along the length of the indentation. The indentations appear wider at the edge, while they narrow to a consistent mouth width as they go back in to the mold. I think this may be caused by excess deflection of the right lip of the indentation (when looking at the below images) due to lack of constraint. If this is the case, it should not be problematic when producing actual molds.
The width of the mouth of the indentation, once it becomes consistent, is about 20um. This may mean that the 'fat' CL Sturkey microtome blades (used to create this mold) may be appropriate. Thinner blades from Delaware Diamond Knives are available if necessary.

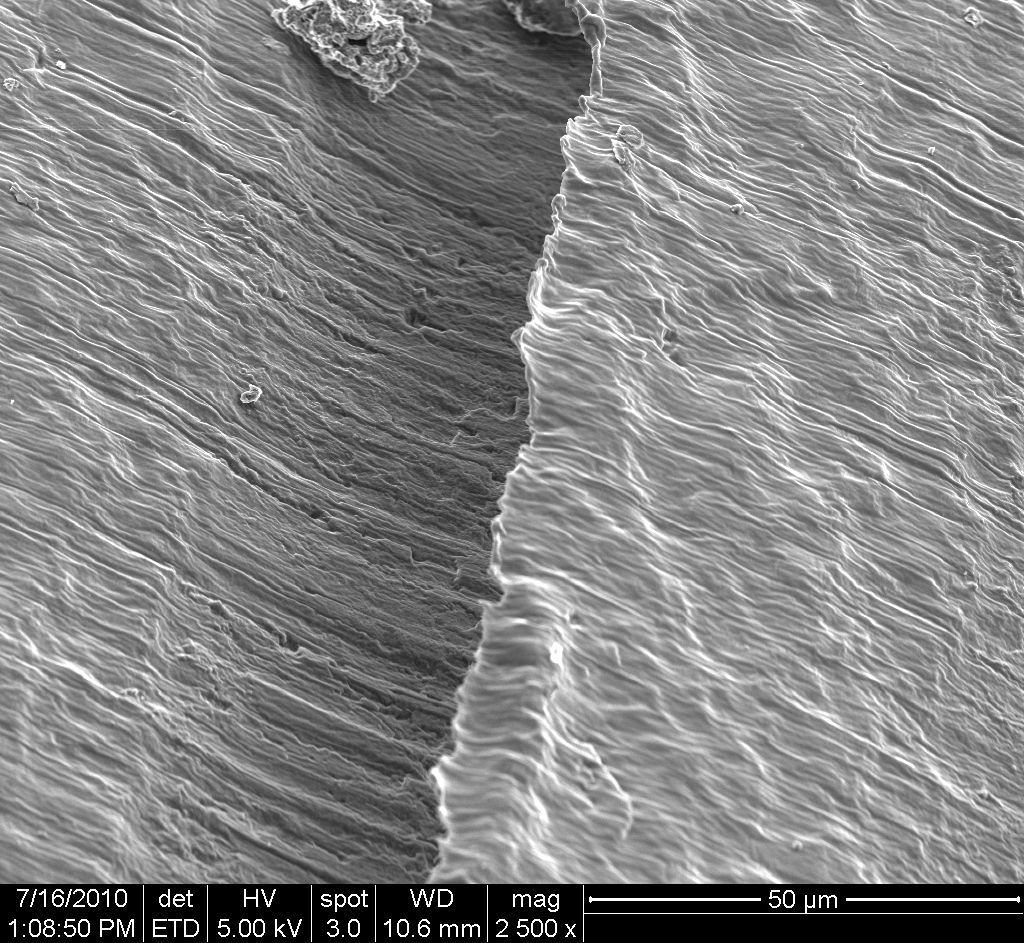
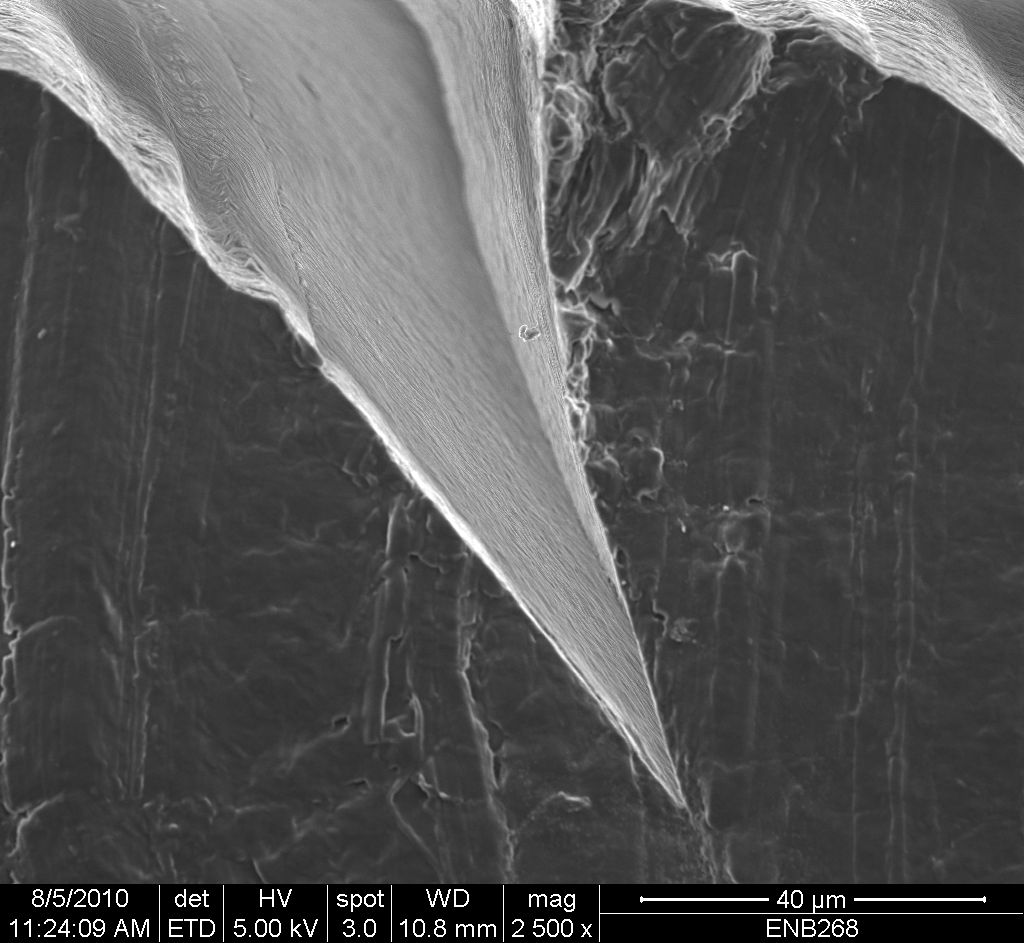
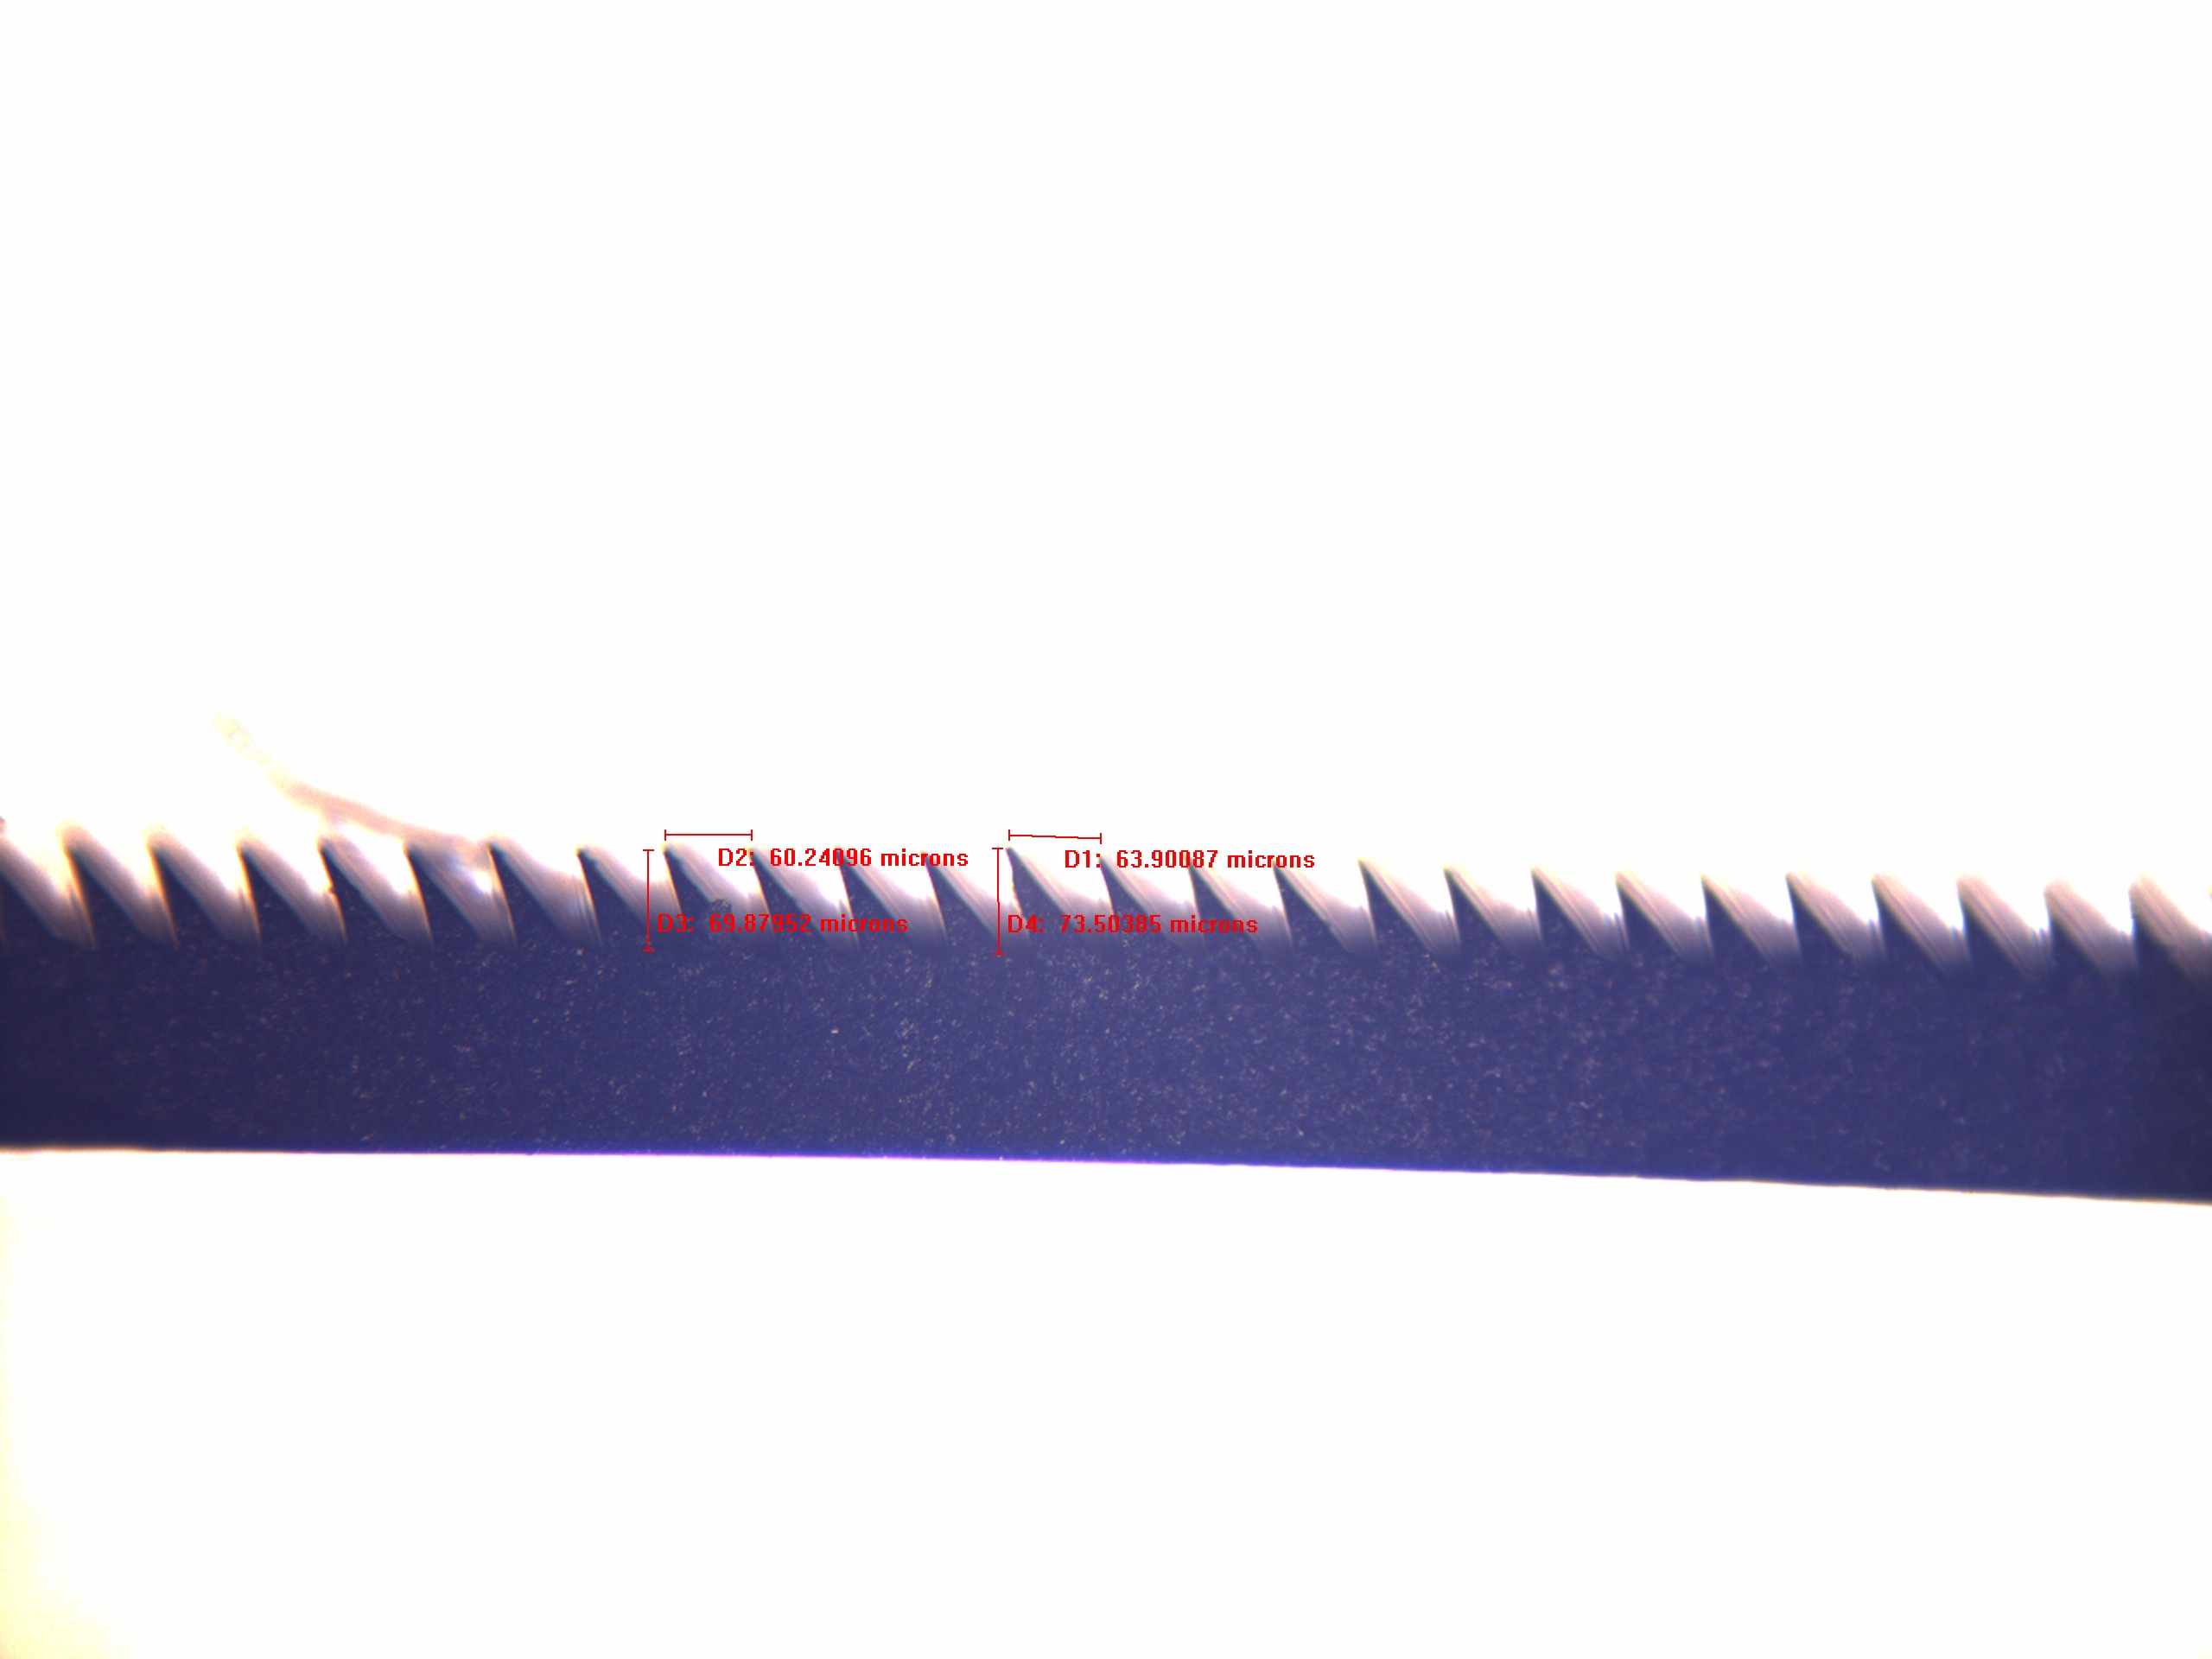
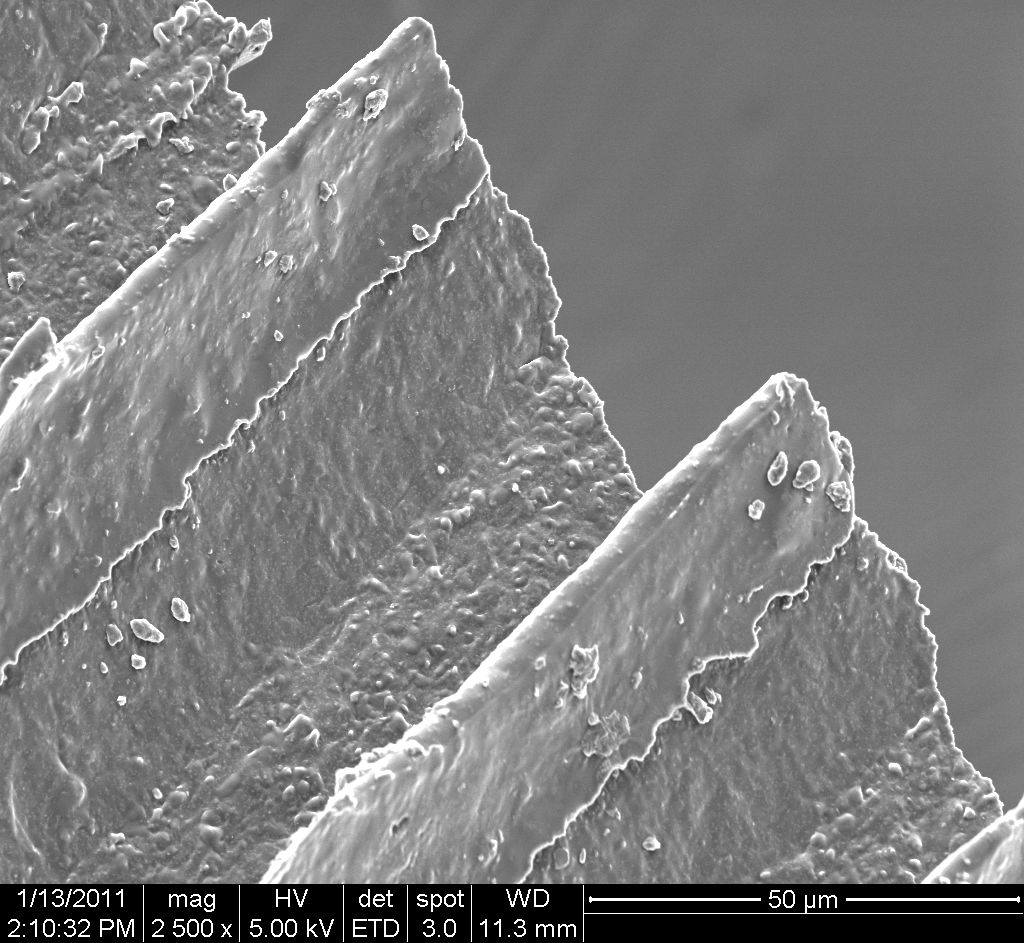
 Because of this, It is difficult to see exactly what the profile of the indentation is once the edge effects have subsided. We can, however, look at the profile of the far end of the indentation to get an idea of the shape of the 'body' of the indentation. The image below shows the profile of the end of multiple indentations which have a desirable, double-angled wedge shape. I believe this is more indicative of the shape of the indentation if it were done in the center of a block as opposed to on the edge.
Pours Made from Soft Wax Molds
The first attempt at making a mold to produce a large (~1cm^2) patch of indented squeegees yielded encouraging results. Four molds were made in total, each with a desired squeegee length (along the angle of indentation) of 80 microns. Two molds had the squeegees spaced at 120 micron intervals, the other at 80 microns. These were fairly arbitrary spacing choices as this was the first attempt. Although the depth was shorter than desired, it is an easy parameter to tweak. Consistency between indentations was fairly good, as can be seen below.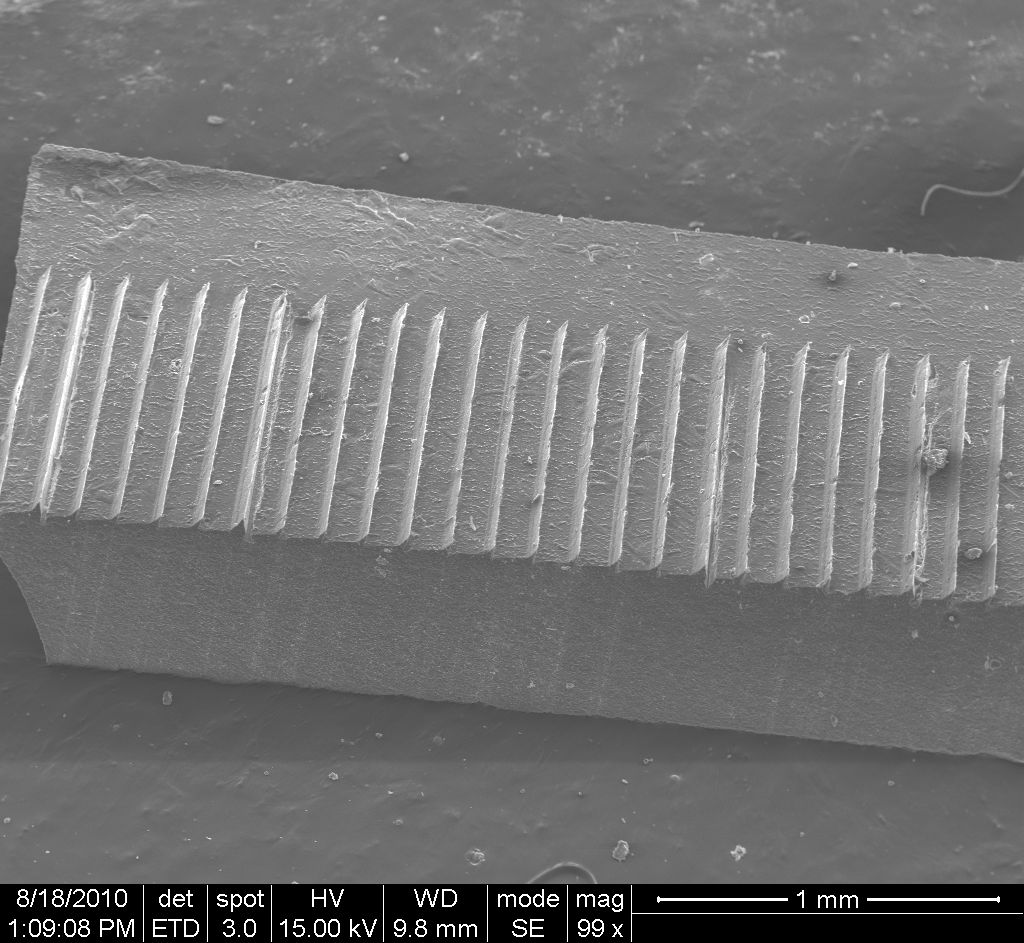
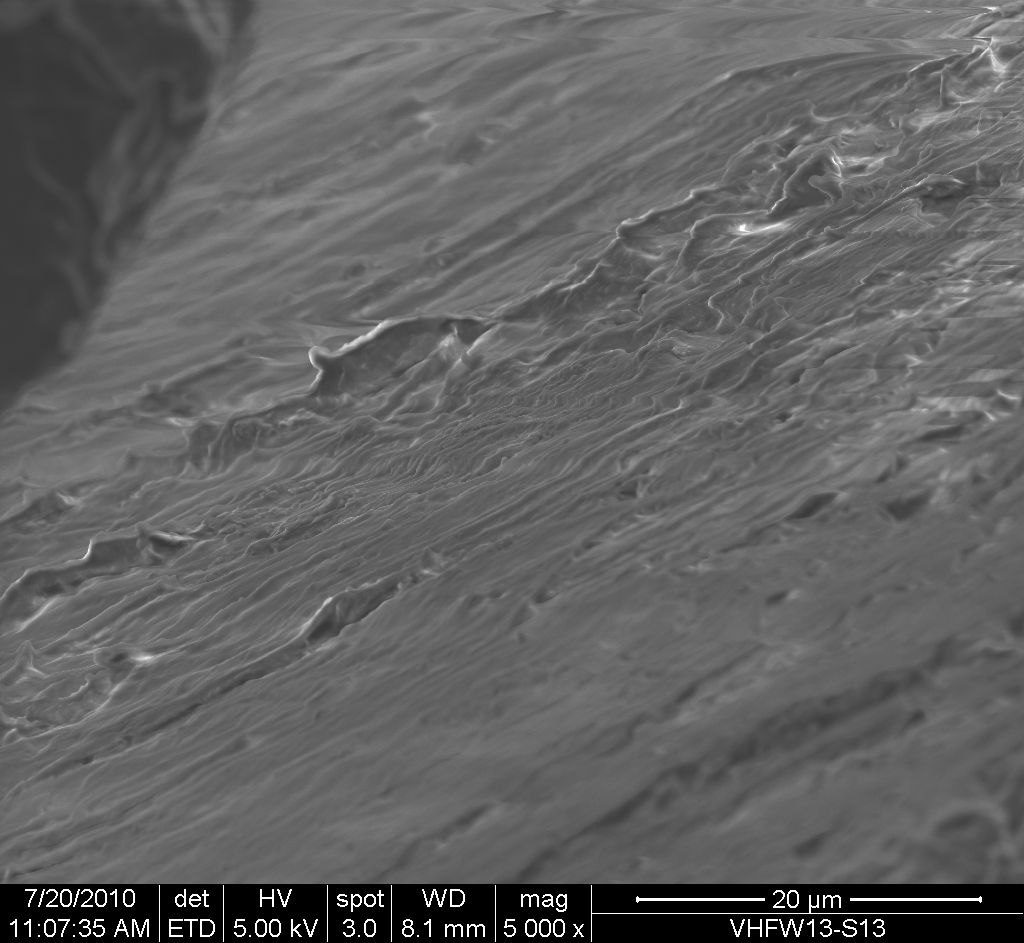
 Looking closer, we can see that the squeegees are not perfectly formed. The sharp edge of the squeegee is not consistent along their entire length on some, but it is reasonably good on a good proportion of the features. Whether this is due to contamination being present in the indentations at the time of the pour or some other factor remains to be seen. A second pour of the same mold should help us gain some insight on this problem. However, when a proper edge is present, it is fairly sharp. Indented squeegee surface roughness, while more significant than what is present on squeegees produced via SU-8 molds, is still small, with an amplitude on the order of a micron.

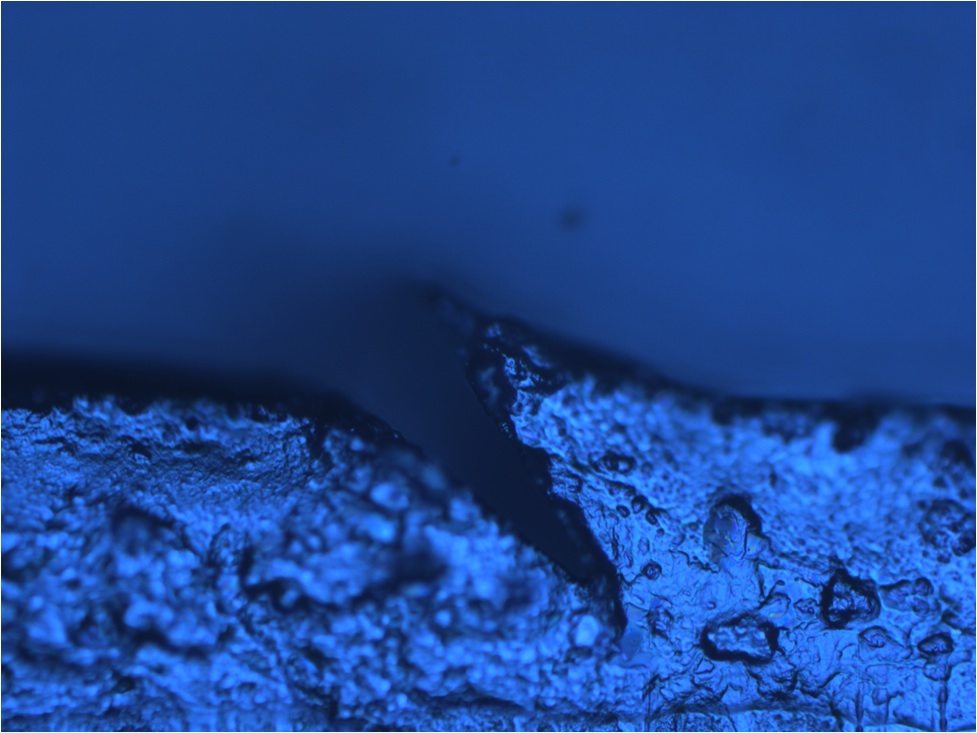
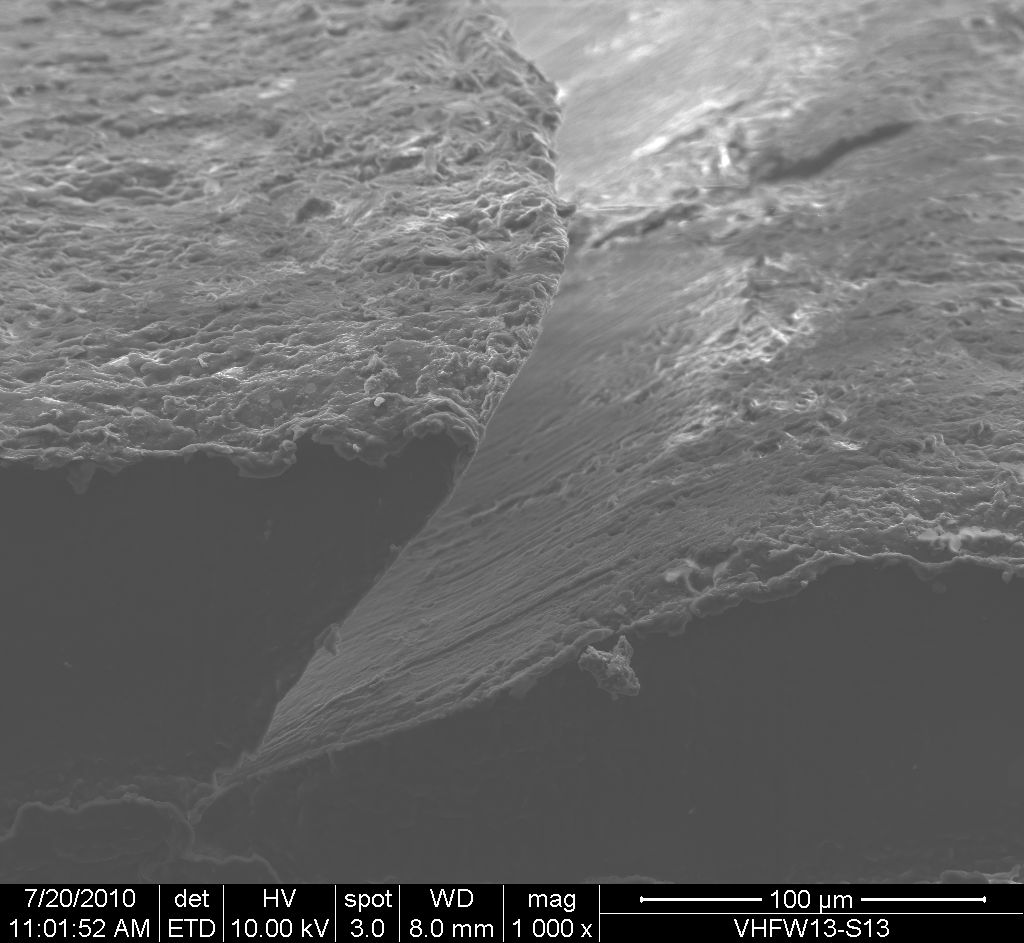
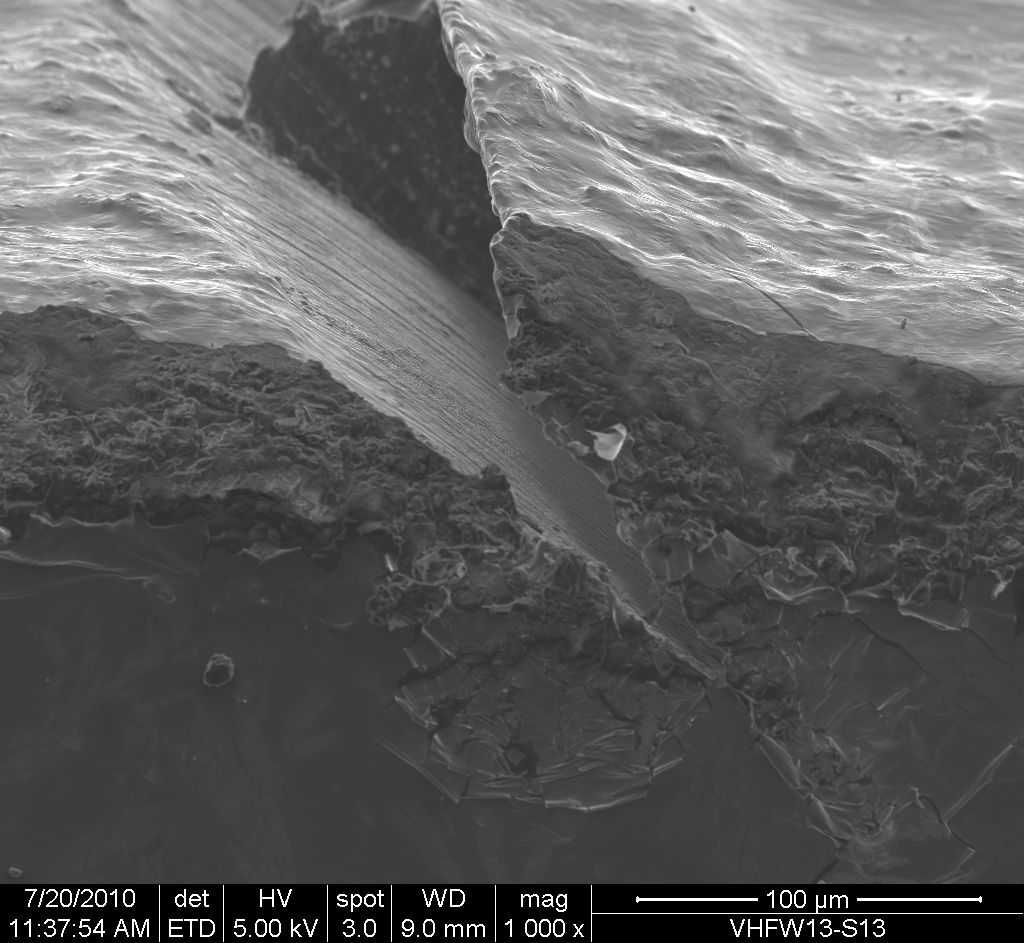
 The ends of the features also seem to be well formed. When there is a clean cut on the indenter, in this case the factory-cut end of the blade, the feature ends in a predictable way, as seen in the first image below. In the second image, the ends are less attractive, having been formed by the rough end where I snapped the blade off to get a small piece with which to indent (stock blades are 3" or so long).


Pours Made from Soft Wax Molds with Melted/Re-hardened top layer
I noticed that after melting the wax and letting it cool and re-harden it had changed color and felt easier to indent when experimenting at the macro scale. It also seemed to produce less of a compressive deformation in the surrounding area of an indentation at the macro scale. I confirmed with the manufacturer that melting and re-hardening will reduce the density of the wax as the manufacturing process is geared towards producing a dense product and what we're doing is counteracting that. Below are images of pours made in a mold created with 60 micron feature spacing and an 80 micron depth using the DDK 'toothed' blades from Surface Engineering. As you can see in sample 1 (first image), some features came out taller than 80 microns which indicated that this run did not start out with the tip of the indenter perfectly at the wax's surface. The slenderness of the features is likely due to the indentations beginning to interfere with each other at this depth. In the second two images the features are much closer to 80 microns tall and the features are much closer to the shape of the indenter. These figures show the closest packed full size (~80 micron tall) features we have been able to achieve to date. Unfortunately, due to manufacturing limitations, we still have yet to get an entirely consistent turnout across a large scale (~1cm^2) patch of indentations. While variation is small (within ~10 microns), the indentation depth varies from one end of the patch to the other due to the wax sample not being perfectly level with the tool axis. It's possible that some tricks during the melt/re-hardening phase could be used to alleviate this.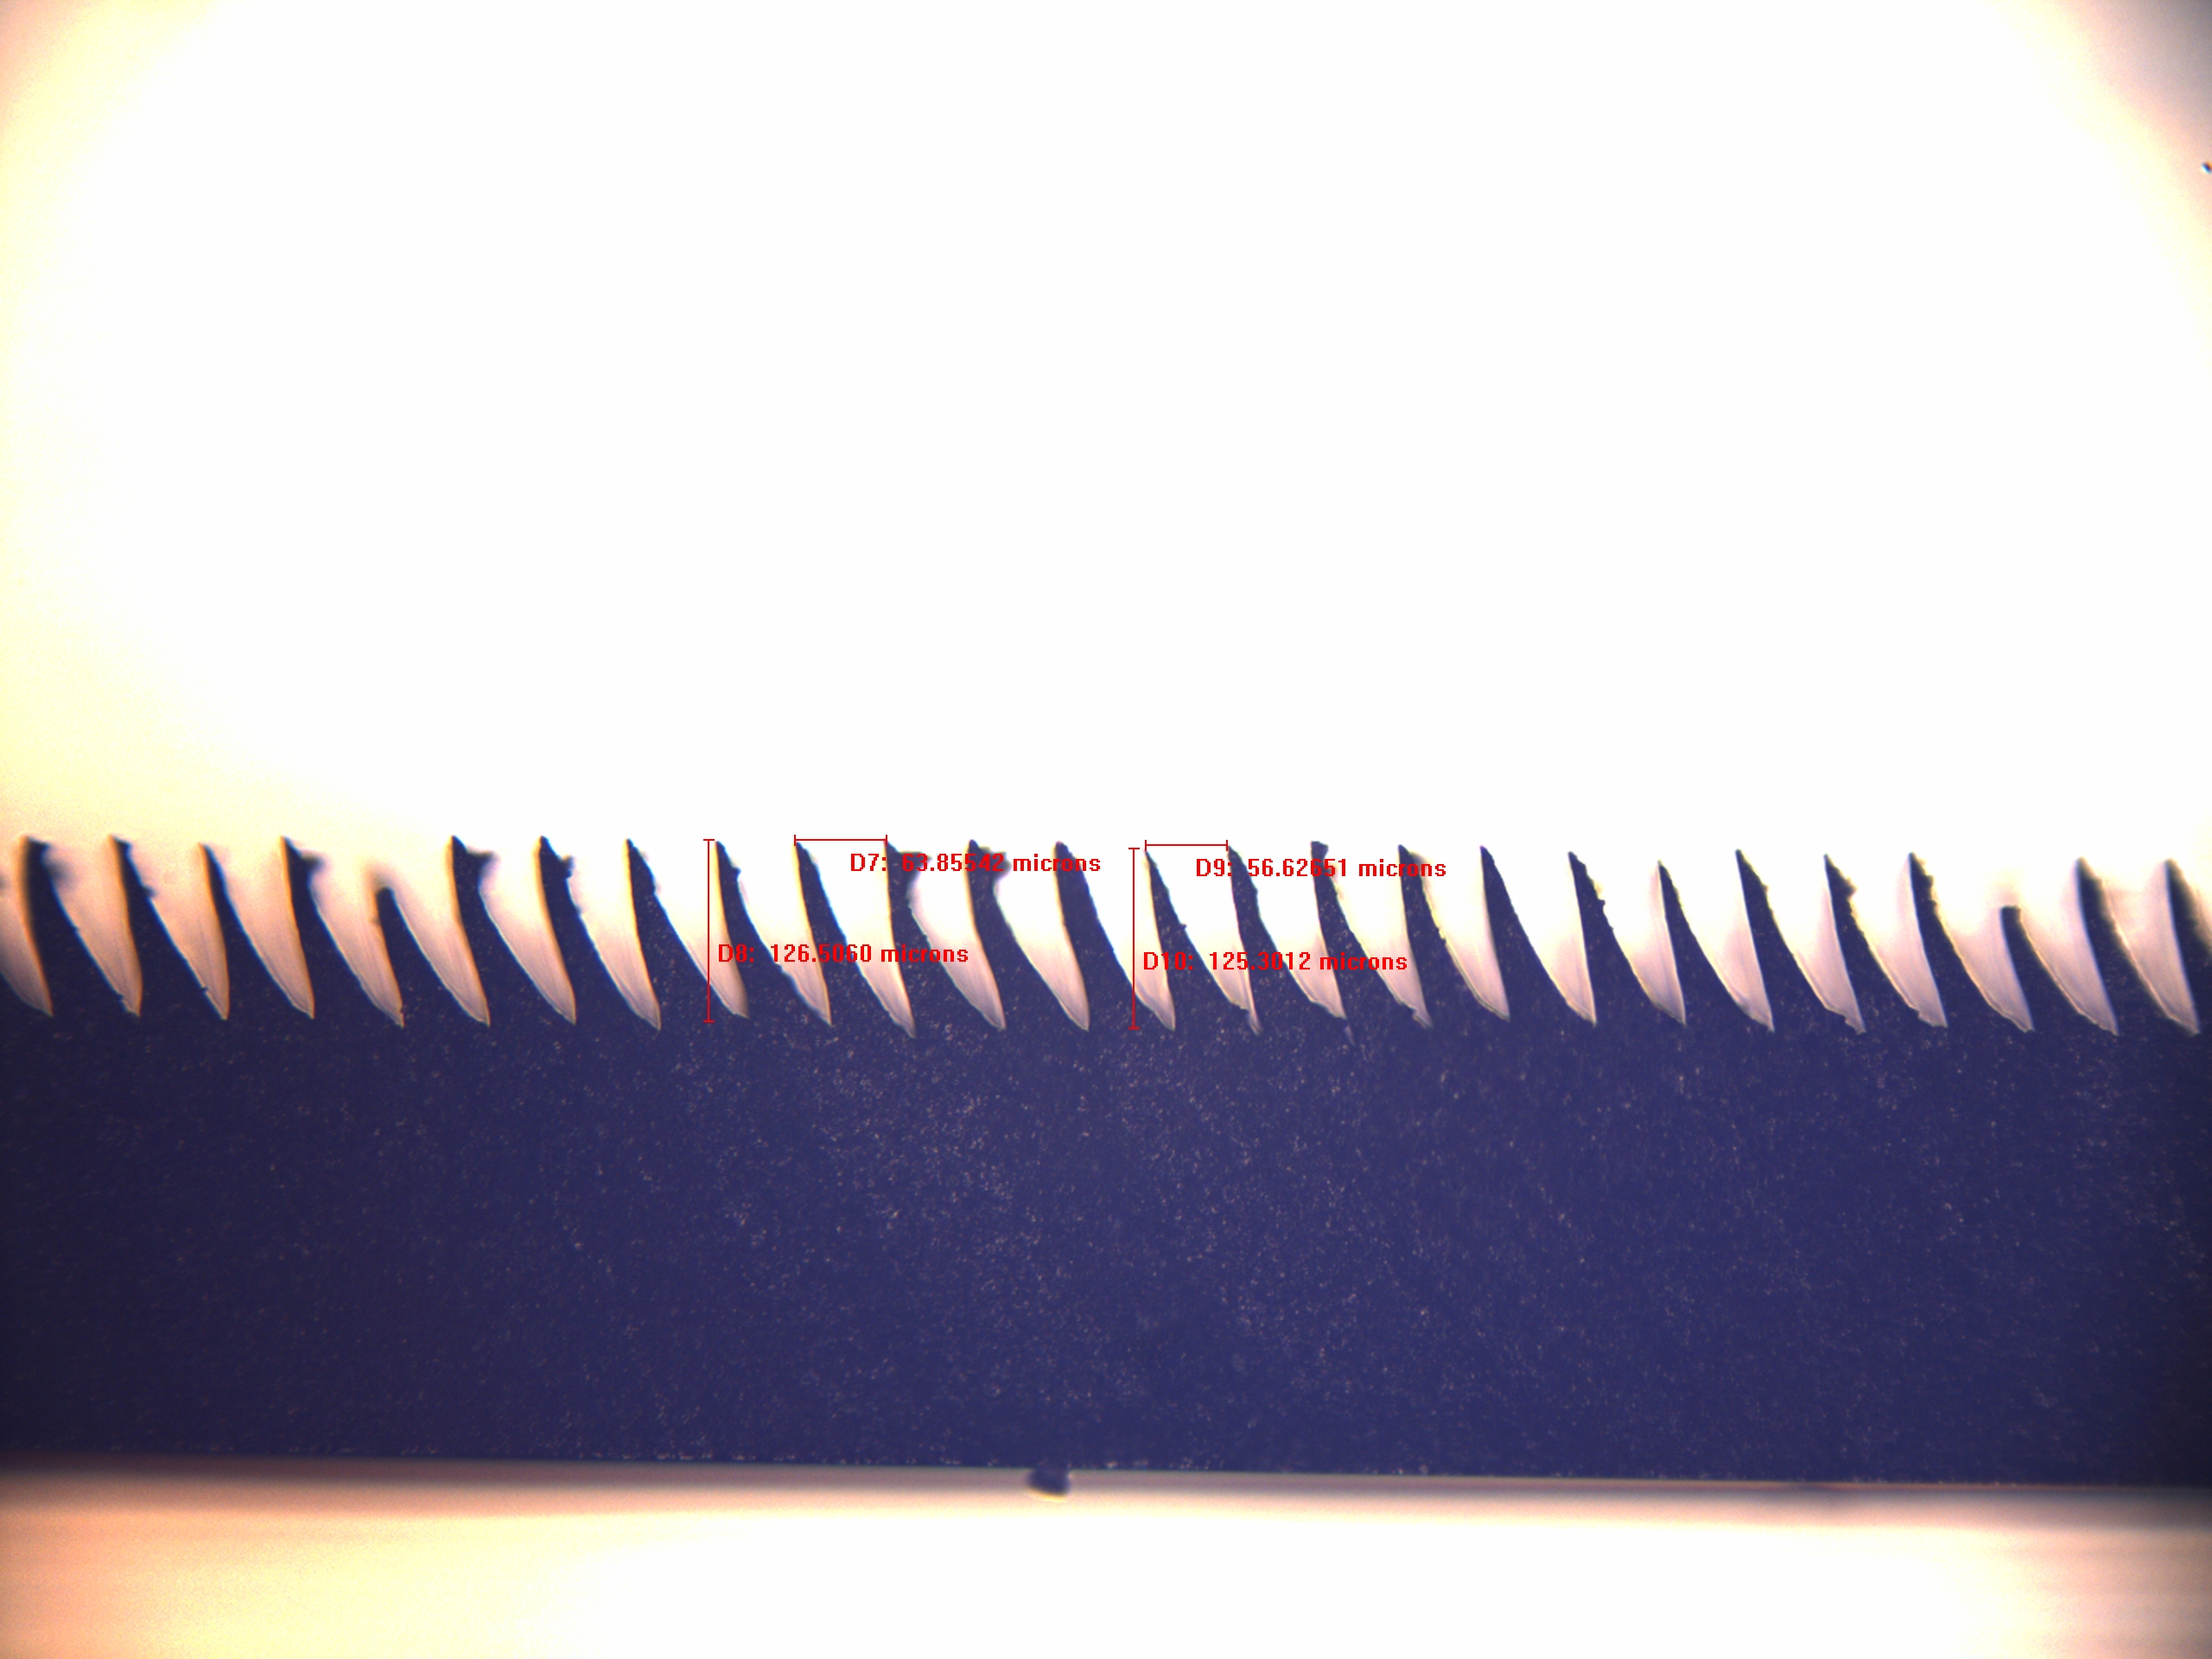

Post-Treating Indented Mold Pours
After testing a number of indented pours, the maximum adhesion they were capable of generating seemed to be topping out around 7kPa. We hypothesized that this lackluster performance could be due to the surface roughness of the features that was a result of the manufacturing process. To test this, we spun a 1-3 micron layer of PDMS (diluted with Toluene) on to a quartz wafer. After wiping clean one half of the wafer and aligning an indented sample with it, we brought the indented features in to contact with the PDMS coated half to 'ink' a small amount on to the tips of the feature. After inking, we brought the features in to gentle contact with the clean half of the quartz wafer and left the PDMS to cure. Doing this, we hoped, would leave a very flat patch of PDMS on the contacting surface of the indented feature. Below are some SEM images of the post-treated features. It can be clearly seen that the top ~20 microns of the feature are coated in a flatter (still not perfectly flat) layer of PDMS, a noticeable contrast from the rest of the feature.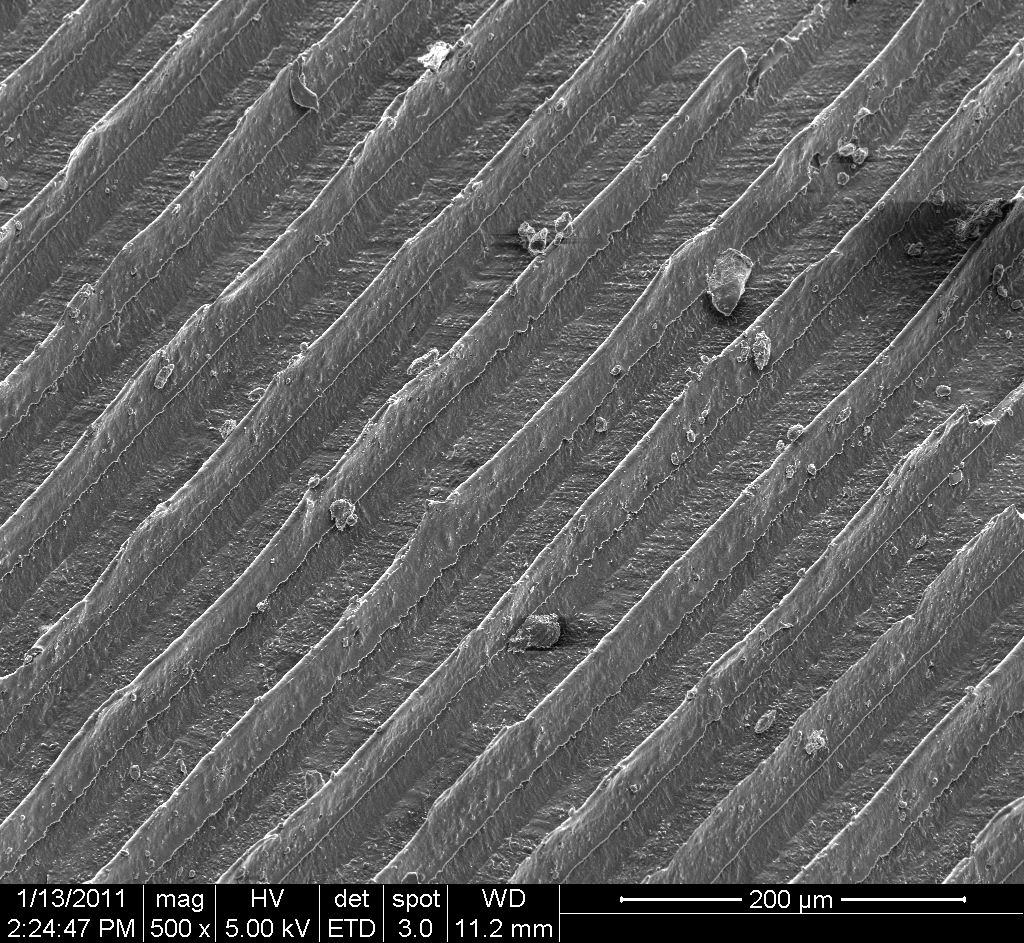
 This sample produced significantly higher maximum adhesive pressures (~100% improvement) over the non-post-treated features. Abnormal behavior (embedded cone) was exhibited at very low shear loads, so more examination of low shear behavior is necessary.
Indenters
First Generation Indenters:
These indenters were blades right out of the package. They were very sharp, with a tip radius of about 1-4um.- zoom_util_tip_meas.bmp: Close up of sharp utility blade
- zoom_razor_tip_meas.bmp: Sharp Razor Blade tip
Sharp Blades
- double_pass_razor.bmp: Result of Multiple close presses into soft carving wax
- zoom_dull_20x_150um_depth.bmp: Indentation creadted by intentionally dulle utility blade
Purposefully Dulled Blades
Because the blades seemed to be slicing through the wax as opposed to indenting a useful shape, I began dulling the blades by hand to yield a specific tip radius. Experiments with ~10um tip radius seem to yield decent results.- dull_utility_20x_150um_depth.bmp: Multiple indentations with very dull Utility blade (~20um tip radius)
- round2_20x_2_meas_crop.bmp: Zoomed indentation with Utility Blade (~10um tip radius)
- round2_20x_4_meas_crop.bmp: Zoomed indentation with Utility Blade (~10um tip radius) (2)
MIcrotome Blades
Due to the coarse edge of the straight razor blades previously used, we tried higher quality blades made for microtomes. For microtome blades from CL Sturkey, (low profile Silver), it can be seen that the edge of the blades are significantly finer than the straight razor blades used previously. The profile of the microtome blades is thicker than that of the straight razor blades. It may be possible that different manufacturers can produce blades closer to the desired thickness.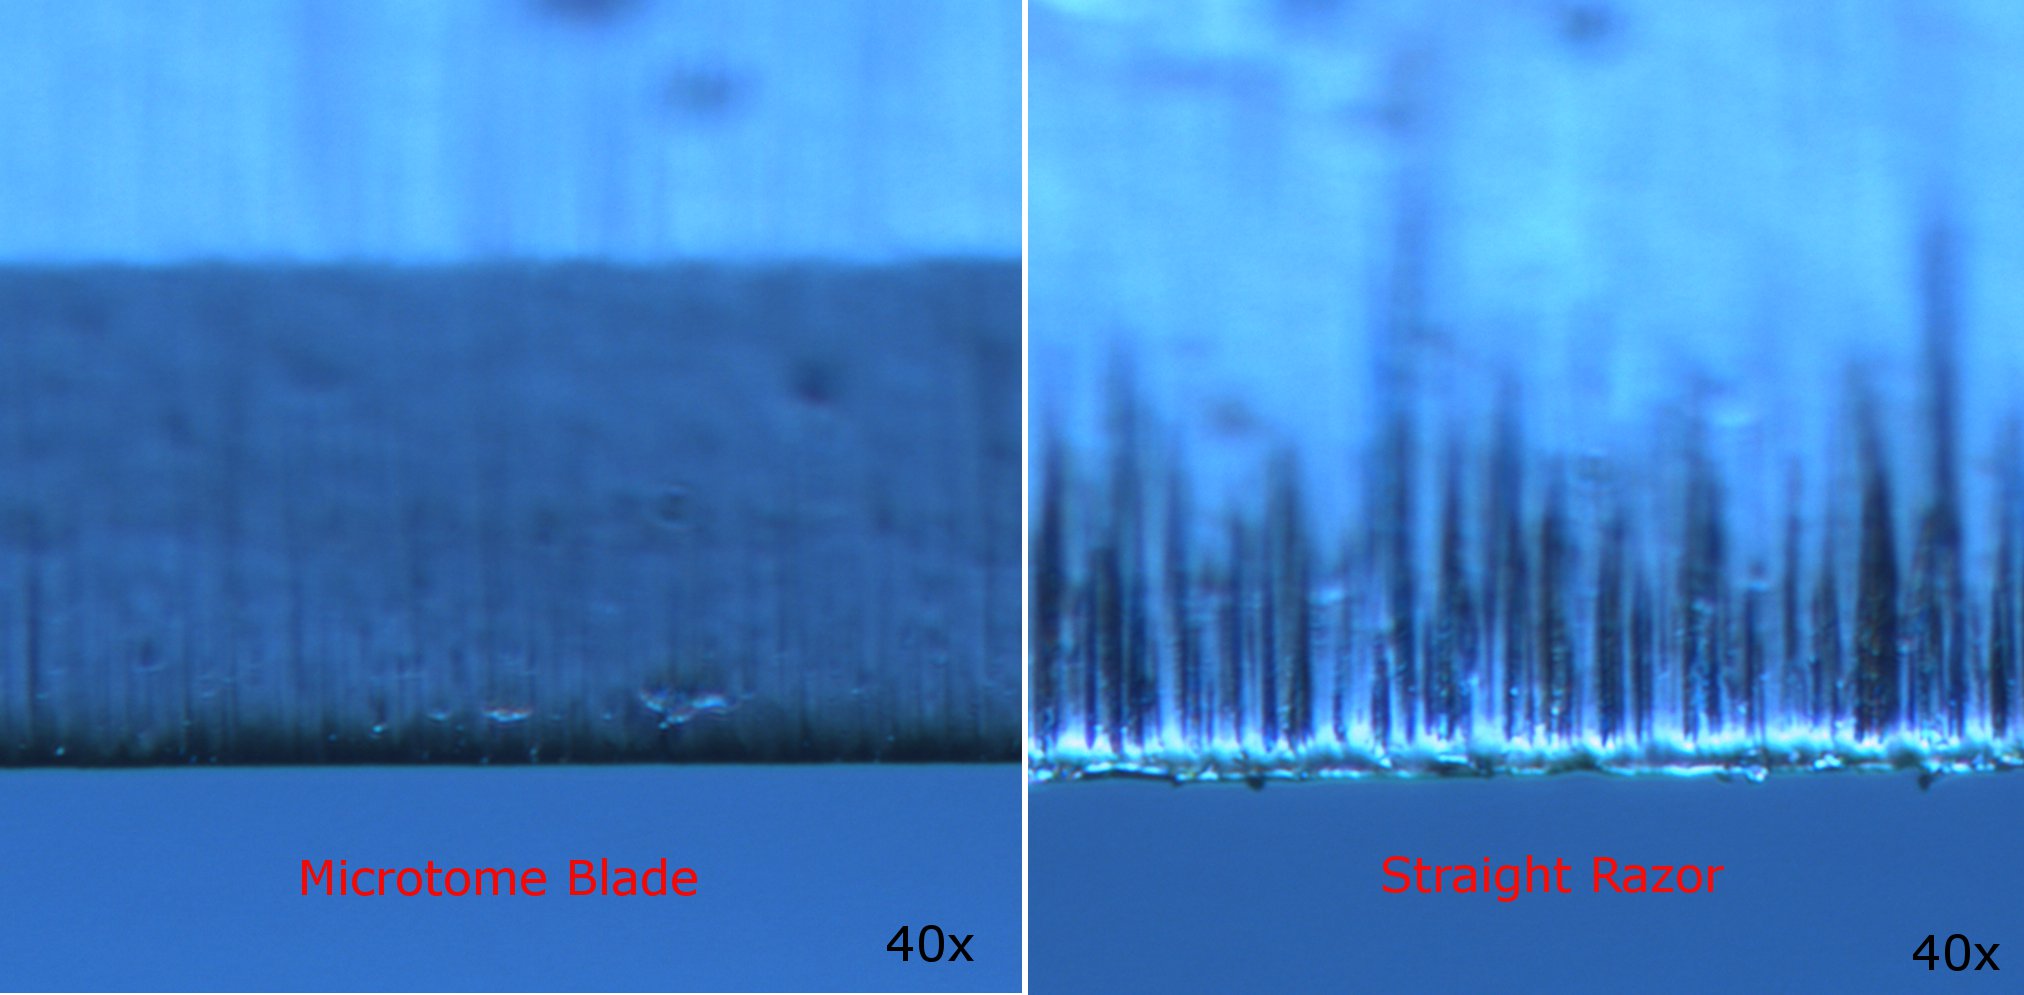
Second Generation Indenters:
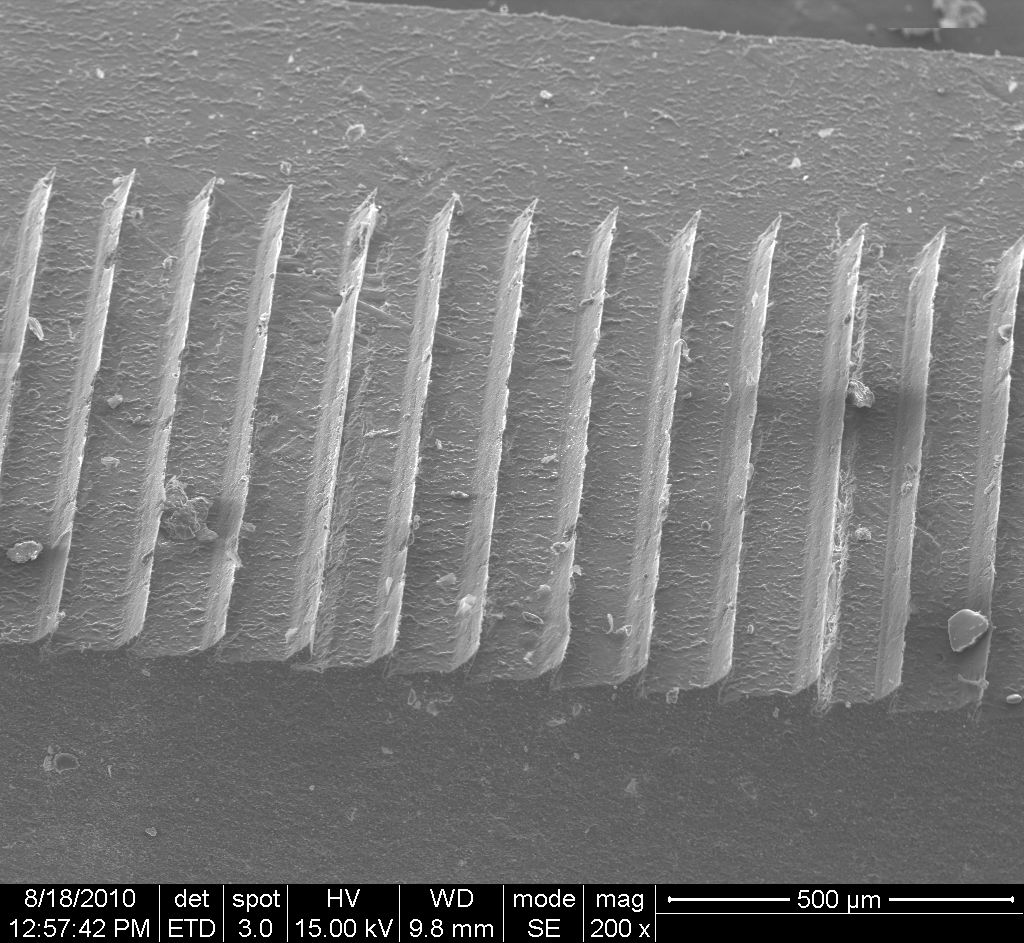
The next generation of indenters involved laser machining straight razor blades to yield individual, 500um wide squeegees as opposed to one, long squeegee. The total width of the indenter is approximately 1cm. The slots in the indenter are approximately 30um wide. Below is a picture from the machinist showing the general shape of the indenter from the top down. Machining was done by Dave Rich of Surface Engineering. (drich@surfeng.com)
Indenting on the Haas VF-0E
The Haas VF-0E in the PRL would be a much stiffer system for indenting, which will be necessary for indenting in metal and may produce better results in wax as well. Additionally, the Levil seems to have inaccuracies in its ways that show up as undulations in the surface of the wax and the depths of the indentations over large areas (>50mm), so we would like to try indenting on the Haas to see if this will eliminate these problems. Measurements were taken from the Haas to design a fixture that would allow both the steel (22 deg) and the carbide (14 deg) blades to be used: haasspindle.zip -- PaulDay - 20 Jul 2010Ideas, requests, problems regarding TWiki? Send feedback