new web: http://bdml.stanford.edu/pmwiki
TWiki > Rise Web>TWikiUsers > BarrettHeyneman>SDMPartsInSolidWorks (20 Jun 2008, BarrettHeyneman)
Creating Parts for SDM in SolidWorks
This page includes tips on how to take a part from concept to files ready to import into Unigraphics for tool path planning. Contents:Preparing for Multiple Cuts
Unless your part is relatively simple (in which case you can skip this section), you will probably need to make multiple cuts. This would include the initial cut, any subsequent cuts required for pouring different polymers, and any final cuts needed to post-machine the finished product before removing it from the wax (like drilling holes). One option is to simply make your part and try to manipulate the tool path directly in Unigraphics. This can be difficult and has much higher potential for error, so try at your own risk. The other is to create the cuts themselves in SolidWorks and use each to create a different tool path. At this stage there isn't anything concrete to say. You will need to think through how your part will be made, keeping in mind that the HAAS must machine on the z-axis (perpendicular to the surface of the block) and that any polymers you pour will fill to the top of the molds (unless you create inserts or other fancy techniques ADD LINK HERE). Once you've laid out the cuts that will be required, create parts in SolidWorks for each of those cuts. One good way to check that you have what you want is to create an assembly of all the cuts and make sure they fit together as you expect.Creating a Mold
Creating a mold is relatively straightforward, once you have a part.| For the following example we'll use this part; a square plate with a pin in one corner and a cylindrical extrusion in the center. |
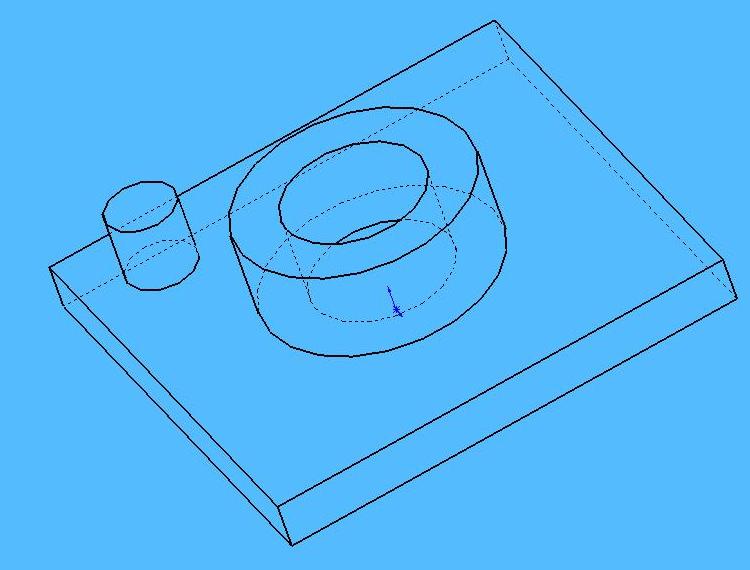
|
|
1. Get a wax block part file, found here (or create your own 12"x12" extrusion a few inches thick).
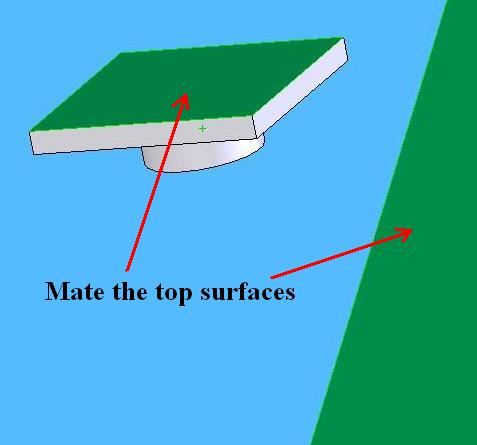
2. Create a new assembly, and insert both the wax block and your part file. 3. Mate the top surface of the block and the top surface of your part (green surfaces in the picture), so that the part is inside the block. 4. Move the part to where you want it; leave ~1cm from the edges. It's also a good idea to look at the actual block you will use to see if there is a good spot for your part. You may want to leave more room from the edges and between parts for deeper parts, as you'll need that room to chisel them out. |
|
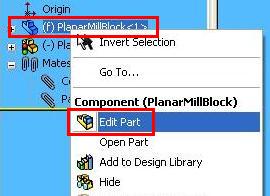
| 1. Right click on the wax block and select Edit Part. You will be prompted to save the assembly if you haven't already. |
|
|
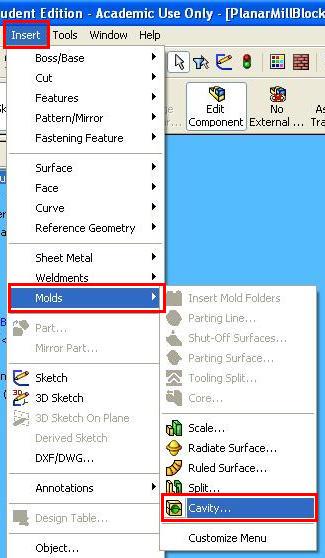
1. Select Insert->Molds->Cavity..., this will let us insert a mold of our part into the wax block
2. Click on your part; usually this is easiest in the tree view in the top left of the workspace. 3. Select File->Save As... and save the wax block (not the assembly) as a STEP203 file. 4. Rename the file as a .stp not a .step, which will now be ready to import into Unigraphics. |
|
Ideas, requests, problems regarding TWiki? Send feedback