OceanOneK Hand
The motivation comes from the harsh environment underwater and the robot's need for sensing. Currently, OceanOneK is equipped with a tendon-driven underactuated hand to perform grasps and is teleoperated by human operators on the boat. When performing grasps the human operator can only gain information from the RGB cameras mounted on the head of the robot. Two challenges during this process:
- The human operators cannot precisely localize the object based on vision (have a sense of whether the hand is in contact with the object)
- The human operators often need to deploy different forces to different objects but missing force feedback.
My plan consists of:
- Design and fabricate the tactile sensor (analyze and iterate using finite element methods)
- Develop machine learning methods to interpret the raw sensor signal to forces
- Provide force feedback to human operators
7.29 to 8.12
Meeting Notes:
- More experiments with FBGs
- Change the material of the tubing: Nylon
- Improve joints
Questions:
Material and Making:
Still waiting for FBGs to do more experiments
- Tube Materials:
- PTFE: clear and able to slide in the tunnels created by super glue, but not sticking to any part of the finger
- PVC: sticks easily to the ring, and can be peeled off from the skeleton if connected with silicone glue. Don't have a clear tube currently, can't observe anything inside.
- Nylon tube: too big for individual finger, might be useful for protecting all fibers together.
Design:
- How to prevent excessive joint twists and inserts from being pulled out?
- Thicken the side of joints.
- Print with bigger holes and use Pull-Out Resistant inserts
- Should I thread the tendon in before casting the skin or after?
- Before casting: Easy to thread, but difficult to cast and will create an extra hole in the skin.
- After casting: Easy to cast, but difficult to thread.
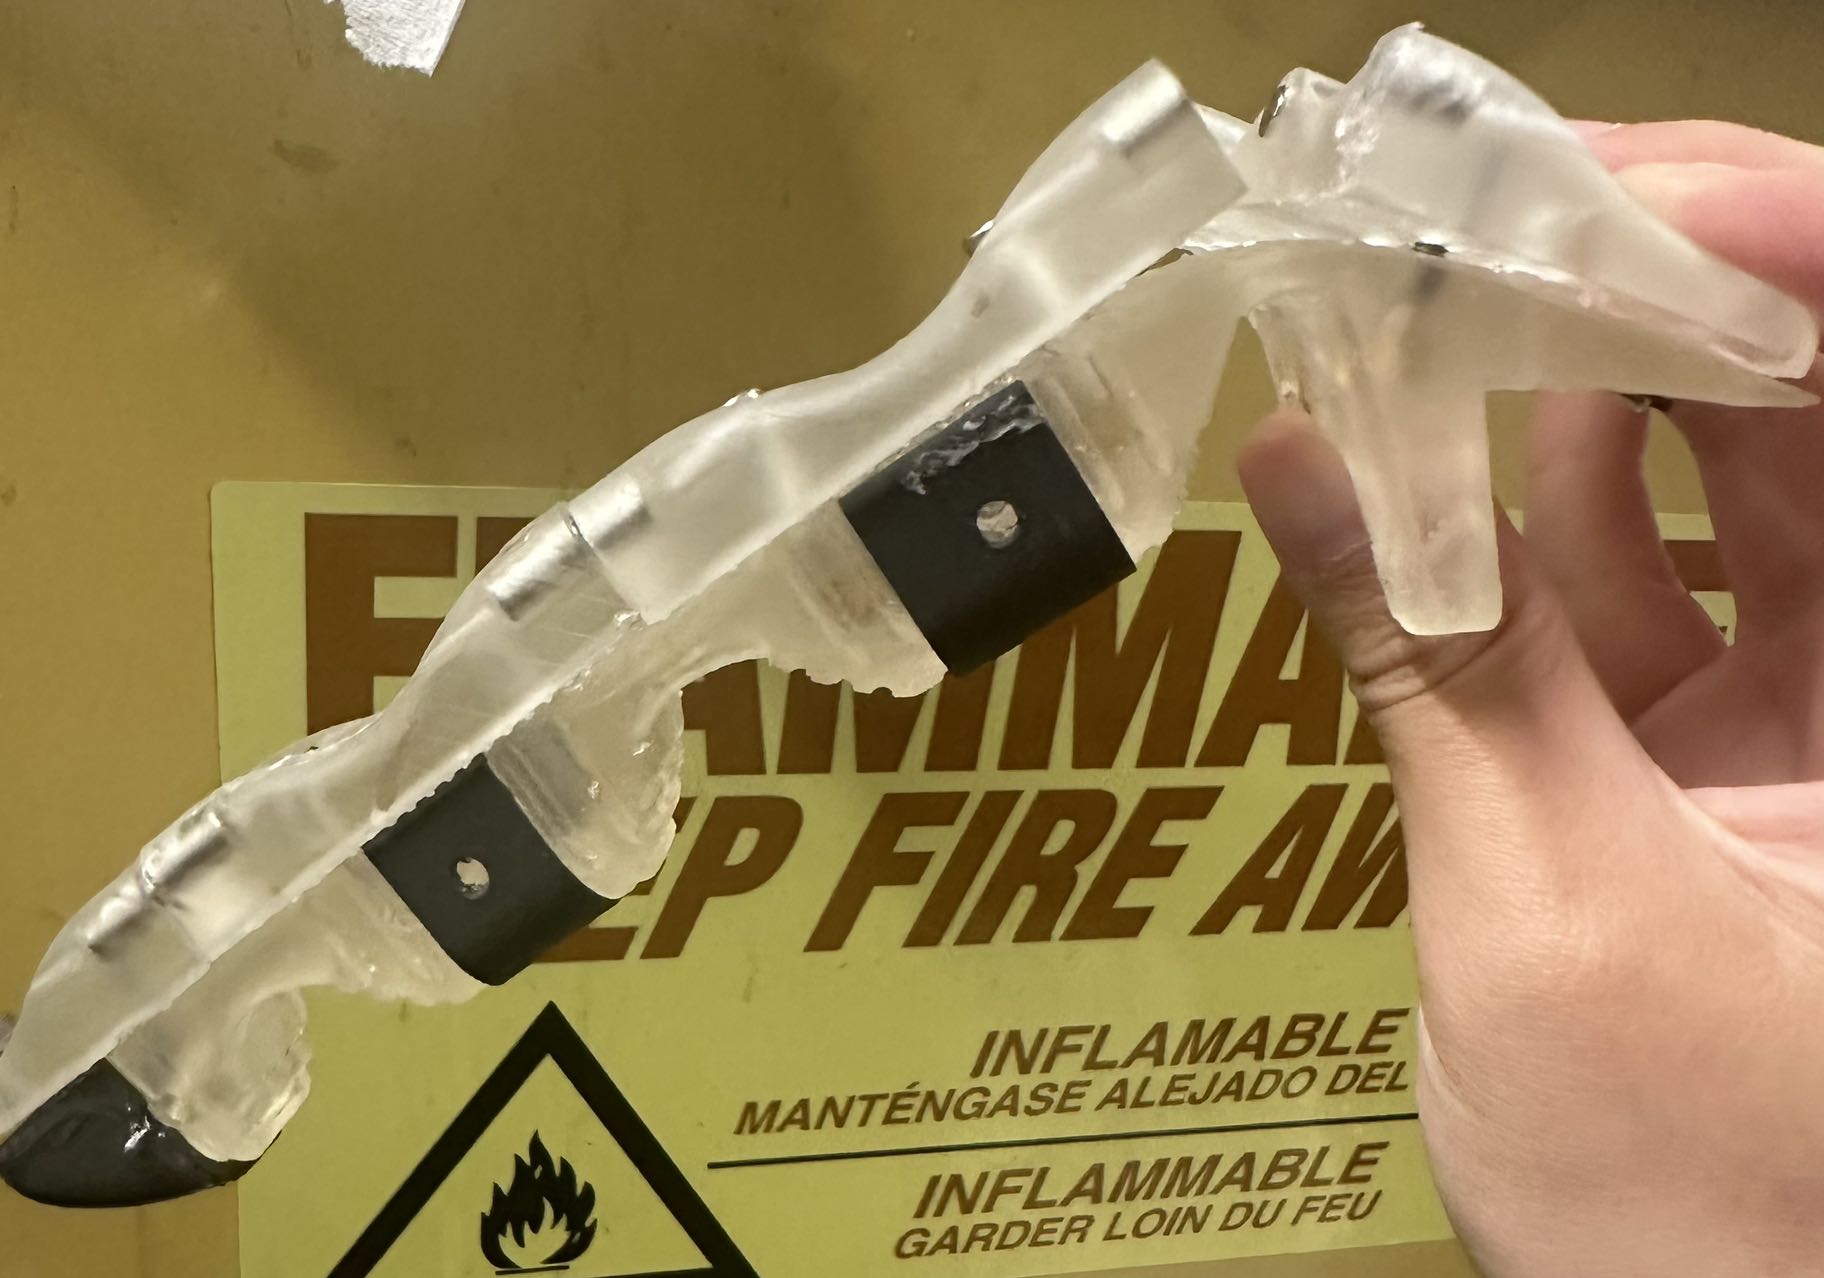
- How to make sure the weakest joint springs back in all conditions?
- Thicken the joint (tried with the newest version)
- Add nitinol back
- Ask the operator to swing a little
- Is the bridge necessary?
- Not sure about the influence of fiber fixing with tube and glue/rubber filling in the tube. Might or might not break the fiber.
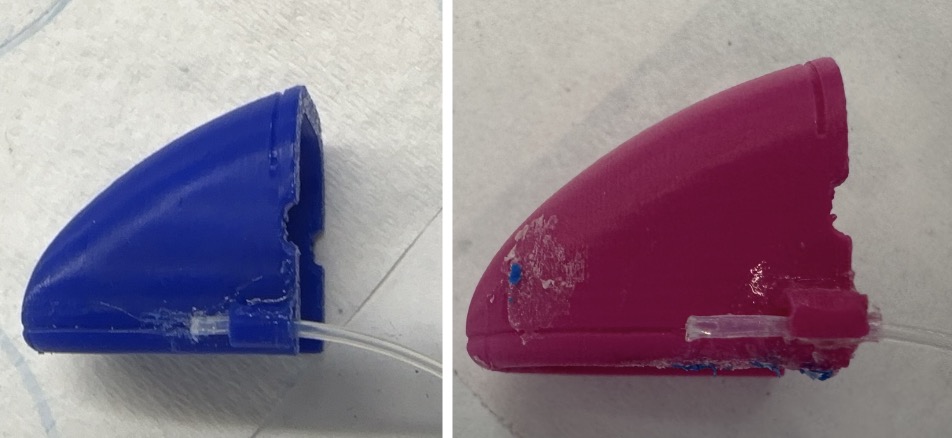
Current Progress:
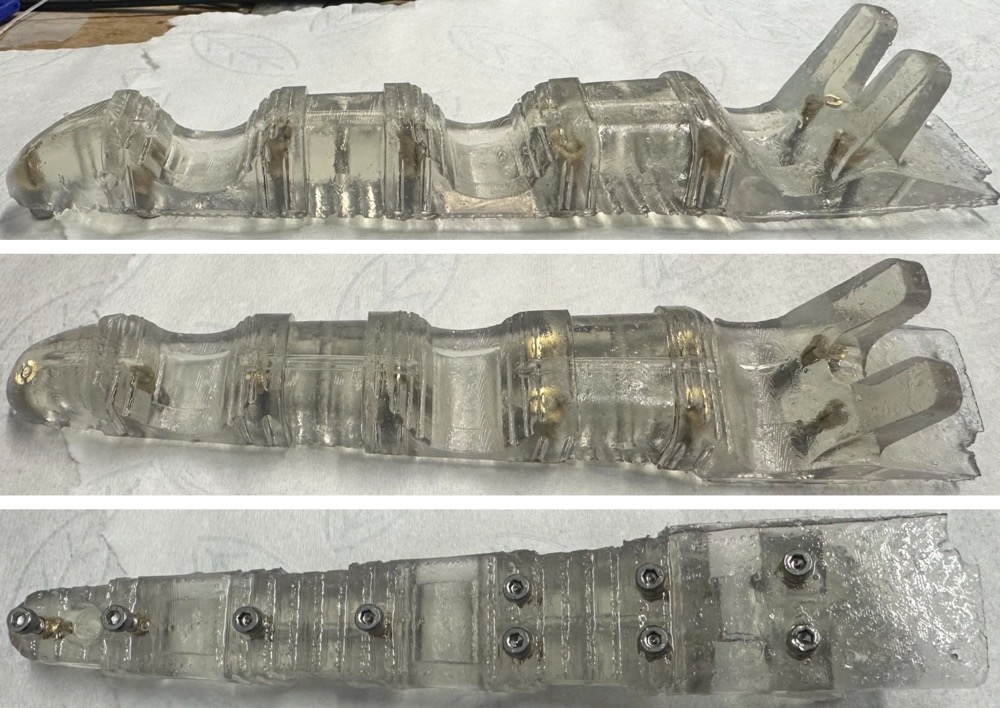
Latest Endoskeleton
Improved Skeleton
- Thicker joints with anti-twist walls
- Deeper groove in skeleton
- Harder material - Elastic v2 55A
- Pull-out resistant inserts
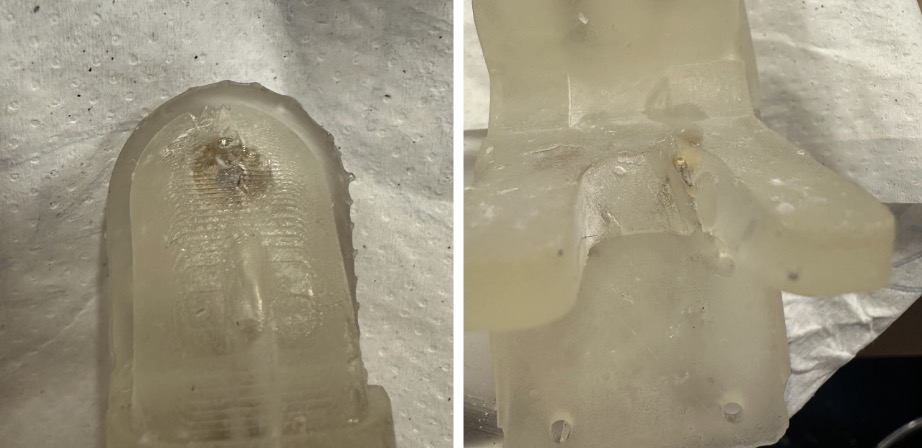
- Almost perfect but I accidentally broke the corner after printing :(
- Falied Experience: Unlike regular inserts, the hole size for new inserts must be at least drill size (4mm), or it will break the resin after post-cure.
Improved Mold
- Thicken to fit the new joints
- Delete injection holes, use bolt place to inject and end gap to vent -> try to reduce bubbles, because fiber can’t fit in the degasser with mold
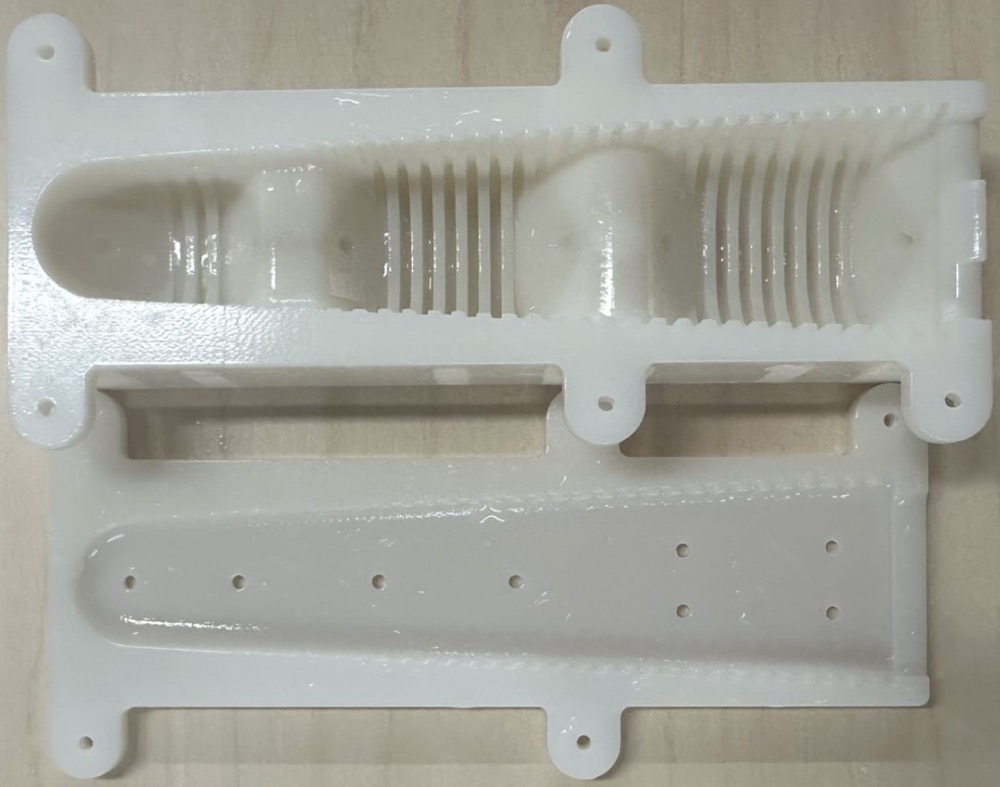
Experiment:
- Tested with 2 ways of curing and 4 different types of inserts.
- Winner: insert before post-cure and Brass Screw-to-Expand Inserts for Through Holes in Plastic
- Post-cure then put the insert in with some resin and post-cure again
- All ended up displacing or spinning
- 1 failed to insert: nut

- Insert before post-cure
After heavily over-screwing
- 2 came out
- 1 displaced
- 1 survived - bolt will break the resin and keep going

Better Making Procedure:
- Use Nitinol to straighten and keep the tube’s inside space in shape before and during the assembly.
- Current tubes: Chemical-Resistant Tube Sleeving 0.027" and 304 Stainless Steel Tubing Miniature, 0.022" OD

- Falied Experience: Using accelerator for 401 glue will release heat and might deflect PLA when applying a lot of glue (apply as little glue as possible, 401 works well on PVC)
- Finalized assemble order

Step 1

Step 4

Finished
Assemble Order:
- Put the ring on and tube on top (use screws to secure ring place)
- Use a drop of glue in 2 proximal ring grooves to stick the tube
- Take the ring out and fill any edge gap if needed to avoid gluing with skeleton
- Apply silicone glue to the whole tube except the part connecting with the distal ring
- Stick the steel tube to the right place on the fiber
- Thread the fiber in and glue on the distal ring
- Close the bridge and seal both ends to avoid rubber leaks in casting
Latest Version:

Latest Endoskeleton with Rings, Cable, and Fiber
7.15 to 7.29
Meeting Notes and Tasks:
- More interesting 3D material
- Add to palm
- Thicken the joint and/or insert nitinol wire to help spring back
Questions:
Material and Making:
- Current material: 3D print endoskeleton - Elastic 50A Resin Family Comparison
- How to glue the tube to the skeleton?
- Find tubes made with other materials instead of PTFE
- Use skin to cast it in and stabilize it
- Skin Material Choice: need more experiments with fibers on
- Vytaflex 20: softer better sensing
- Vytaflex 30: stronger
Design:
- How should the FBGs be located on the fiber?
FBGs on all parts, only distal FBGs are fixed, proximal FBGs slide in the groove - How to prevent excessive joint twists? (from Rachel)
- Thicken the sides of the joint
- Redesign the joint only connected on the side but hollow in the middle
- How to avoid inserts being pulled out when screwing?
- Print with bigger holes and use nuts/Pull-Out Resistant inserts
- Drill through the front and connect the nut to the shell (Plan B)
Current Progress:
Endoskeleton Design
- With all rings embedded nitinols (optional) and thicker joints (from 4.5 - 3.75 - 3.2 to 5.4 - 4.5 - 3.4 unit: mm)
- Shorten distal bolts from 10 mm to 8 mm.
- Insert a steel tube for FBG which senses the temperature effect
- Move the center cable tunnel downward to avoid endoskeleton tearing during pulling
- CAD Link

New Endoskeleton Design
Flexible 80A endoskeleton with Nitinol wire: too strong to pull and still has hysteresis
Endoskeleton without Nitinol and rings

FBGs’ position in red
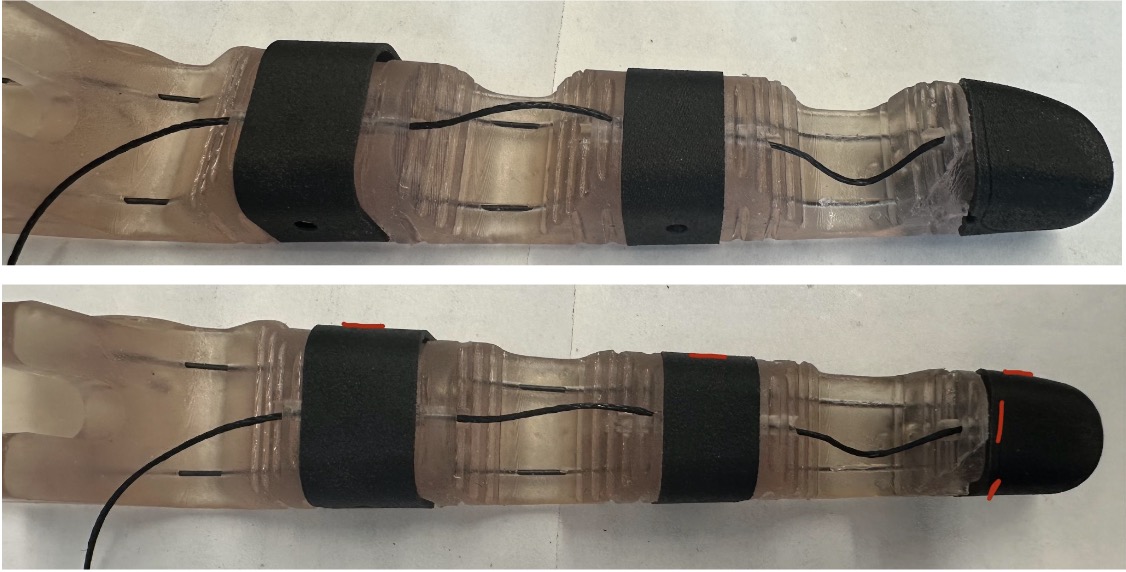
Thin Tunnel Printing Test:
The tunnels for Nitinol wire need to be printed to insert the nitinol into the endoskeleton. Drilling will be difficult after printing.
Tilt the model at least 30 degrees to print tunnels with 1.5 mm diameter. Flat printing will result in the remaining resin filling in any tunnel under 3 mm diameter. The relative position of the tunnel (closer to the top or bottom) doesn’t matter that much

Elastic 50A V1 endoskeleton: very elastic, springs back quickly to the original shape
Do not use any glue that is not flexible; 401 super glue caused the joints to crack

Need to face down during post-cure or the bolts will keep it in a bending shape. But it will still work after attaching the shell with magnets
FBGs’ position in red, steel tube in yellow
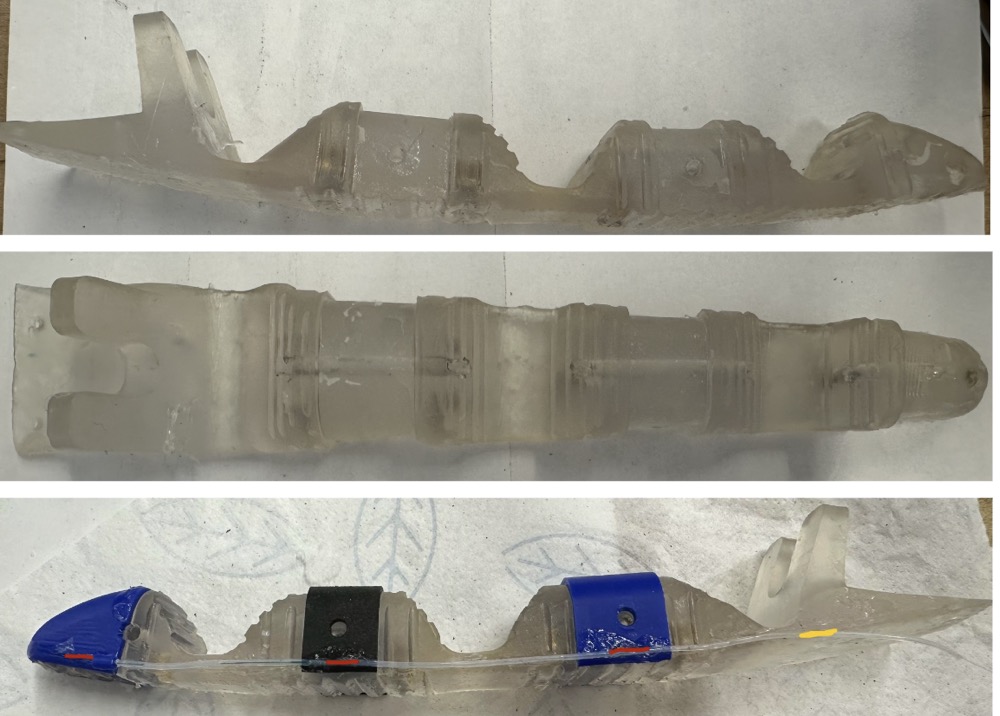
Latest Endoskeleton with Rings, Cable, and Fiber
PTFE Tube insertion:

Ring after step 2
- Open the bridge and put the tube in
- Apply glue on, close the bridge, and wait until hardened
- Drag the tube back to the middle
- Seal both ends with super glue to avoid urethane leaking during casting
Improved Insert Install Procedure:
- Don’t need to clean the remaining resin in the hole after printing.
- Screw the bolt in the insert first to avoid over-screwing that pulls the insert out.
- Push the insert down to the bottom of the hole
- Post-cure at 60 °C for 20 minutes

Inserts after post-cure
Confirmed FBG locations (from finger tip’s top,“--” is FBG, distance in mm)
FBGs’ position in red, steel tube in yellow
Type 1:
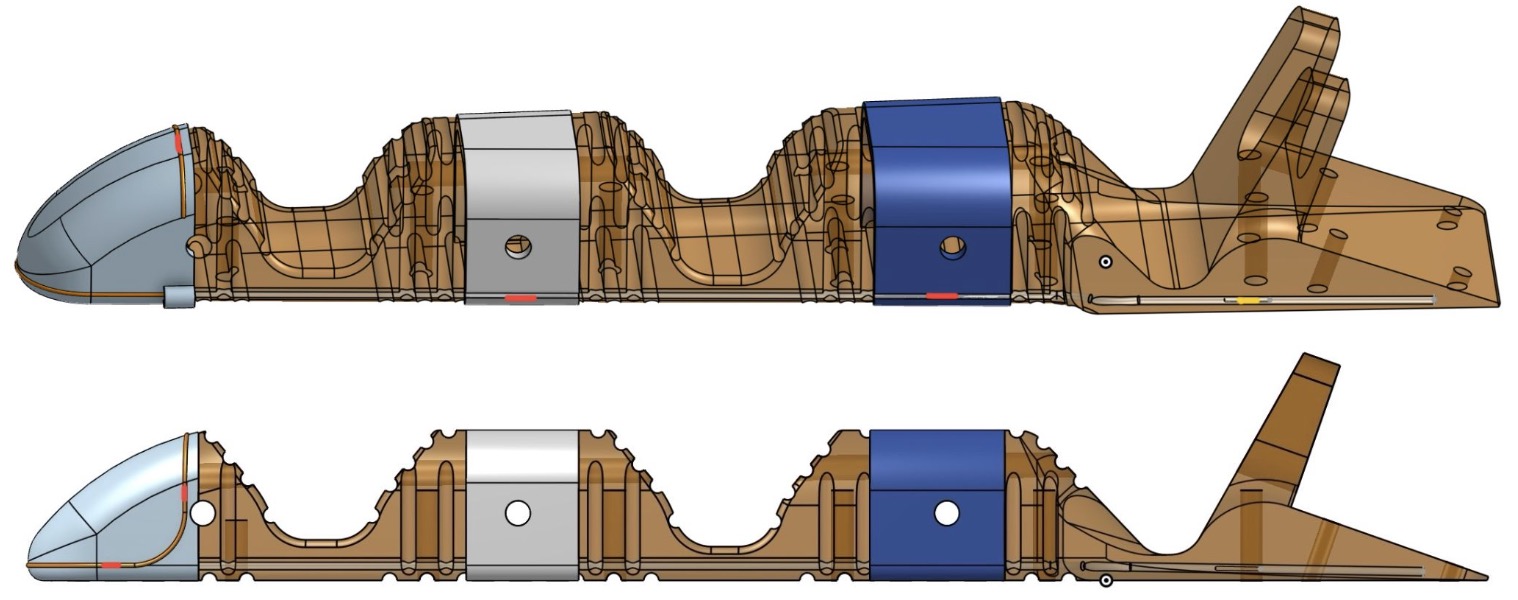
- -- (8.43196/2) + 2 + 9.576 -- 2 + 45.045 + 5.607+ 2.5 -- 2.5 + 46.40855 -- 55.563 -- 15.297 + 22.316 + 3
- --15.791 -- 55.152 -- 48.908 -- 55.563 -- 40.613 --
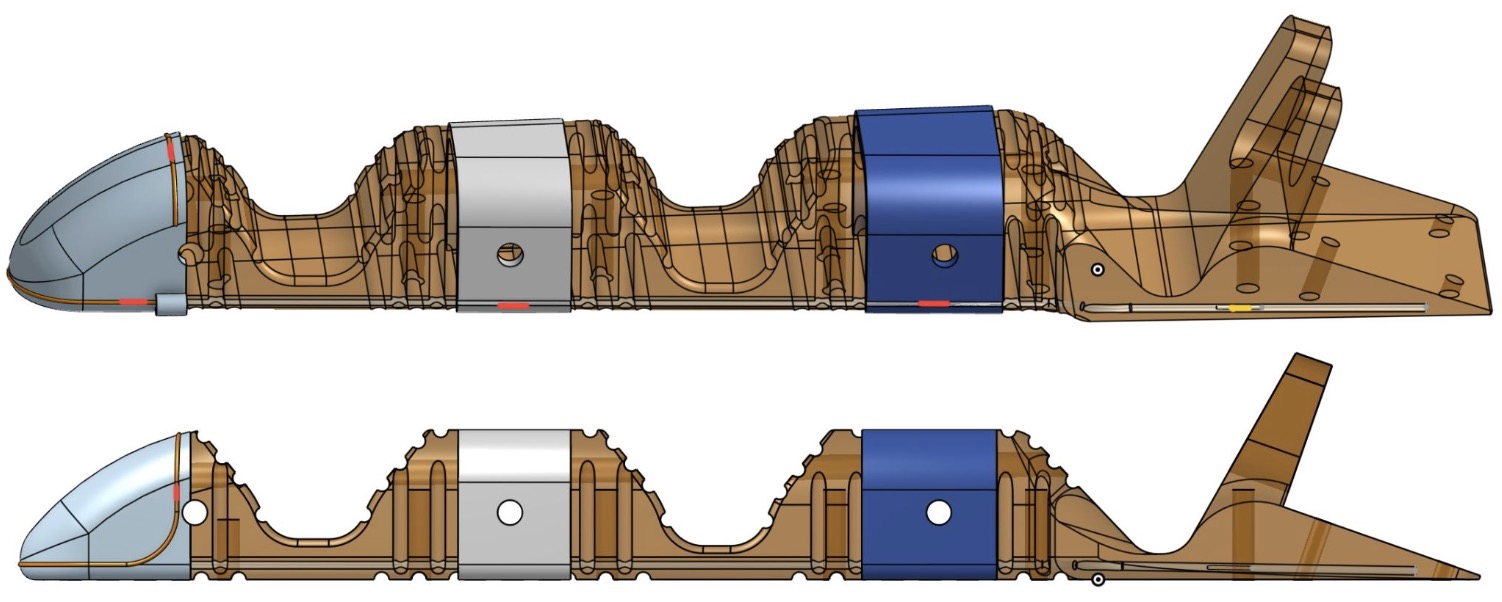
Type 2:
- -- 15.791 -- (5.089/2)+ 2 + 10.773 -- (5.089/2) + 42.79003 + 43.413 -- 55.563 -- 40.613 --
- -- 15.791 -- 15.318 -- 88.747 -- 55.563 -- 40.613 --
New Molds:
- Skin: modified the overall thickness, shapes, and cable position.
Potential improvement: Seal the hole on the top, the cable screw cannot go through the last hole with ring on. Move the cable tunnel slightly upward to thicken the skin on top.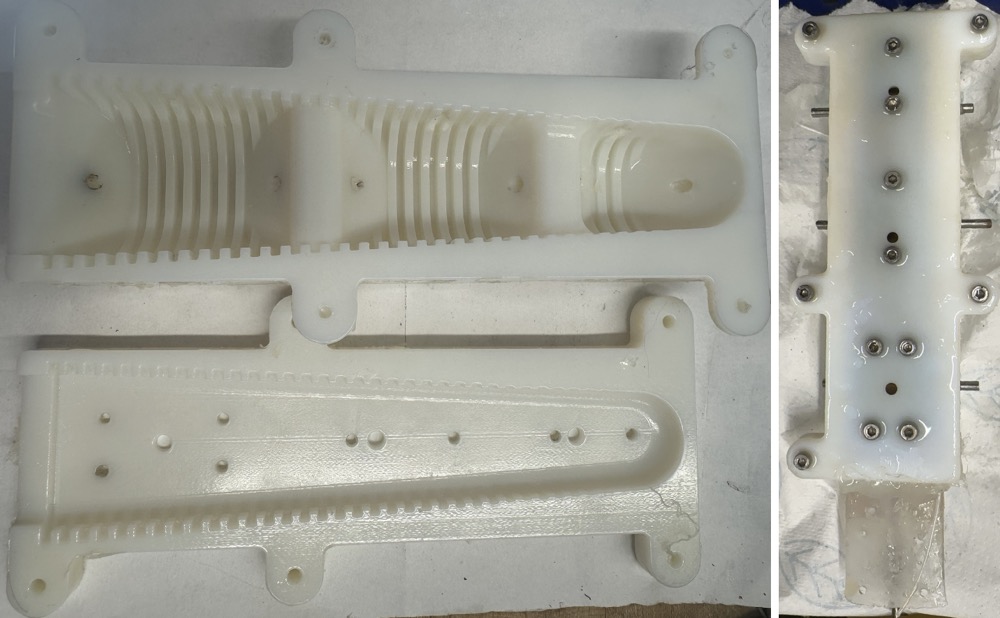
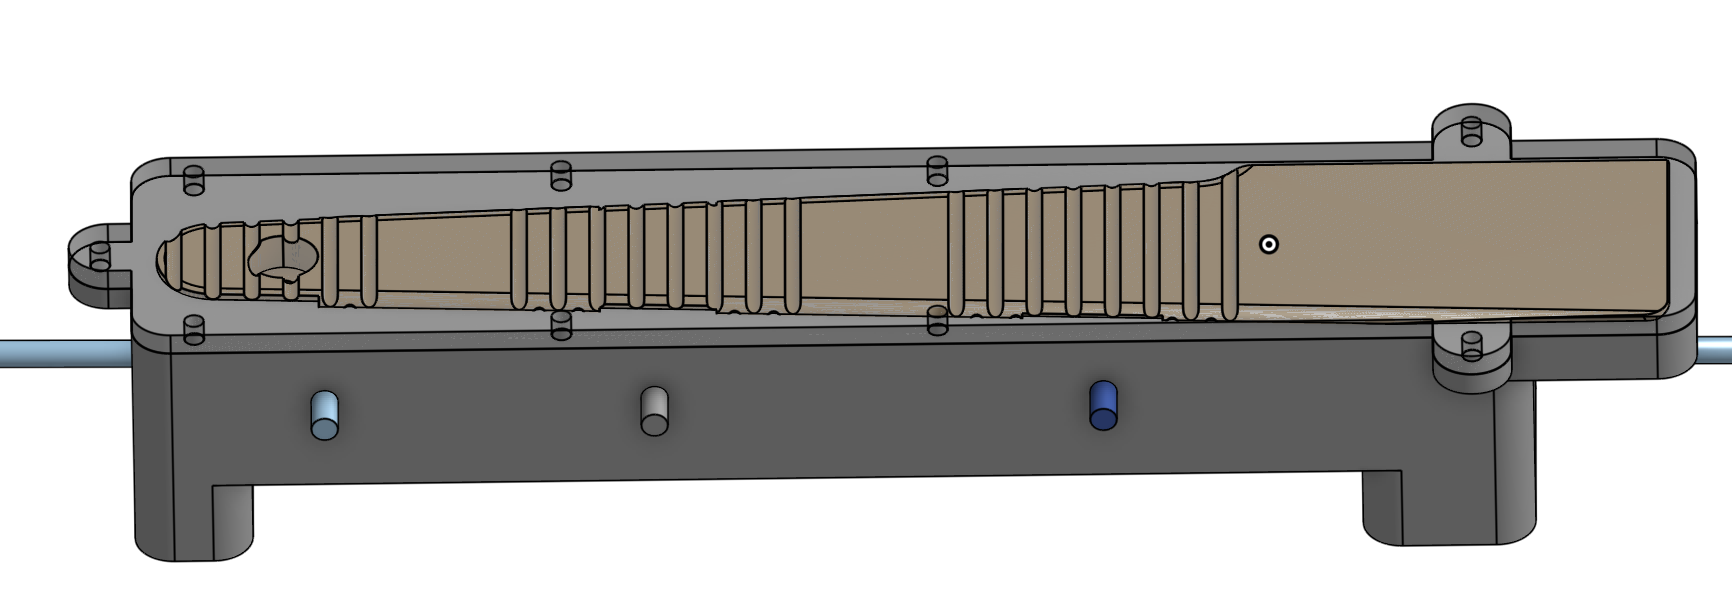
- Endoskeleton: Backup plan if we need to cast with PMC780 in the future.
Skin Cast:
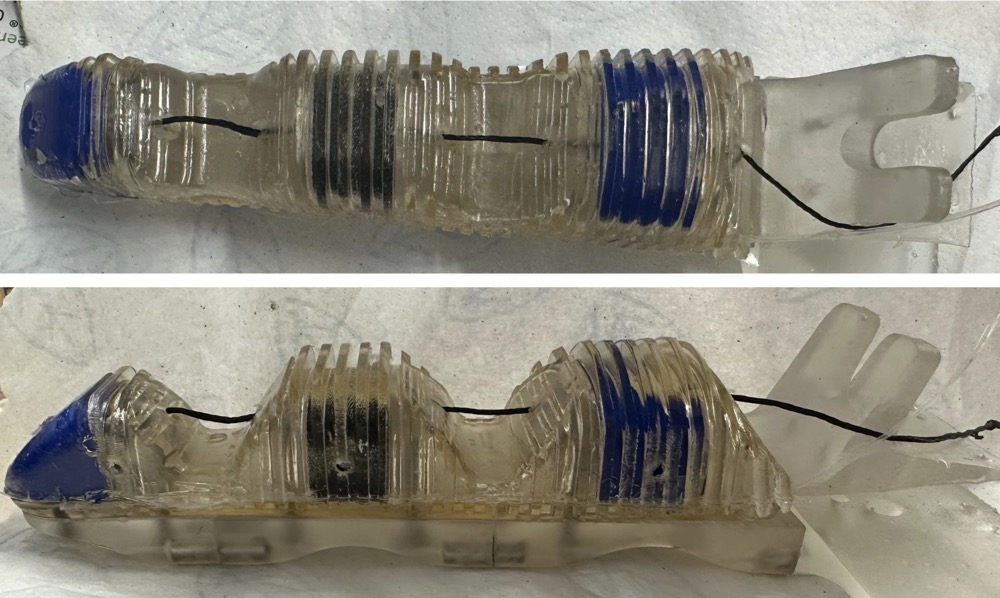
- Vytaflex 30: Tried with injection only and degasser during casting. More bubbles than the previous method, and too much overflow during casting. Nice on the back.

- Vytaflex 20: Nice clear view. Should thread the tendon in before casting to avoid peeling the skin off after casting. Get pushed too much forward in the mold for not being able to see the cable screw with the ring on. Can mark the screw next time to improve the thickness on the tip.
Experiment:
- Tested with 2 FBGs on the distal part, the ring design will help reduce the effect of tendon pulling and still preserve the sensitivity to contact.
- Pressing the second part with the skin will have a weak signal. Without skin, there will not be any signal for other parts.
- Pulling and contact at the same time is a little bit hard to distinguish manually. Might be able to tell after machine learning. Also, flexible 80A needs much stronger force to pull, and the result might be better with elastic 50A.
- Experiment Videos in Presentation Meeting 3
Purchase List:
- Inserts:
- Barbed Inserts for Plastic Brass M3 x 0.50 mm Thread 5.5 mm Installed Length
- Barbed Inserts for Plastic Brass M3 x 0.50 mm Thread 3.4 mm Installed Length
- Barbed Inserts for Plastic - McMaster
- 18-8 Stainless Steel Twist-Resistant Hex-Shaped Inserts for Plastics M3 x 0.5 mm Thread Size
- Stainless Steel Twist-Resistant Hex-Shaped Inserts - McMaster
- Brass Screw-to-Expand Inserts for Through Holes in Plastic M3 x 0.50 mm Thread Size
- Screw-to-Expand Inserts for Through Holes in Plastic - McMaster
- Tubes:
- Wear-Resistant Nylon Tube 1/16" Wall Thickness 1/4" OD 1/8" ID 5 Feet Long:
- Wear-Resistant Nylon Tube - McMaster
- Chemical-Resistant Tube Sleeving 0.022" ID for 24 Gauge Wire 10 ft. Length
- Chemical-Resistant Tube Sleeving 0.027" ID for 22 Gauge Wire 10 ft. Length
- Chemical-Resistant Tube Sleeving - McMaster
- 304 Stainless Steel Tubing Miniature 0.028" OD 0.004" Wall Thickness 1 ft.
- 304 Stainless Steel Tubing Miniature 0.02" OD 0.002" Wall Thickness 1 ft.
- 304 Stainless Steel Tubing Miniature 0.022" OD 0.003" Wall Thickness 1 ft.
- 304 Stainless Steel Tubing - McMaster
7.1 to 7.15
Meeting Notes and Tasks:
- Need to check the optical fiber in the arm
- Keep Vytaflex 20 and use the UV-resistant pigment (Clearflex is hysteresis and toxic)
- Find possible way to 3d print the endoskeleton
- Better skin cast
- Test out fiber location in finger
- Start experiment
Purchase list:
- Steel rod x2
- Pmc 780
- Vytaflex 20
- Smooth on universal mold release
Questions:
Material and making: Possible 3D printing material for the endoskeleton
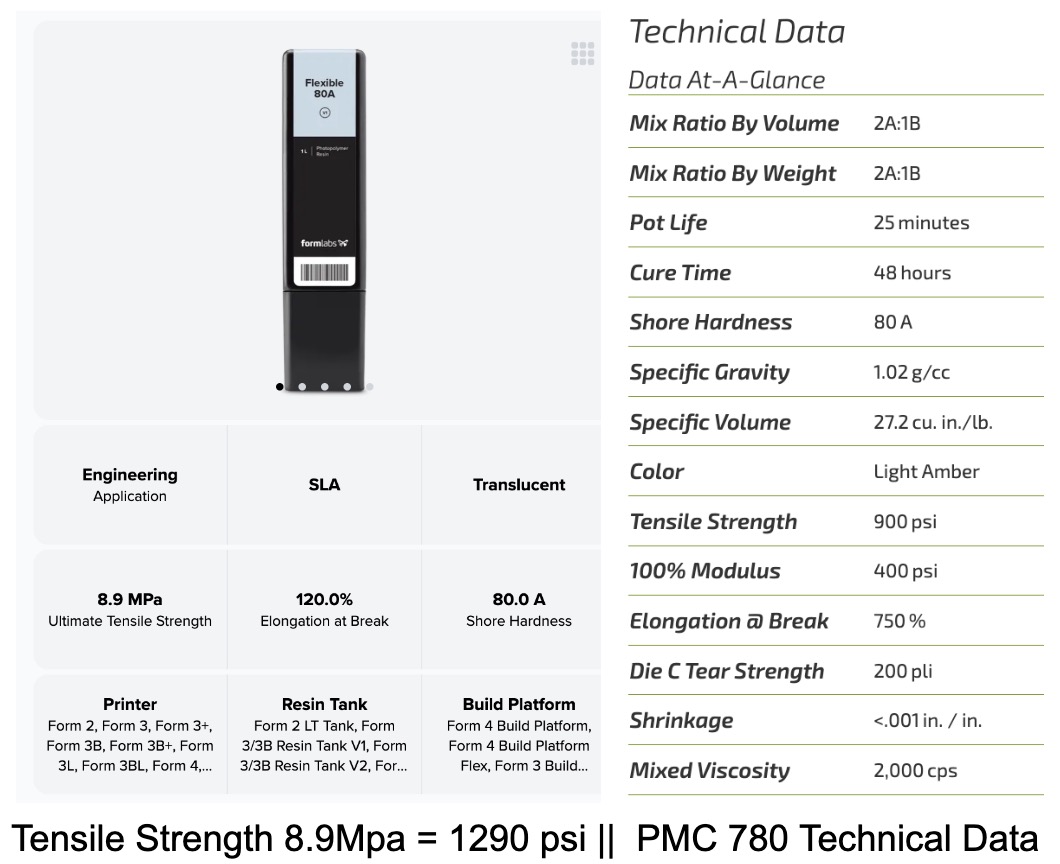
Flexible 80A vs PMC780
- TPU in Bambu: Ninjaflex 83A or Filaflex 82A.
- Rachel: Tested. Hard to eliminate the air inside and water is not absorbed inside
- Flexible 80A in Formlab
- There might be hysteresis, need to make sure it will go back to the original position after leaving closed. Adding nitinol back might help.
Design: How to better connect the endoskeleton with the shell if 3D printed?
- Use insert instead of nuts
- Drill all the way through the front and connect the nut to the shell
Current Progress:
- Improved Casting:
- Skin Cast: much better than the first try.
- Several places are too thin to demold well. Need more mold release for the side this part of the mold is not as glossy as others.
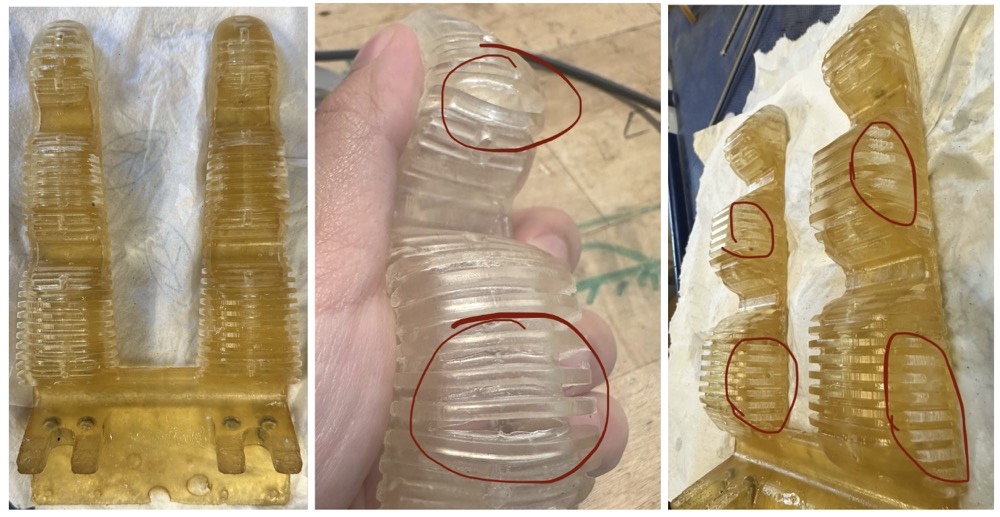
Skin Cast with original skin mold
- Improved Skin Design and Mold: Thicken the skin for 2 mm to better protect FBG under
- Proximal 20 -> 22 mm R10->R12 Distal 12->14mm
- New skin mold: one finger
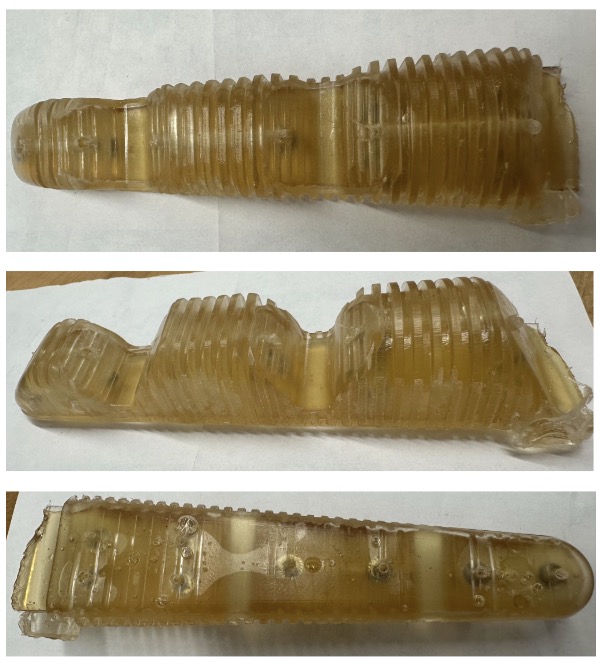
New Skin Cast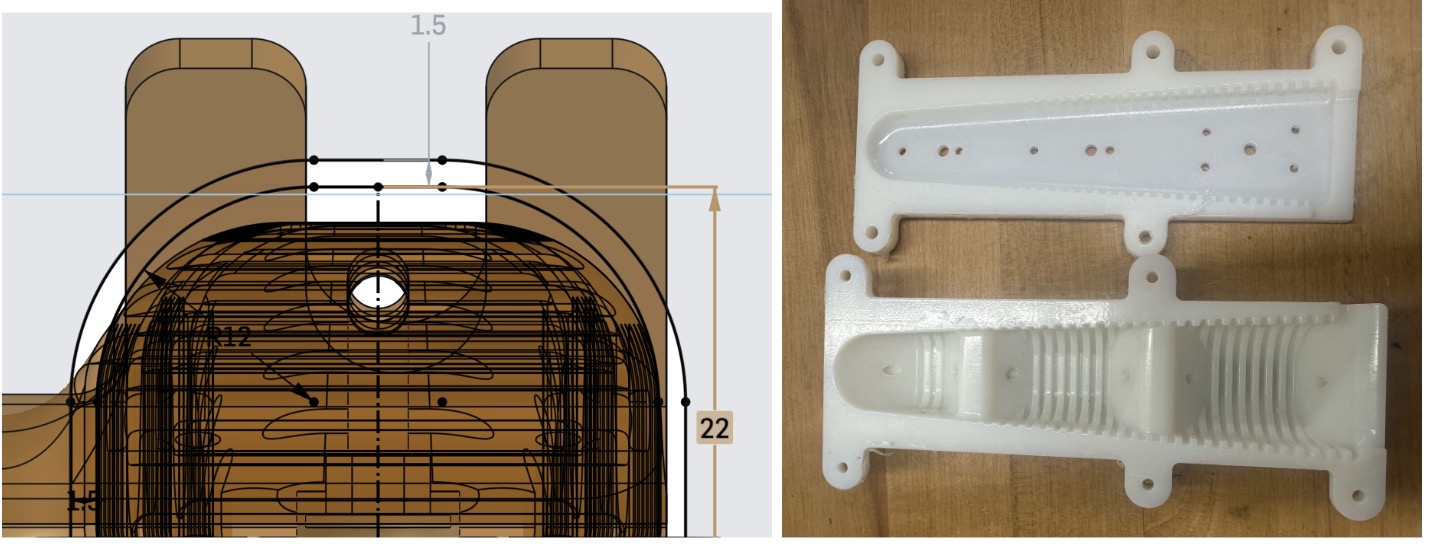
New Skin Mold - New skin cast
- Failed Skin Mold:
I tried to make a soft skin mold to decrease the damage to the skin while demolding. I tried to make a rubber mold with PMC 780 but it doesn’t work well. Silicone or other softer materials might be a better option. I decided to thicken the skin instead to make it stronger as well as provide better protection to the fiber.

Failed Skin Mold
- 3D printed endoskeleton
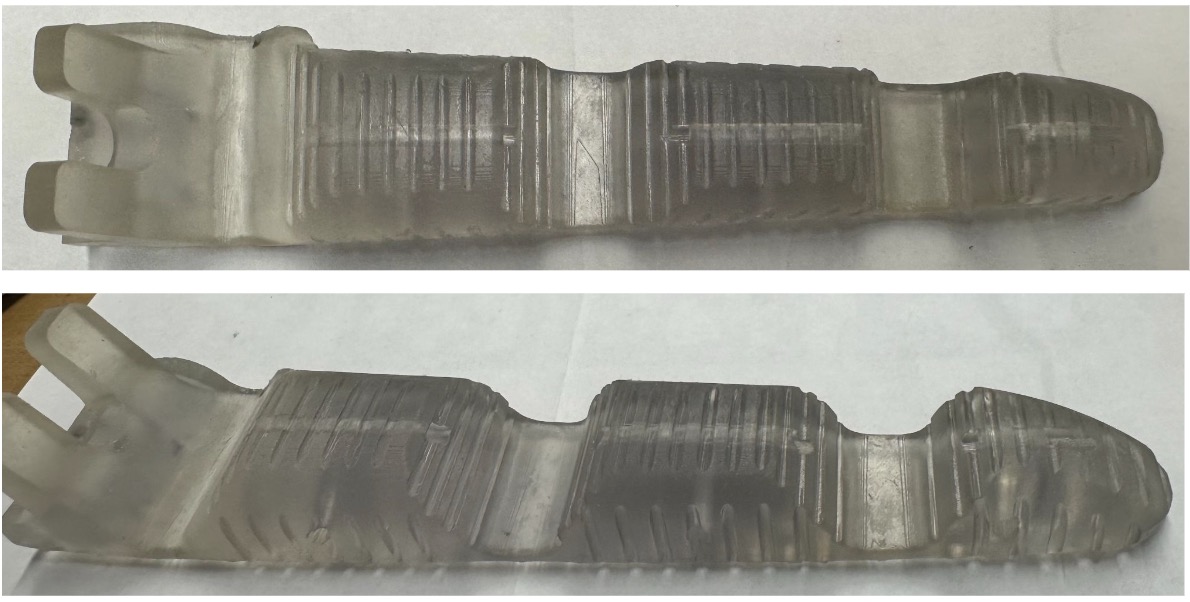
3D printed endoskeleton- No visible bubble.
- Around 3 hours of printing time for 1 finger. Too big to fit 2 fingers together in Form 3.
- Reserved holes for bolt shrink or clogged after post-cure. Solved: plug the bolt in and clean the holes before post-cure.
- Hysteresis. Revert to the original place slower than PMC 780. Experiment: leave closed for 2 days. There is a little deformation of the endoskeleton, but if connected to the shell with magnets, it functions the same.
- FEA analysis
- Analysis 1: Apply 2N force of tendon pulling on the bolt


- Analysis 2: Apply 0.5N force pushing downward on the groove of FBG.
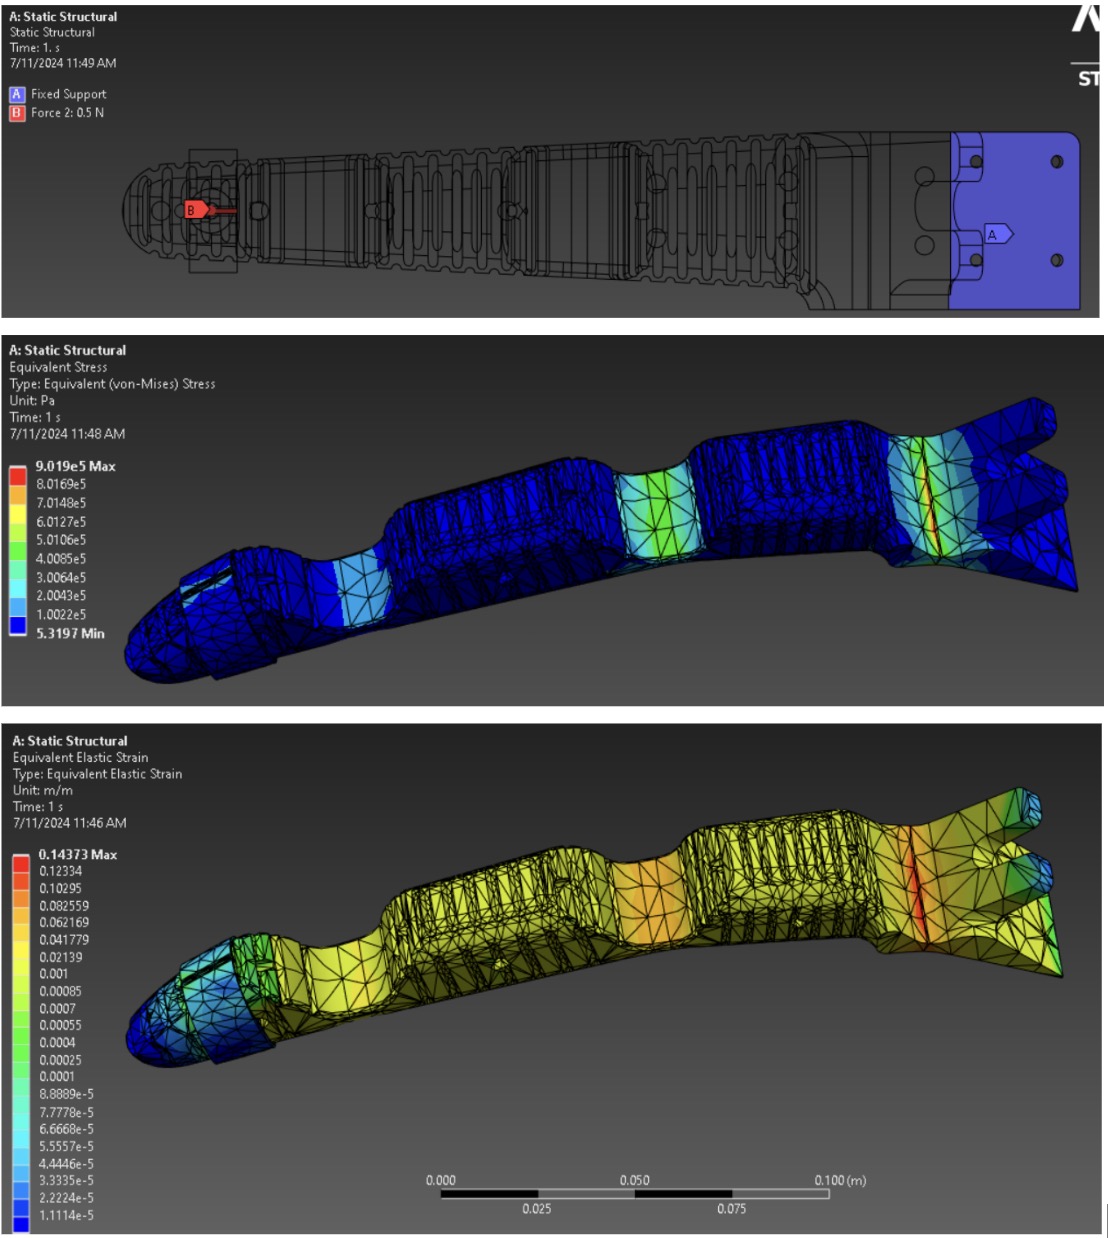

- Analysis 3: Apply 2N force of tendon pulling on all three tunnels
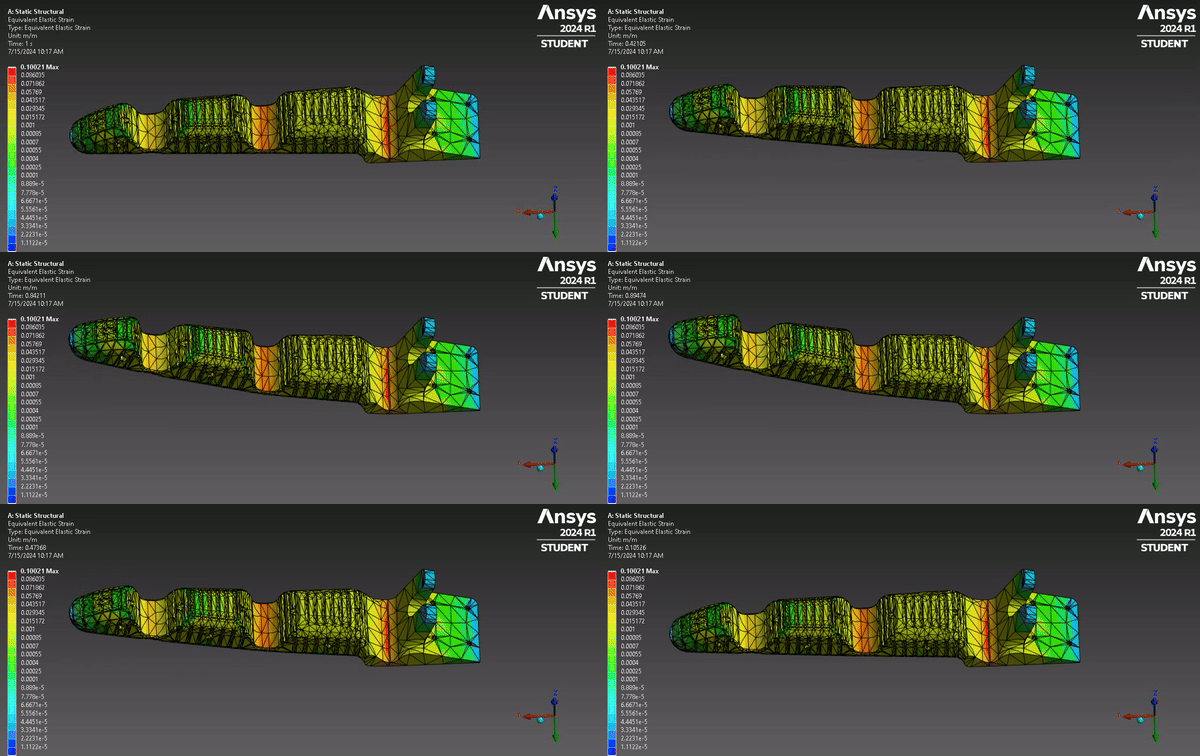
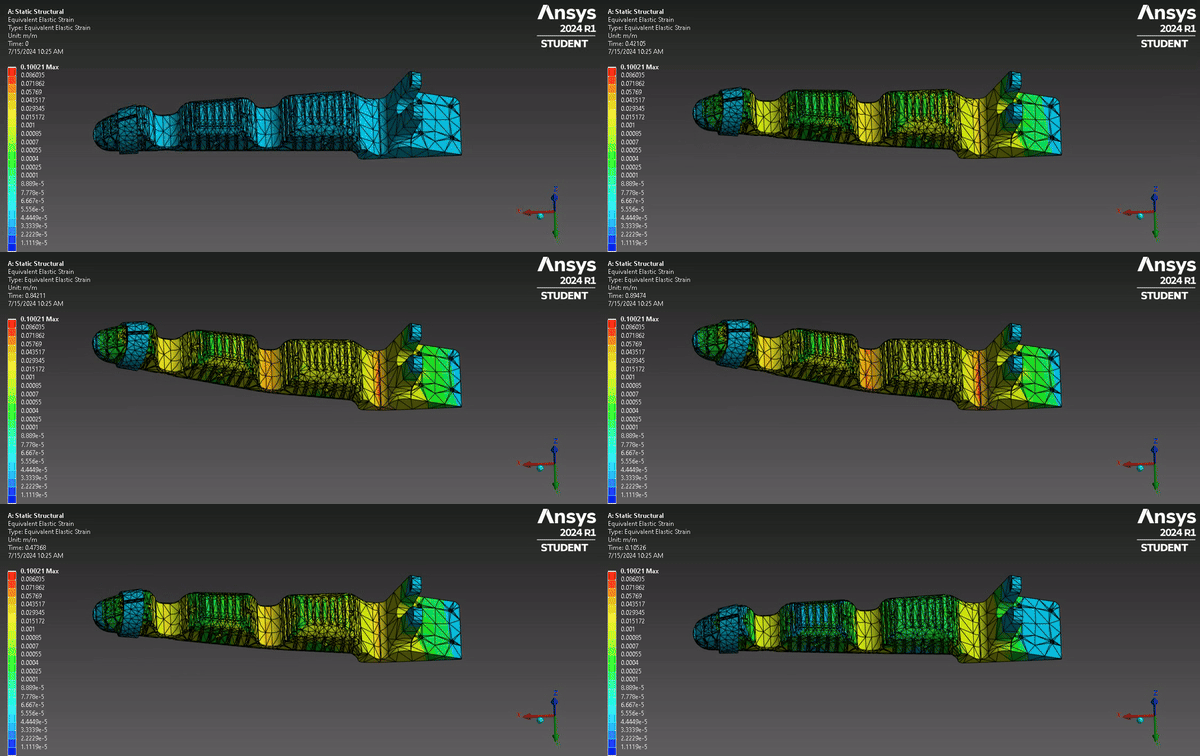
- Analysis 4: Apply 2N force of tendon pulling on all three tunnels and 0.5N pressing on the groove
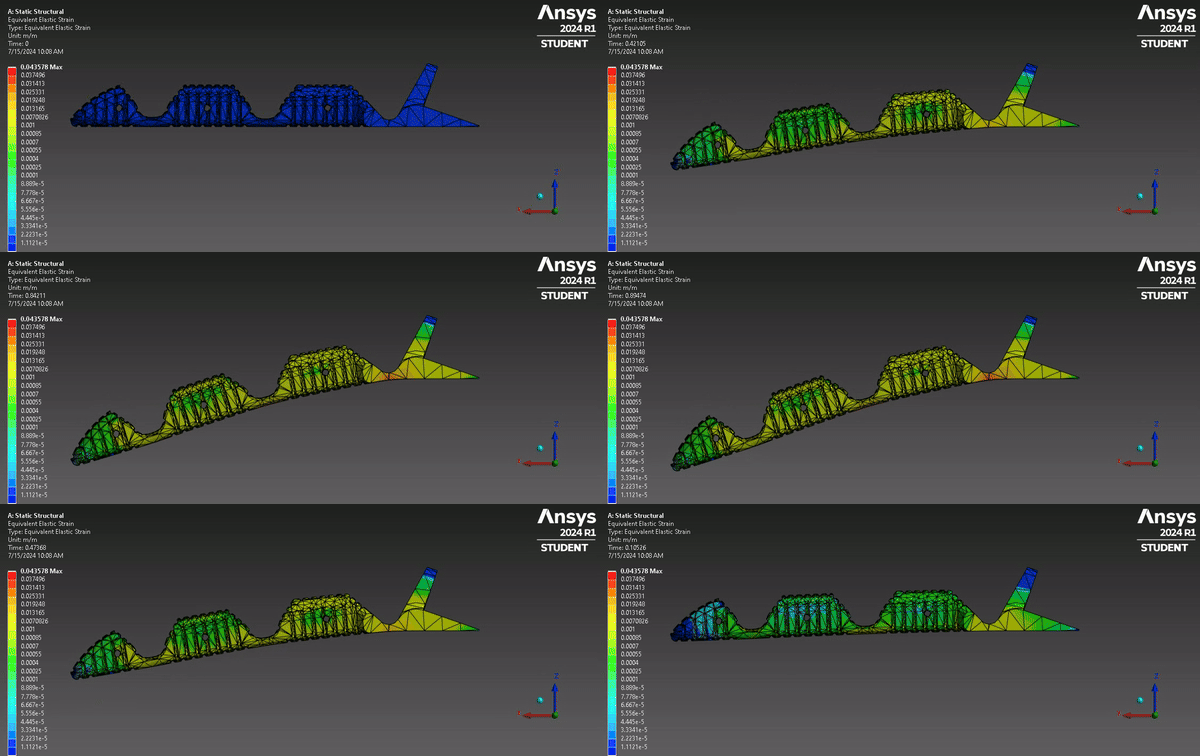
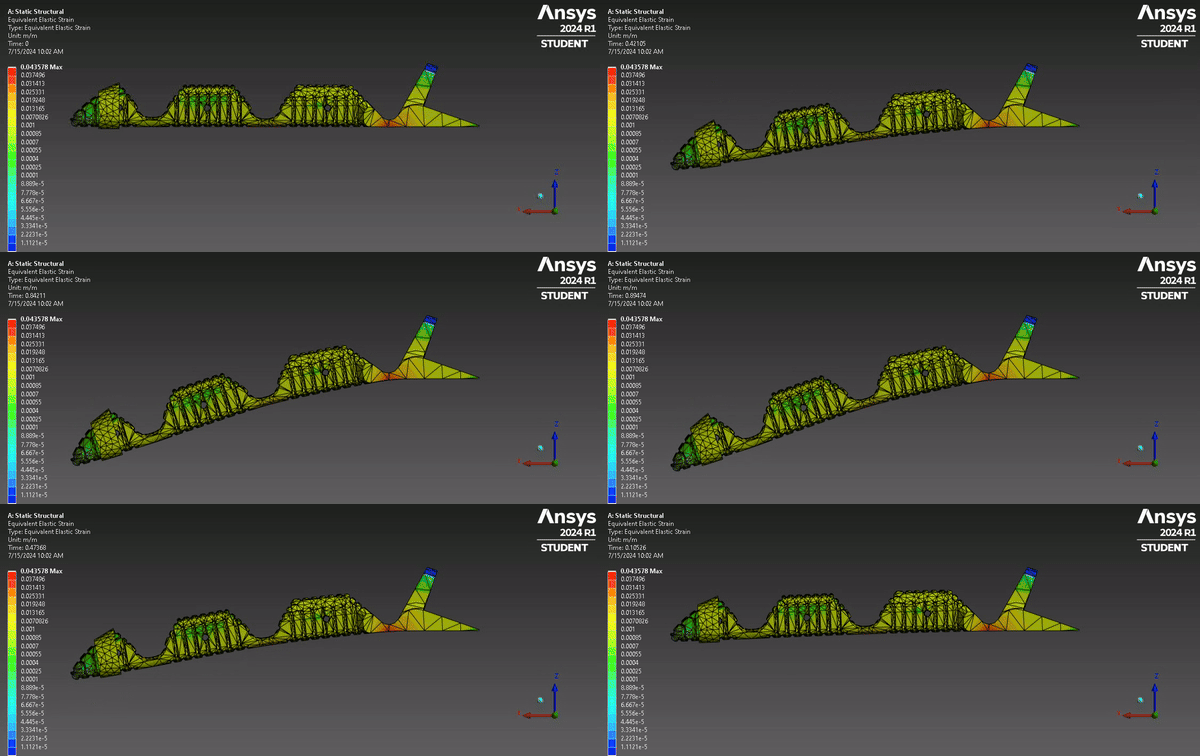
- Analysis 1: Apply 2N force of tendon pulling on the bolt
6.19 to 7.1
Questions
Material: Better skin material under the sun and in the Ocean. -> Requested suggestions from Smooth-on and Full Line Distributor DOUGLAS AND STURGESS
- Smooth-on: Clear Flex 30 - UV resistant. So it should hold up under the sun.
- Douglas: Clear Flex series no softer than a 30 (essentially 3 products 30 50 and 95 Shore A). You could go to a silicone but there we don’t carry anything harder than about 50. We do have samples of most of these at our stores. Clear Flex series
Design: Where should we put the fiber in?
- In the Endoskeleton: the Fbg will be infected when tendon pulling

In the Endoskeleton - On top of the Endoskeleton: reduce the effect of tendon pulling
- Cast on top while casting skin
- Make it a ring with grooves for FBGs

- Cast in the skin: PMC780 might not be hard enough as a base. Might make it easier to replace?
How Fbgs should be located on the fiber?
- Only Fbgs on fingertips - the rest of fiber moves along the tunnel like a bicycle cable
- Fbgs on all parts of fingers - the same tunnel as a) only distal Fbgs are fixed proximal Fbgs slide in the groove using learning to predict sliding or pressing
- Wrap fiber around the finger and leave extra space on the back for bending fiber thread outside of the shell
- Attach fiber along the side and leave extra space at joints
Palm sense - advice from Rachel
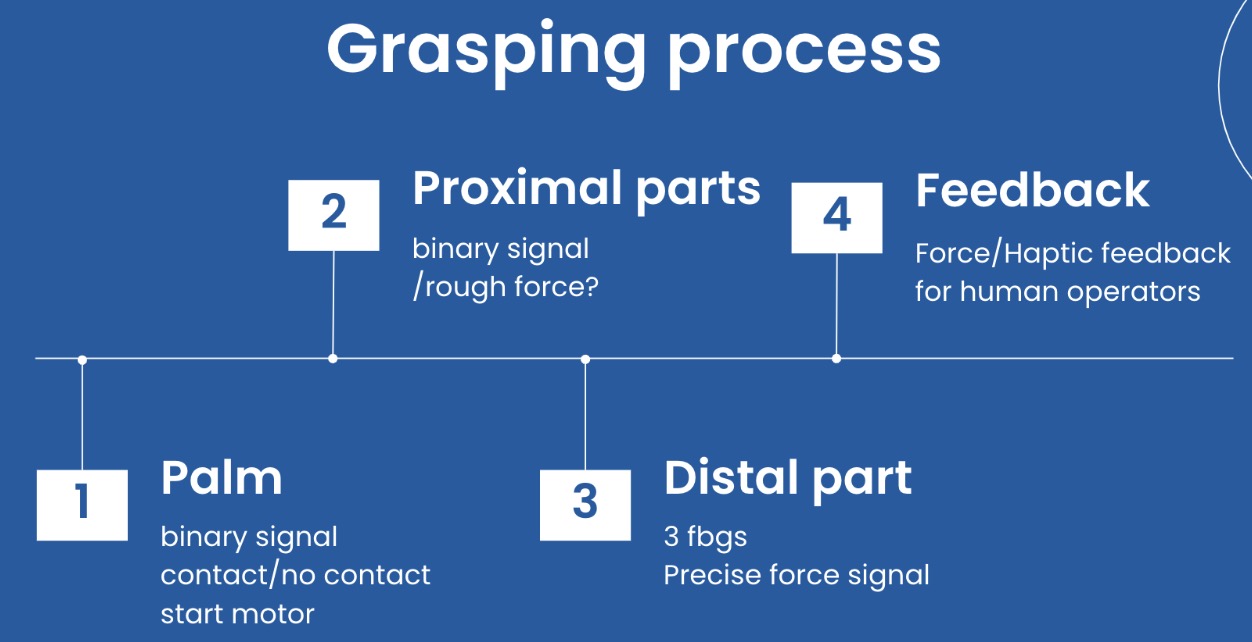
Add a sensor in the palm to avoid pushing things forward constantly
- Contact with palm -> binary signal contact/no contact -> start motor to pull tendon
- Contact with proximal parts -> binary signal/rough force?
- Contact with distal part 3 FBGs -> Force/Haptic feedback for human operators
Current Progress
Samples:

Left to Right: PMC 780, Vytaflex 30, Vytaflex 20
- PMC 780
- Vytaflex 30
- Vytaflex 20
Latest finger design mold & cast:
- Endoskeleton Mold
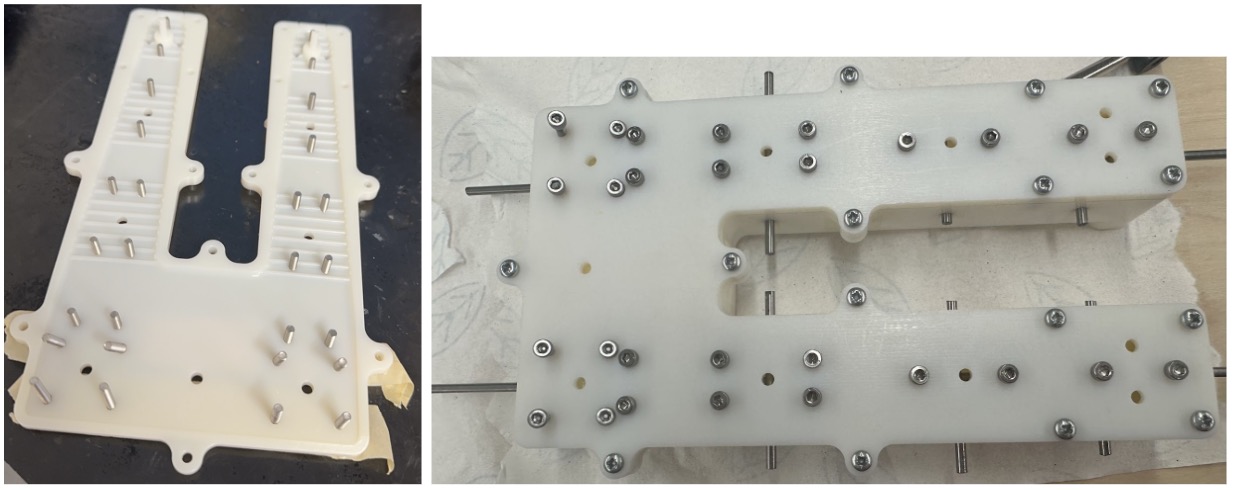
- Skin Mold
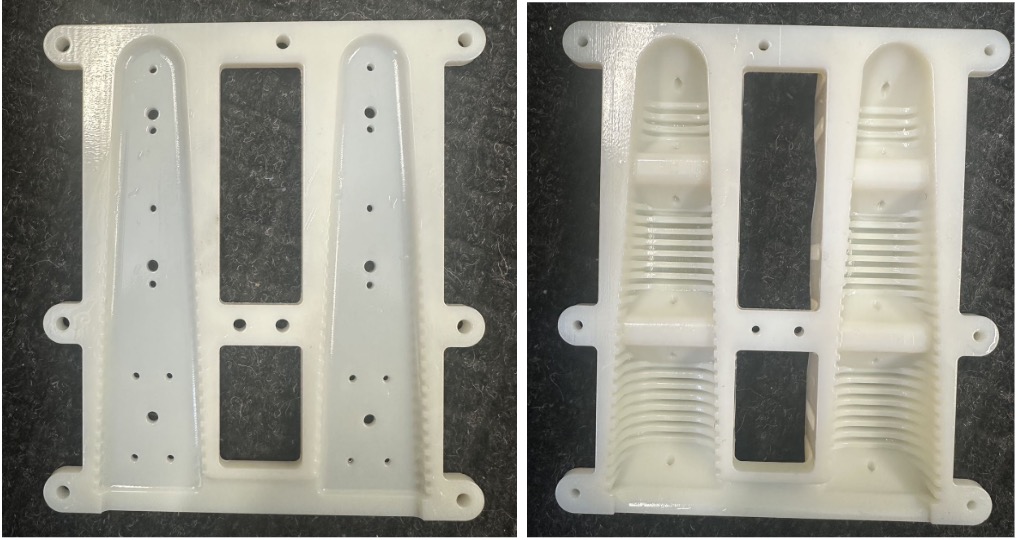
- Cast - Remake the latest version with endoskeleton and skin separated
- Need to improve in reducing bubbles - potential pressure cast all parts
- The skin layer is too thin and fragile to separate with Vytaflex 20.


