Week 7
e-VaC with Xinyi
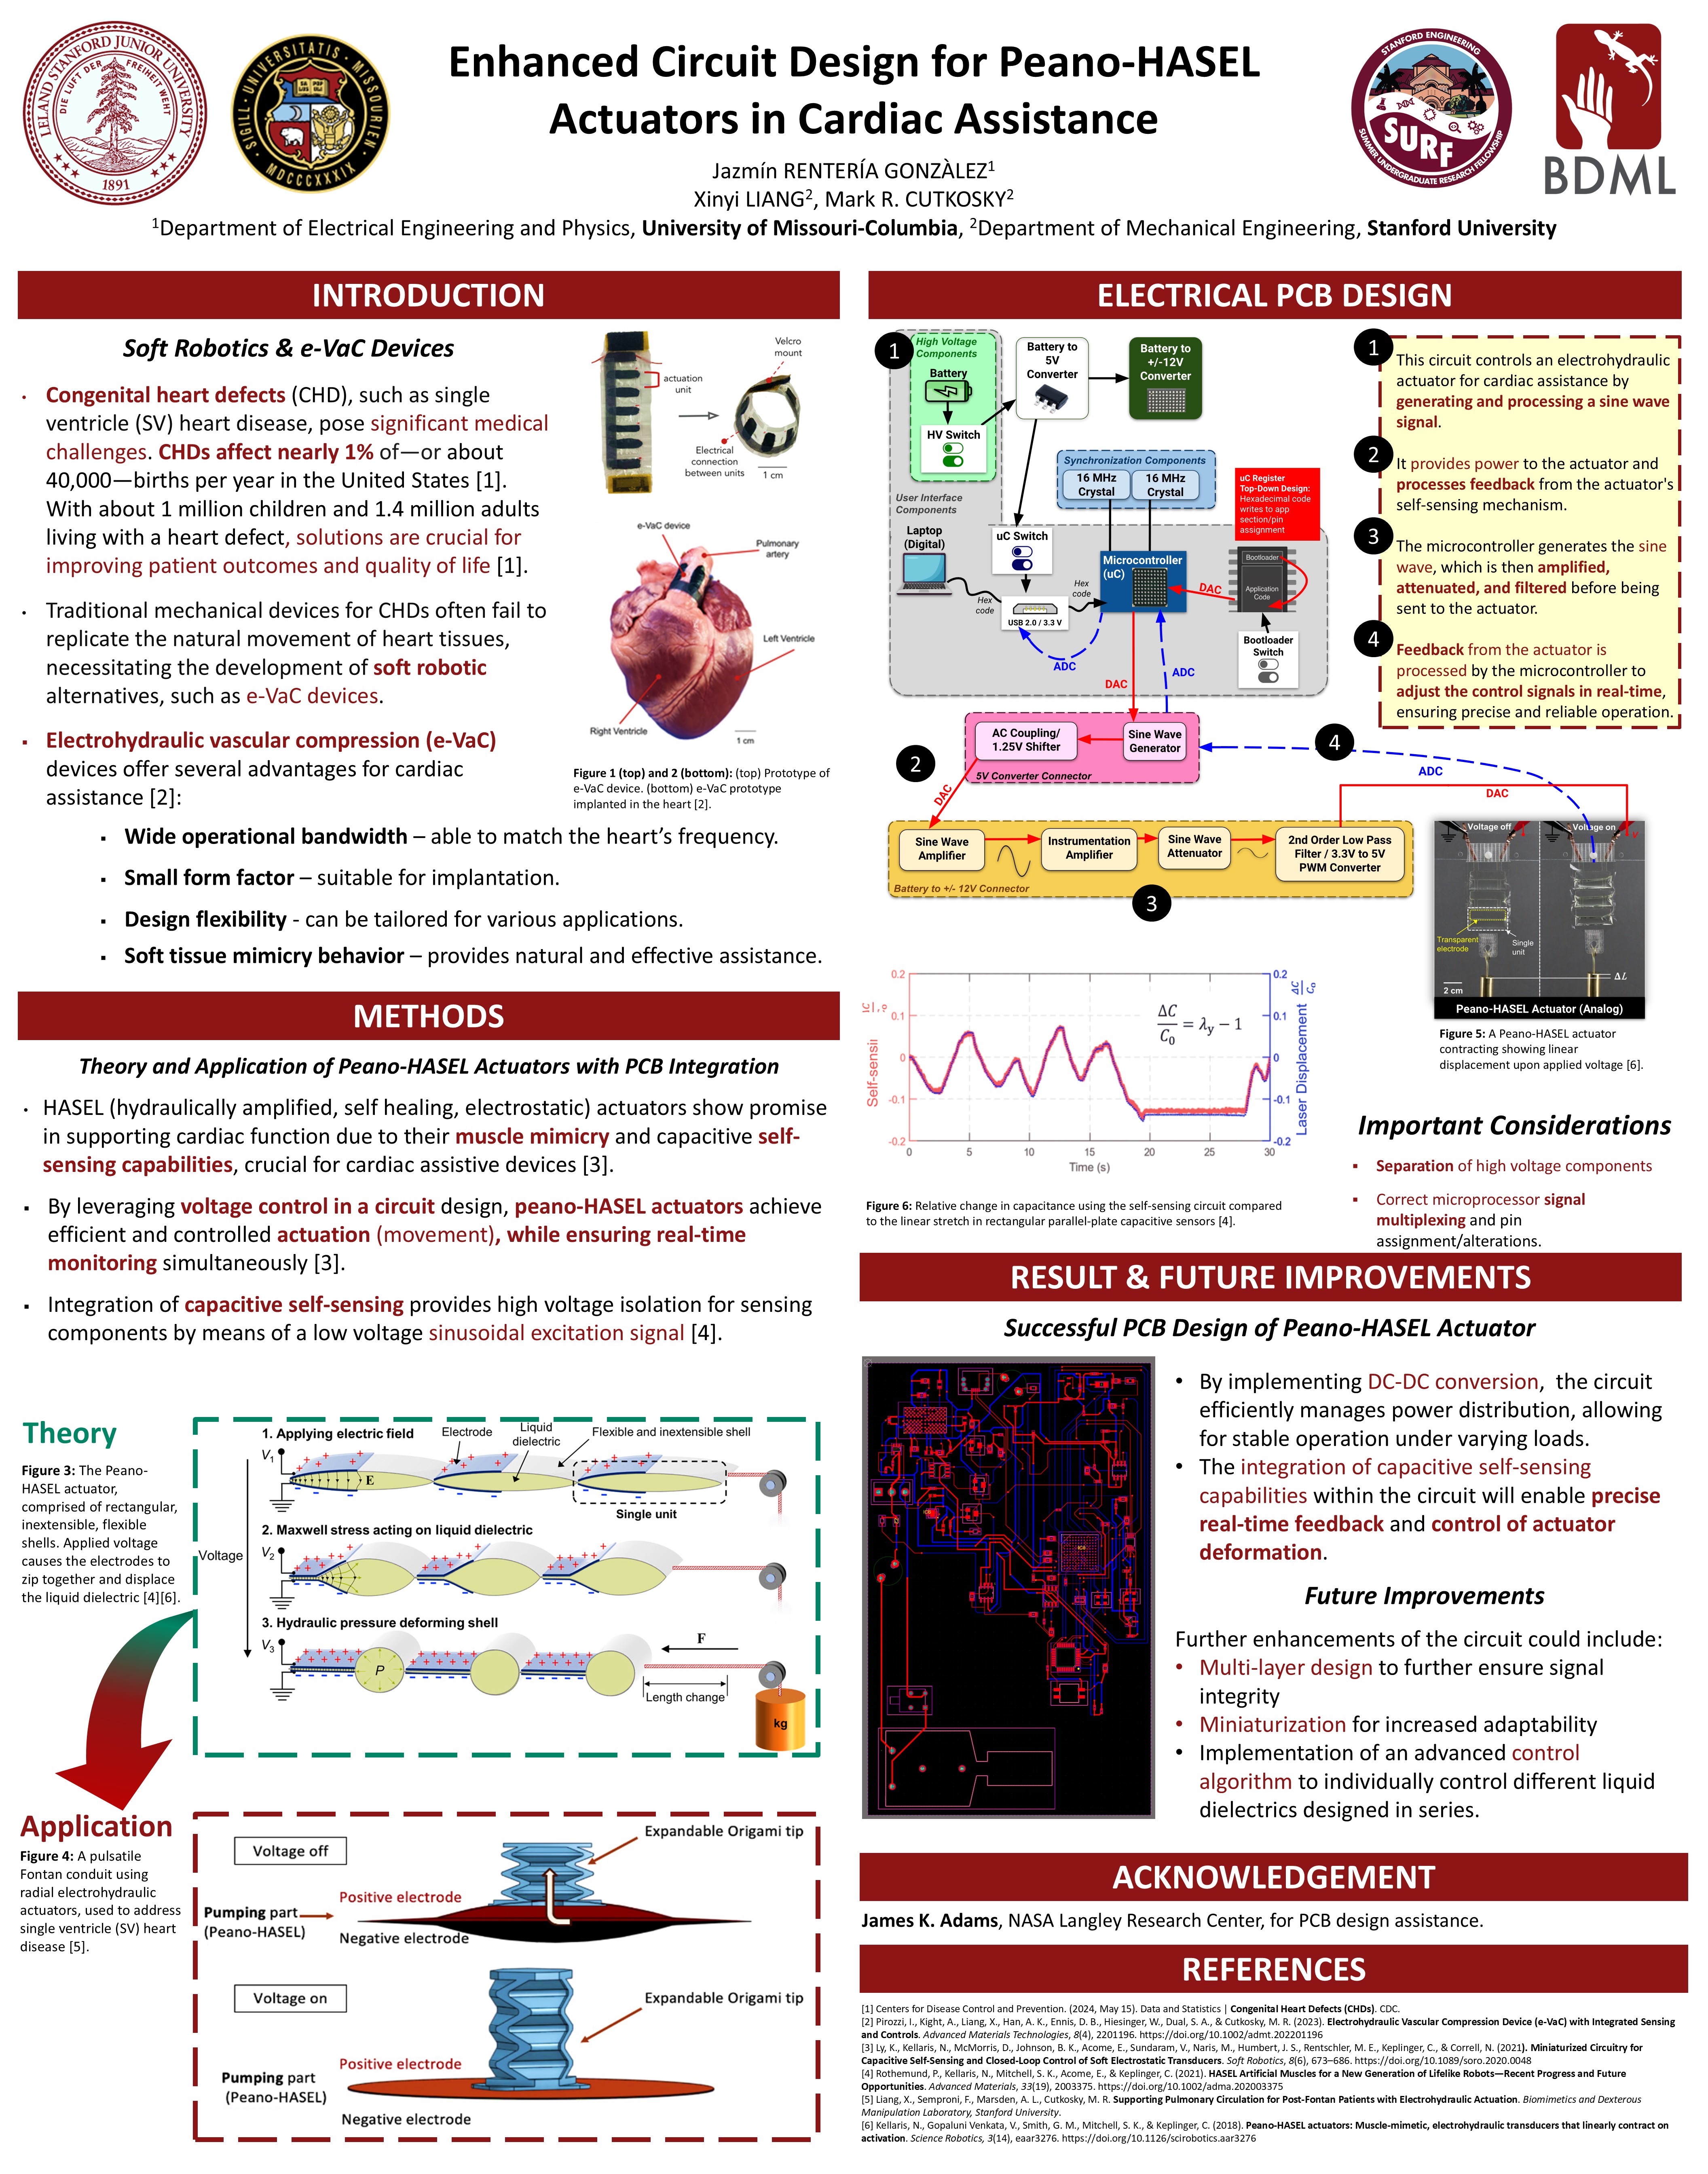
This week, as I've prepared to leave Stanford, I've worked on a few different things. I've completed my SURF Presentation poster, and I'm content with the outcome of it. It took me a few days to complete, and it's shown me the progress I've made this summer. I went to not knowing anything about electrohydraulic actuators to understanding the principle of how they help with cardiac assistive devices and how the research is changing in this area to help control actuation and patient outcomes.
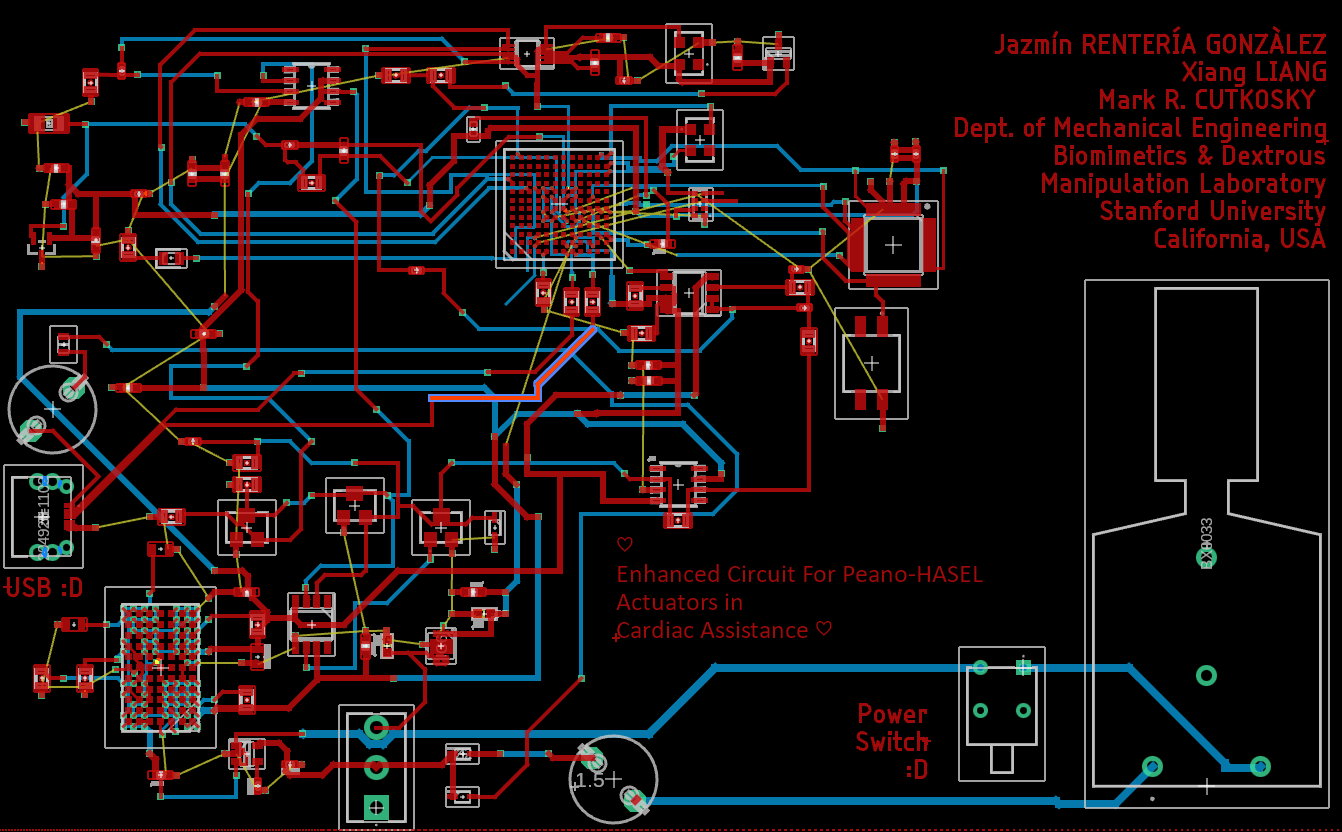
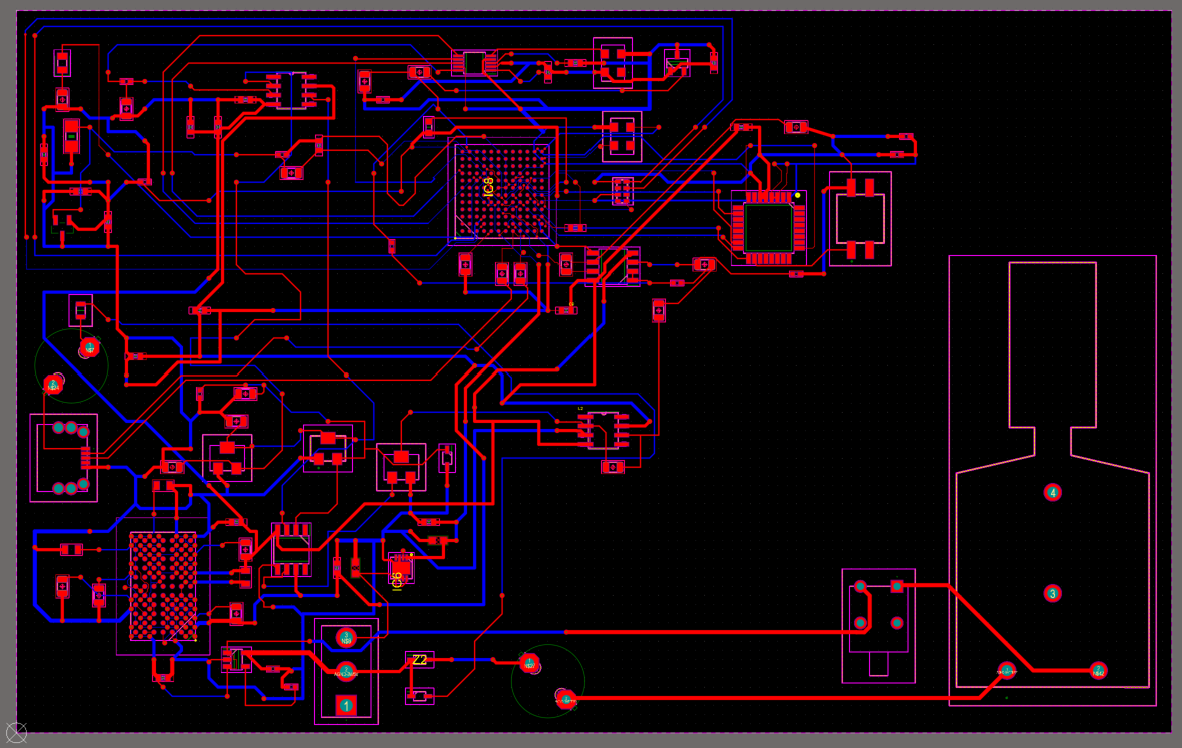
Other than that, I've been making a few tweaks to my final design project, some of them including bettering the traces for better signal integrity, condensing the GND traces to reduce noise throughout the board, and including a copper pour on my final design.
A copper pour is great for grounding due to its excellent electrical conductivity, which provides a low-resistance path for electrical currents, ensuring efficient dissipation of excess charge into the earth. This is why it's perfect for a grounding layer for my board. I was also thinking of having the board be ordered in red, to coincide with the Stanford colors. Overall, I am pretty satisfied with the progress of my work.
Week 6
e-VaC with Xinyi
This week, I was focused on revamping my circuit design for the e-VaC project. The Battery to +/-12V converter and the Microprocessor are Ball Grid Arrays (BGAs), something that I didn't take into account before. Since these pieces can't support traces on the top side of the board and are the most significant parts of my design, I had to rethink my idea.
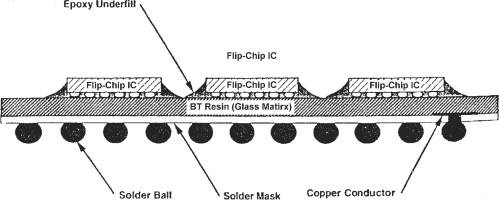
Problem: The solder balls under a BGA occupy the entire area beneath the chip, preventing any routing of traces on the top layer of the PCB in that region.'''
Design Considerations & Solution:
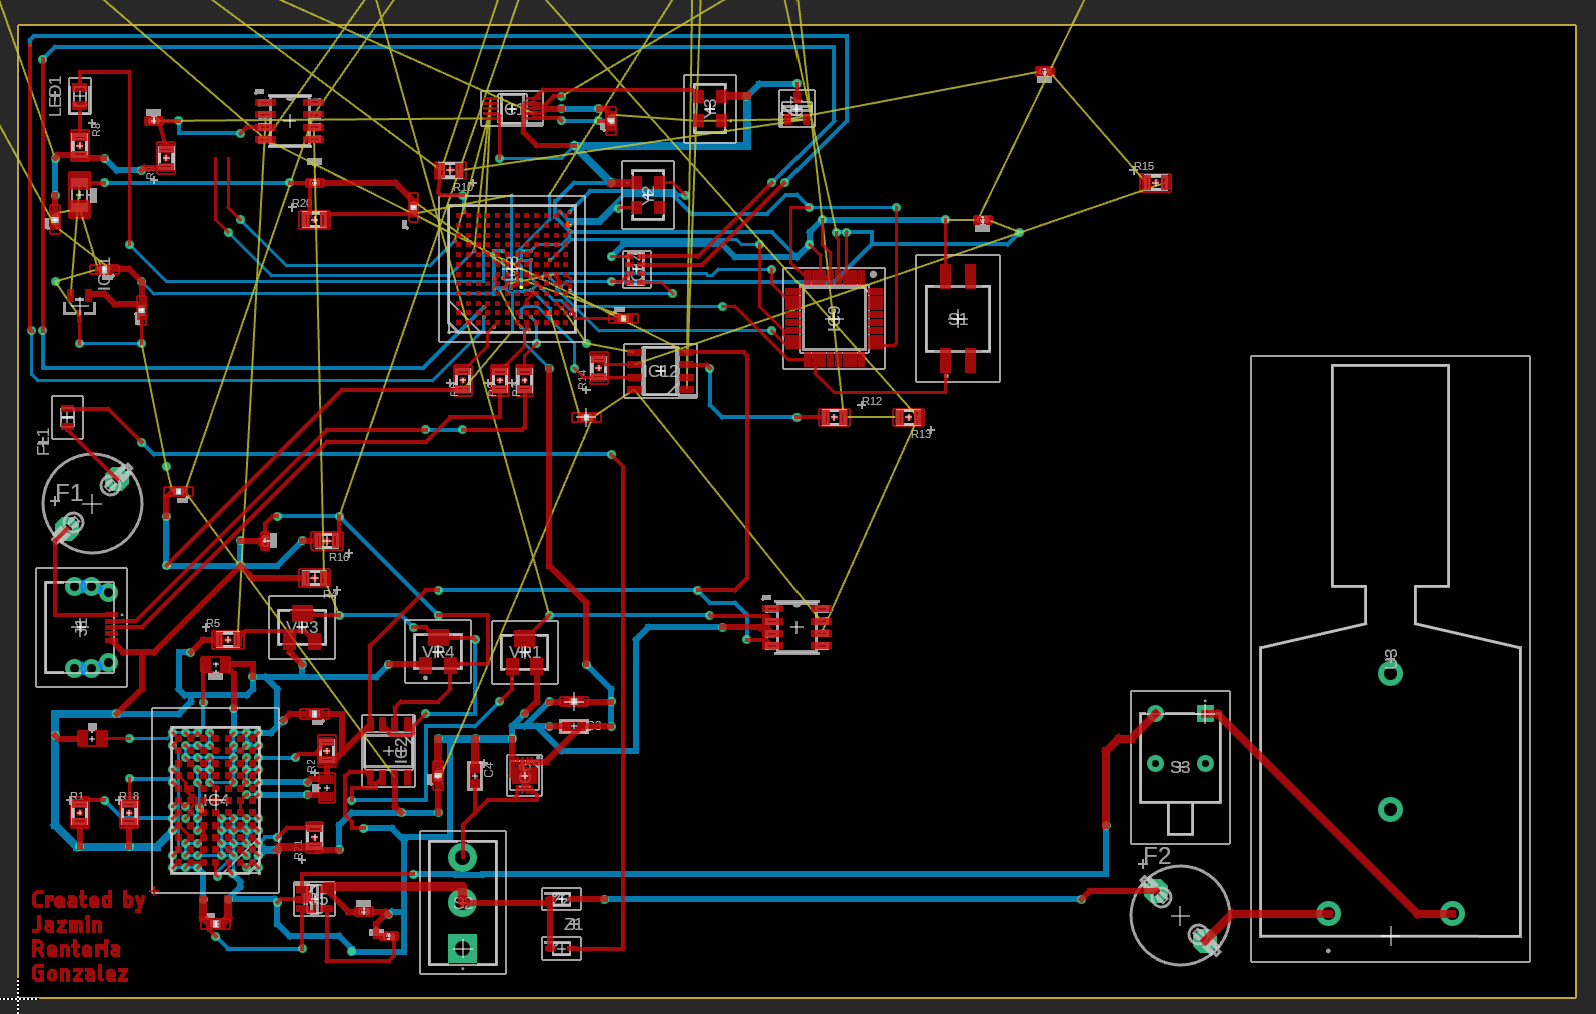
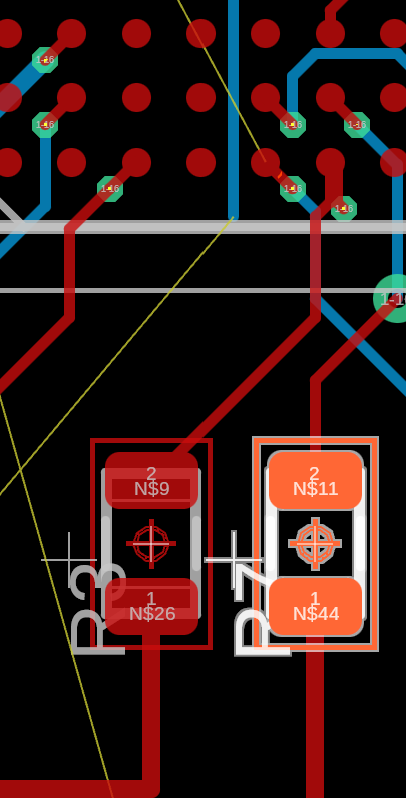
- In order to mitigate this design problem, I opted to try a new way of designing the board by using back and front tracing between the different nets. This ensured I had more options for spacing than the conventional front board tracing method would allow, because top/back traces could cross without any complications.
- Most importantly, I made sure to prioritize the GND/PWR connections, making sure they are thicker (20-30 mils) than the rest of the traces (10 mils), since the ground and power traces carry more current and are crucial for the stable operation of the circuit.
- Vias were used to route signals between the top and bottom layers of the PCB, allowing for better management of the dense BGA connections. I ensured minimal interference and optimal signal integrity by strategically placing the vias.
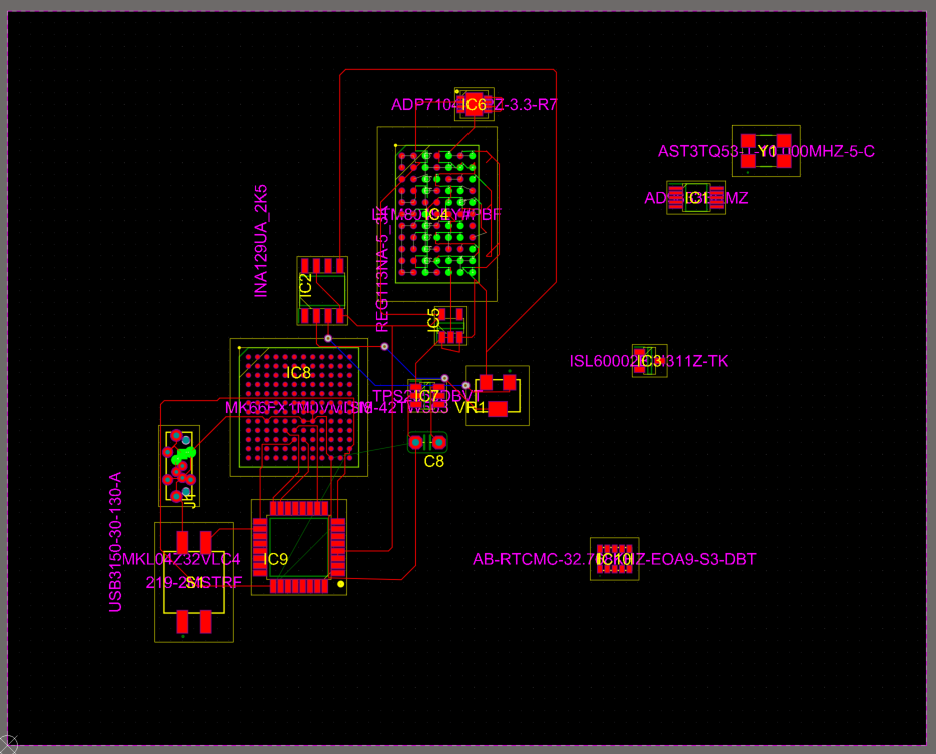
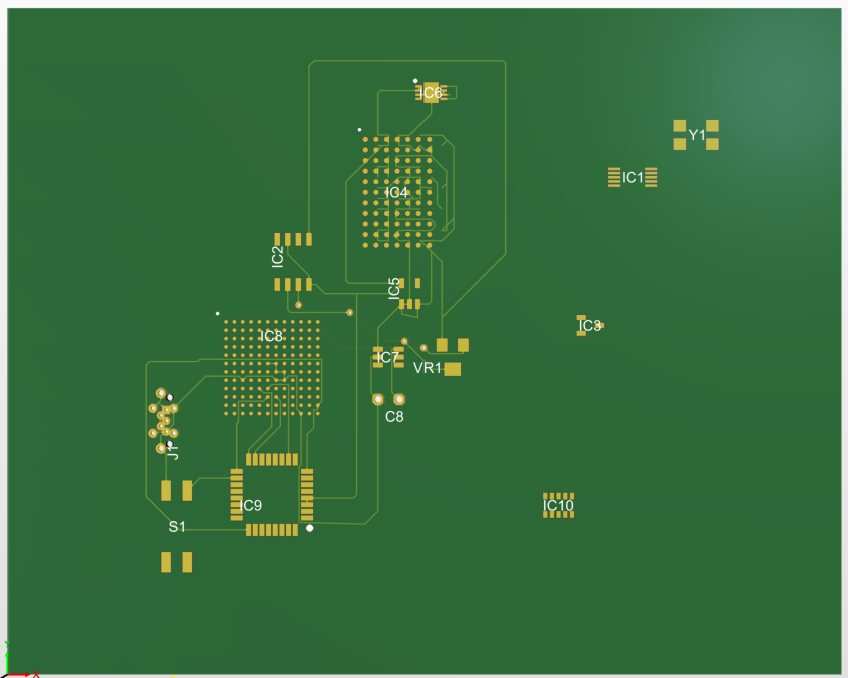
Below you will find a (very messy) before version of the board, compared to the current version which is almost completed.
Before

After
Final Look as of 8/2/2024:
Many thanks to a previous peer of mine, Jimmy Adams, at NASA Langley Research Center, for support in the design of the circuit.
References:
Week 4 & 5
e-VaC with Xinyi
This week, I was entirely focused on continuing the PCB design of the e-VaC self-sensing circuit with Xinyi. It turns out that we had to take a lot more into consideration that initially anticipated. There were some things I learned this week include:
- Impedance matching for the USB to microcontroller connection with 33 Ohm resistors
- I was surprised to find out that we use impedance matching in this circuit in order to connect the USB to the microcontroller since I've only seen impedance matching components in the design of PCBs involving RF (radio-frequency) technology. It was difficult trying to find the purpose for these questionable resistors, but surprisingly enough, the Teensy 3.6 board runs on this specific microcontroller. Once we saw the Teensy 3.6 schematic, it was obvious the usage of 33 Ohm resistors in series to the D+ and D- pins for impedance matching.
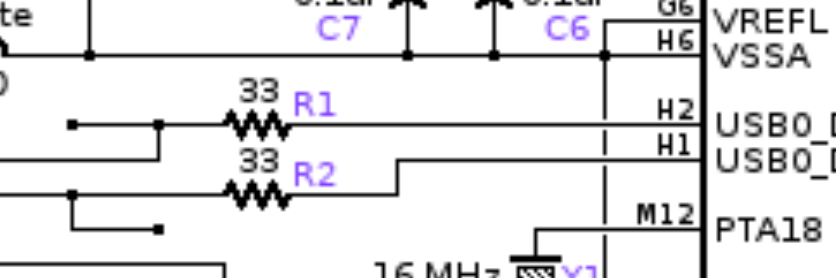
- It is standard between USB 2.0 - microcontroller connections to use 33 Ohm resistors. Series resistors limit the edge-speed of pulses, which means less electromagnetic interference. This means that the resistors have to be placed very closely to the microprocessor pins in the PCB design, which was done.
- Separating high voltage and low voltage components
- Another critical consideration was the separation of high voltage (up to 9 V) and low voltage components on the PCB. This is essential to prevent interference and ensure the safety and reliability of the circuit. We had to carefully design the layout to keep these components apart and use proper grounding techniques.
- Trimmer Resistors
- These adjustable resistors are crucial for fine-tuning the circuit parameters to achieve optimal performance. Understanding their configuration and placement was essential to ensure precise control over the circuit. By connecting a component to either the CW or CCW pin, one can control the amplification and/or attenuation of the signal.
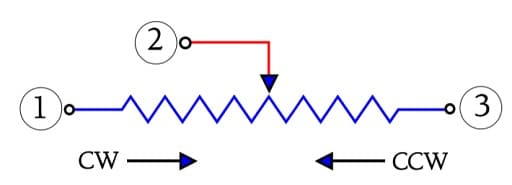
- By this logic, using CW decreased the resistance of the component voltage, while using CCW increases the resistance. This allows for precise adjustment of the output voltage or resistance in a circuit. Therefore, for my design, amplifiers used CW pins, while the Sine Wave Attenuator used the CCW pin.
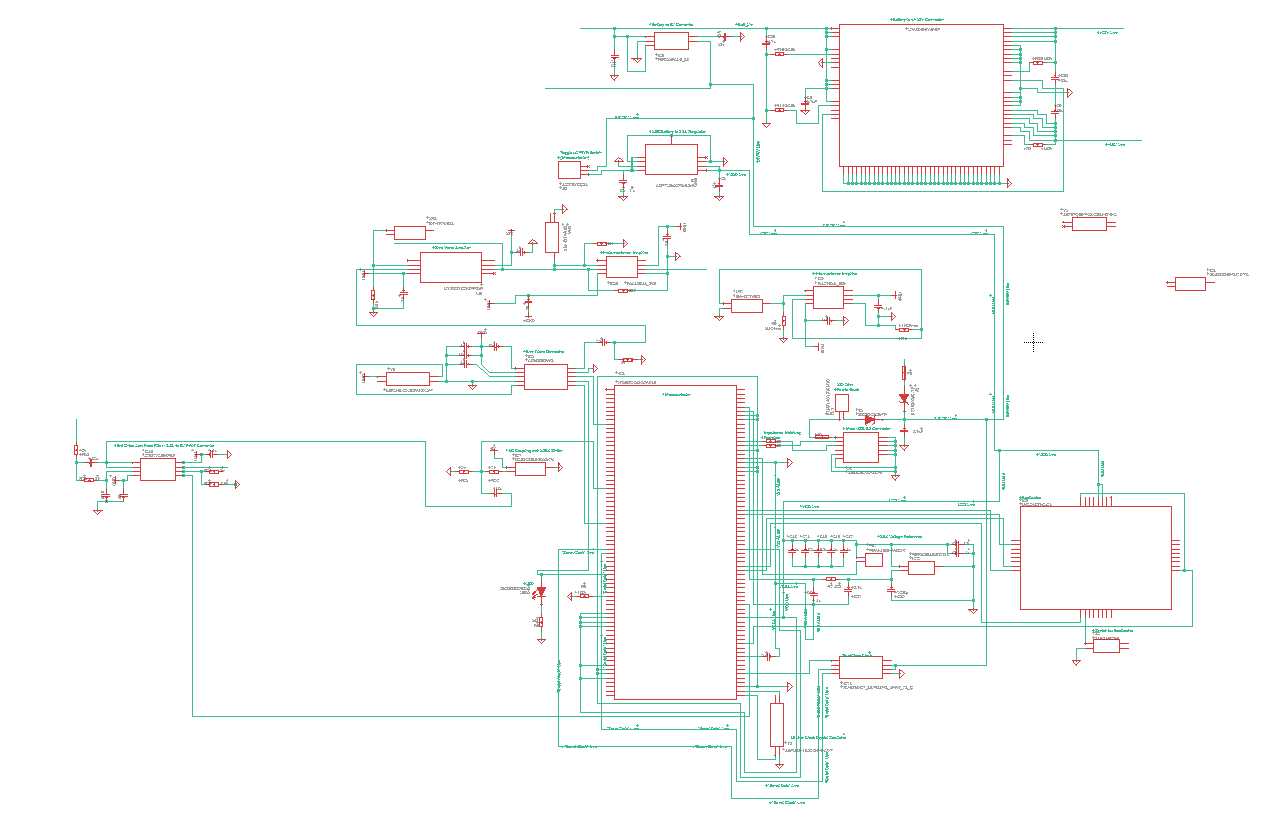
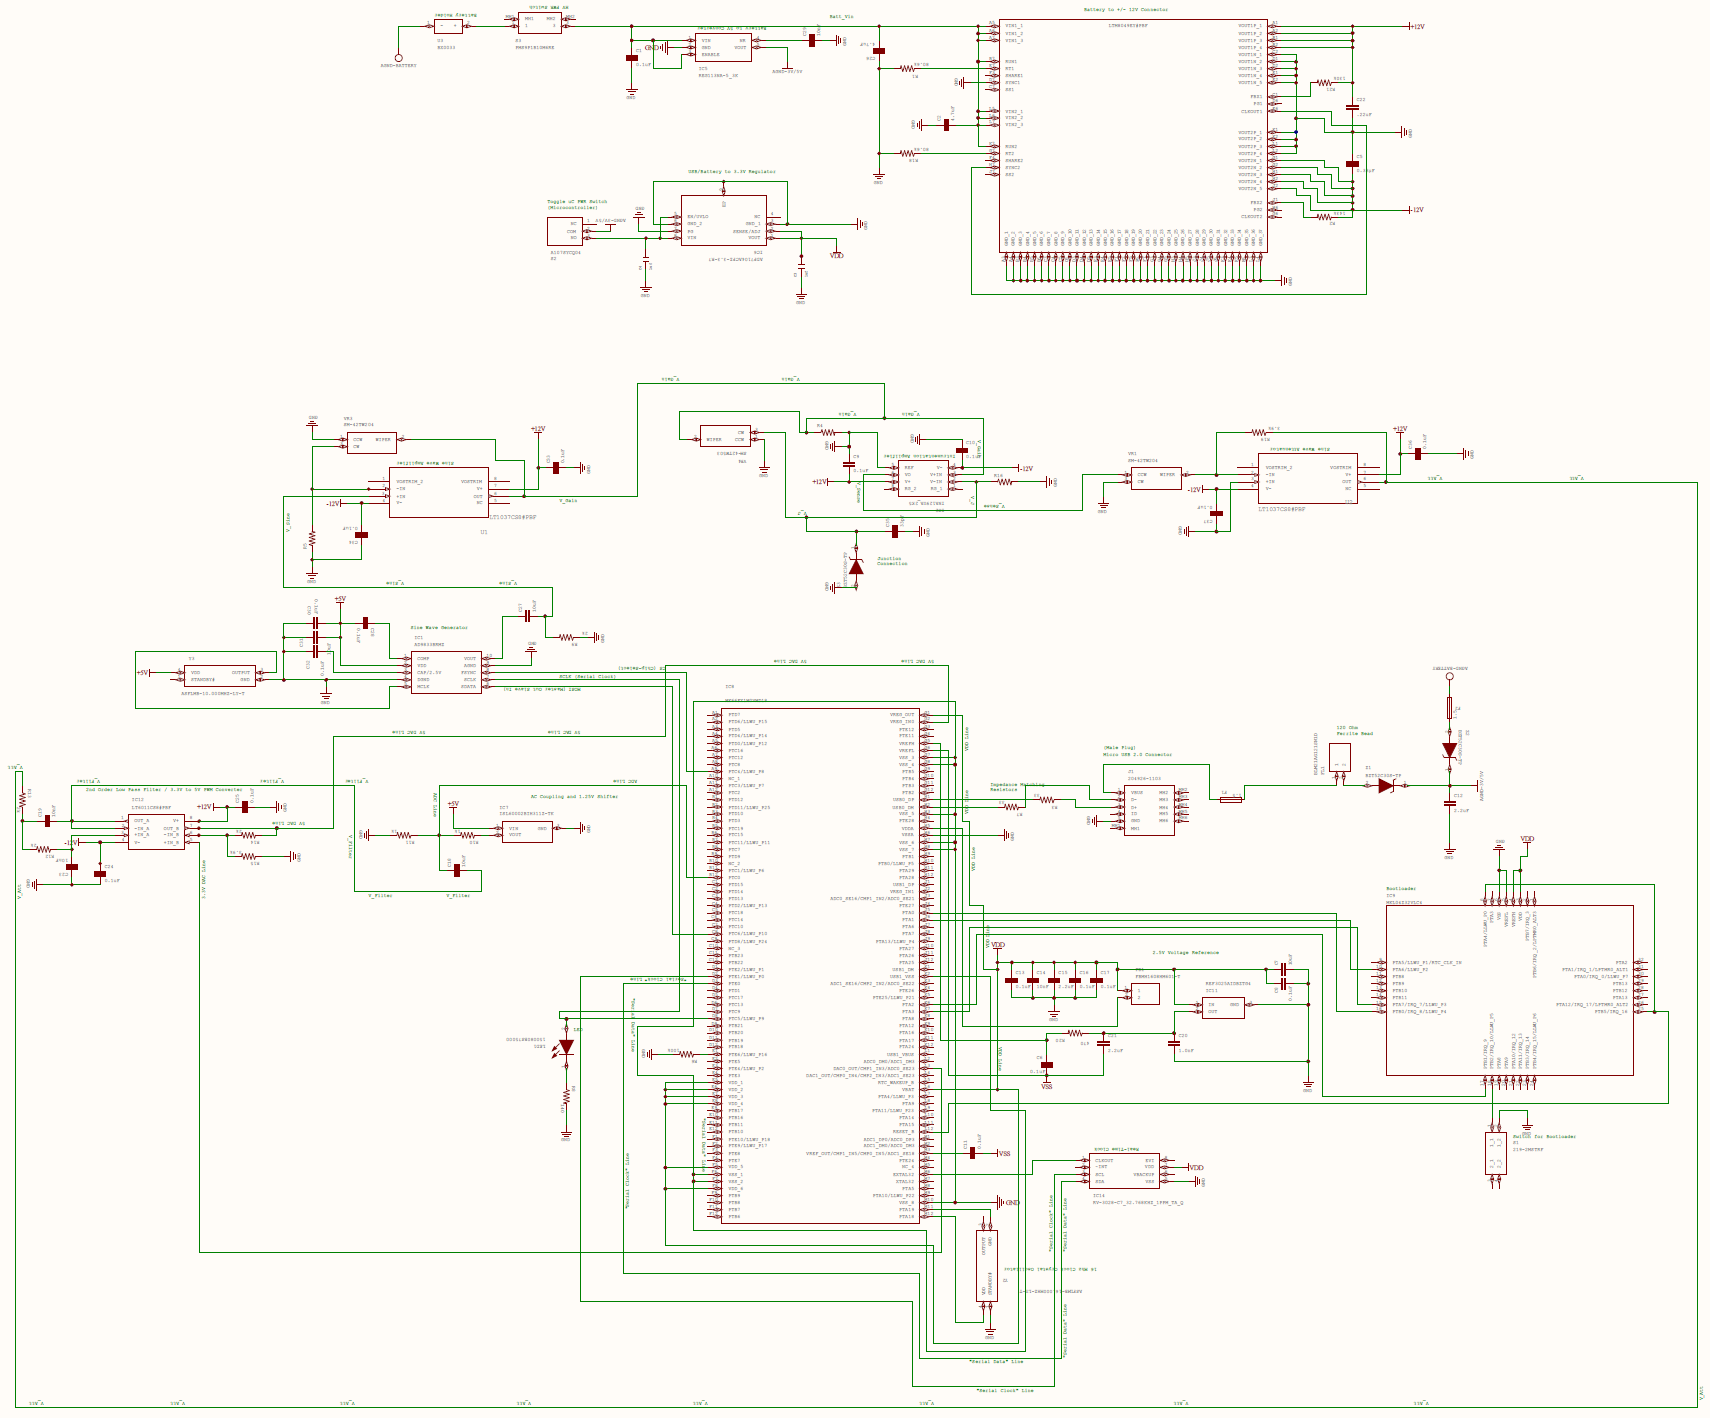
Final Schematic Design:
References:
Week 3
Serial Communication with Mark
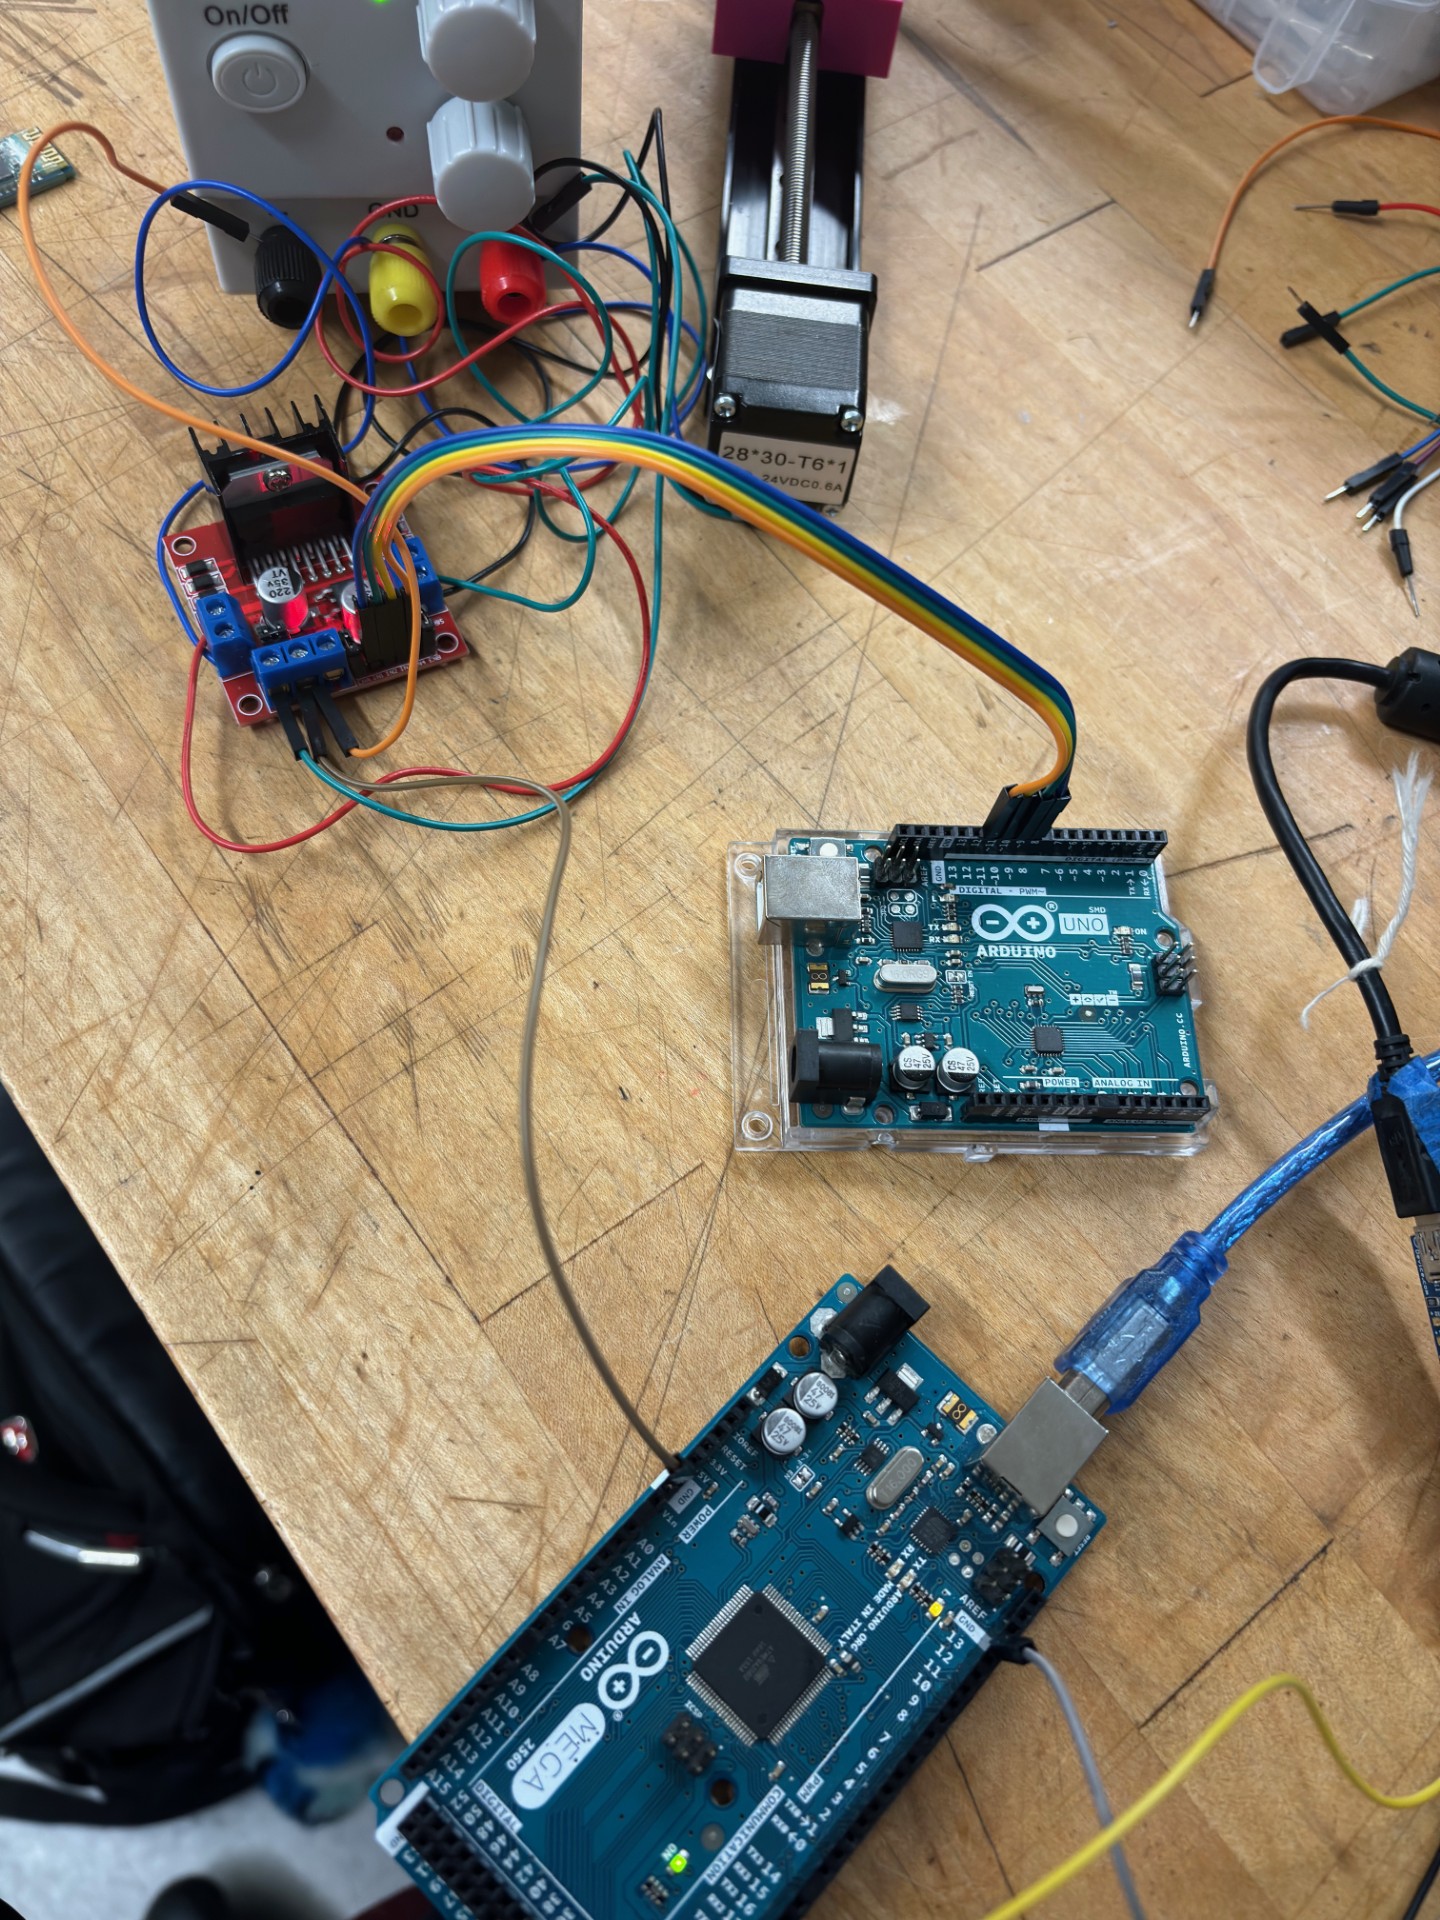
On Monday, Mark gave us a short serial communication lecture, and how serial communication works on an Arduino Uno, when connected a laptop. From there, I learned how to connect it with MATLAB, which Annie has been able to do successfully for the CERVA project. Using the knowledge used in this mini lecture and other online resources, I was able to then connect MATLAB with an Arduino Mega, which allows for more serial communication since it has three pairs of TX and RX pornts. We hope to use this microcontroller for the following weeks to develop the CERVA project. To the right is a image of me trying to move the connections between the Arduino Uno to the Arduino Mega.
e-VaC with Xinyi
This week, I've mainly been focused on the PCB design for the e-VaC self-sensing circuit using off-shelf components available in Mouser. I hypothesize I should be done with the design by next week. Some of my challenges right now have been finding suitable parts and software migration. The literature that presented the circuit design, in Ly et al., provides only a small amount of specific parts for the board, so I'm having to look through mouser to find suitable parts that will function well with the circuit. Though it is a tedious task, it is imperative that all components work well together in order to make the best circuit possible. It's also been a challenge designing the board due to software contraints. Intiially, I was using EAGLE but I didn't like the software layout, so now I've merged the .SCH and .PCBDOC documents over to Altium, since it is better in my opinion. it will also allow us to have a 3D view of the board, which is a design component that EAGLE lacks. I'm looking forward to continuing this project and wrapping it up next week to have it be built before Xinyi leaves for her time off, July 26th. I figure I should have plenty of time by then.
Link to Bill of Materials:
Literature mentioned:
Week 2
CERVA with Annie
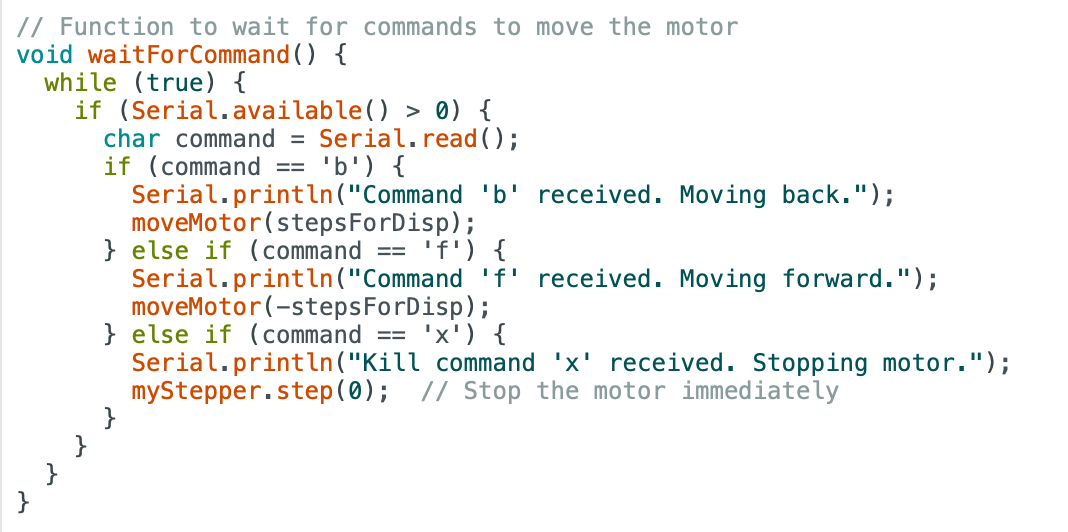
This week (and a little at the end of last week), I was able to successfully drive a stepper motor to displace its load by 10cm. I edited Annie's program and added functions to wait for commands to move the motor. By doing this, the program is able to control a JKM 28 Linear Stepper Motor with a step angle of 1.8 degrees. Other variables were considered, including the screw pitch, total displacement, and linear speed. The system responds to commands to move the motor forward or backward, with a kill command to stop the motor immediately. The image to the right is a view of part of the code, the function that waits for the commands to move the motor.
Code: steppercode.rtf
How it works:
- "f" to move forward 10 cm. (in relation to the motor being on the right, so it's moving left ->).
- "b" to move backward 10 cm. (in relation to the motor being on the right, so it's moving right <-).
- "x" to kill movement, but the program does not stop, it is able to detect "f" or "b" at any time.
e-VaC with Xinyi
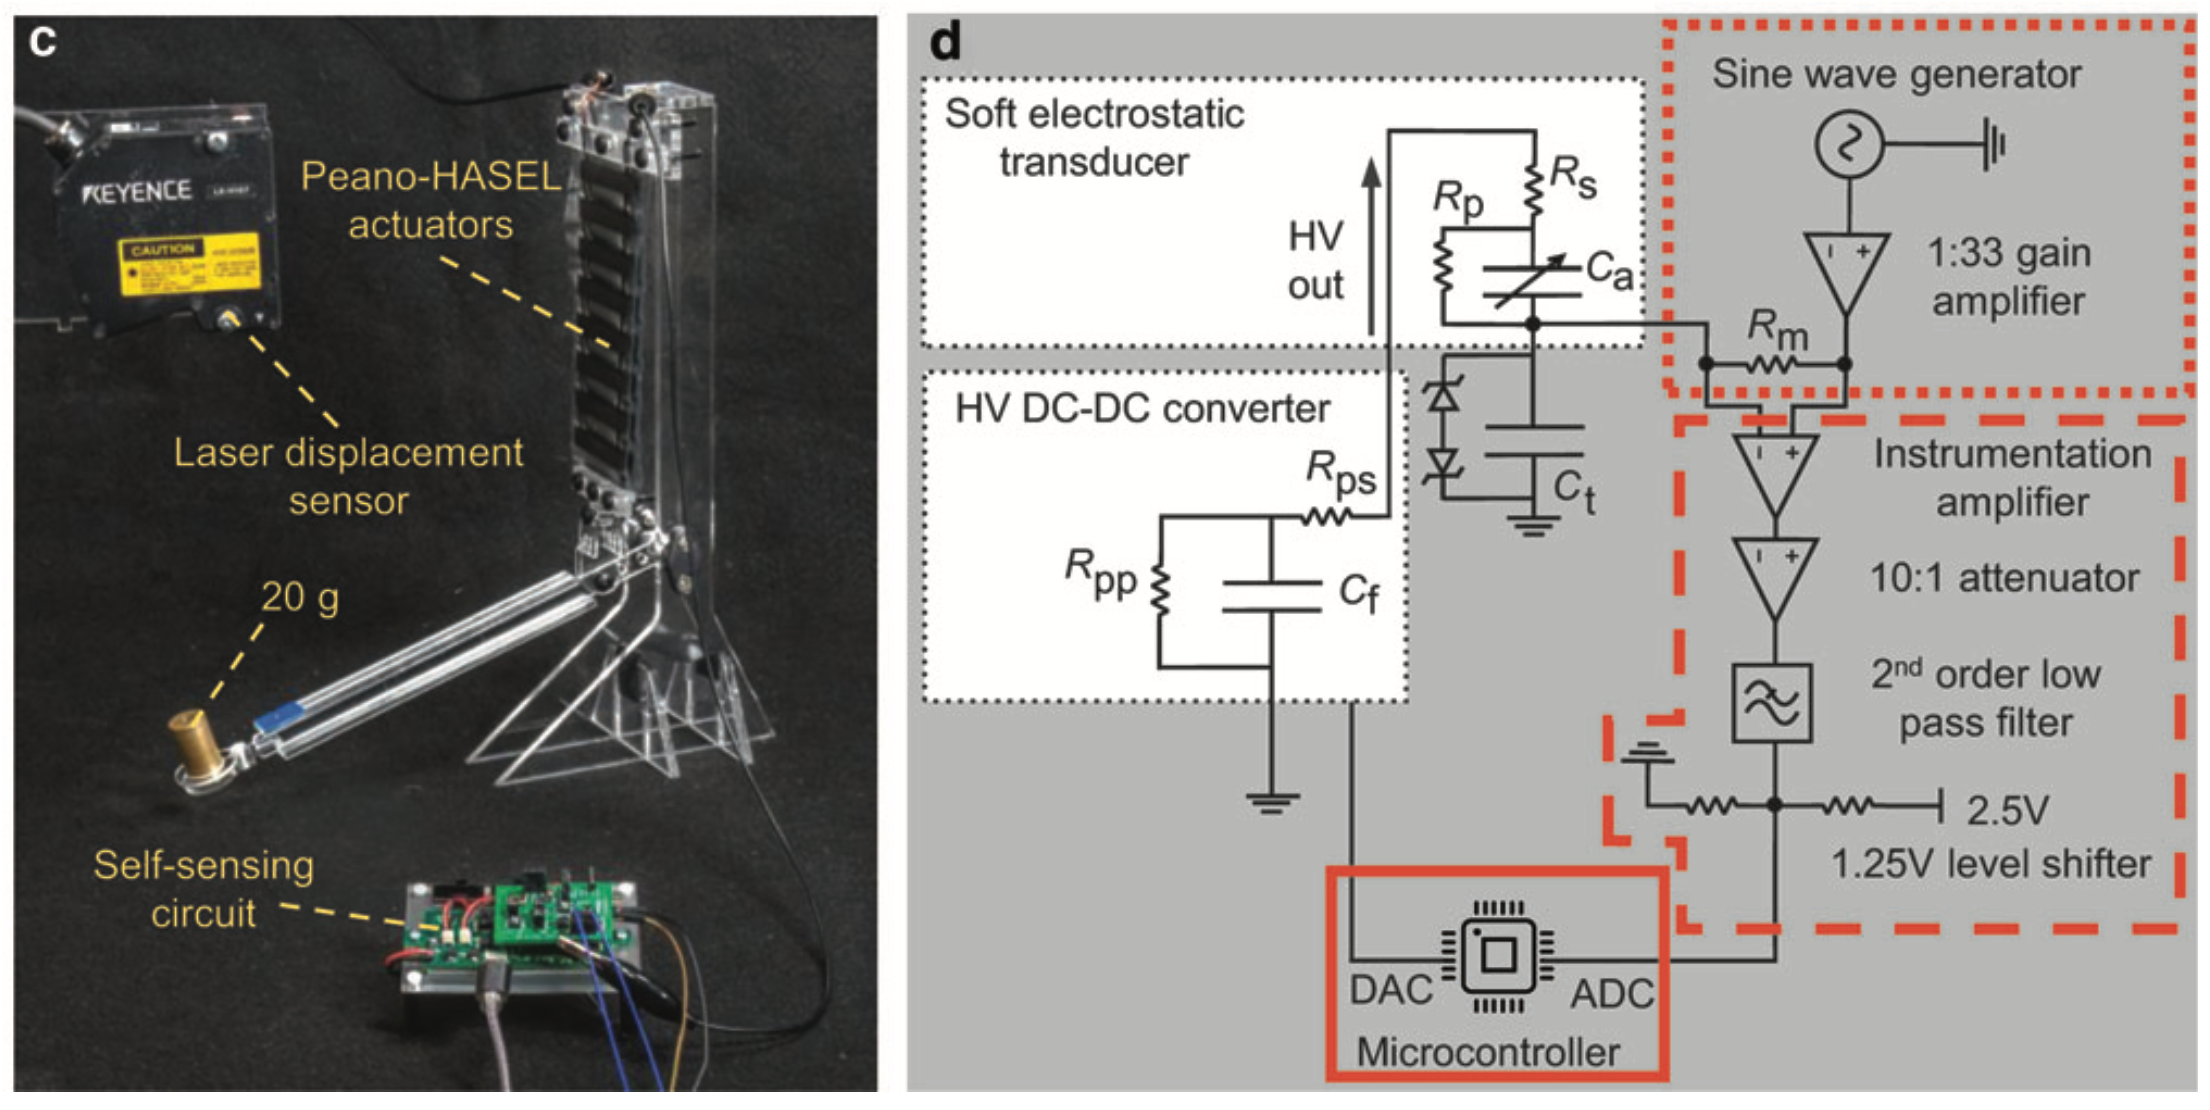
I started the PCB design layout this week with Xinyi, since I was mainly focused on helping Annie last week. The proposed PCB design will be made in KiCad EDA. Some steps we've taken to progress the project are:
- Choosing the board layout we want (which is pictured to the right) from the literature we read, which will be modeled after the board presented in Ly et al (to the right), subject to changes.
- Choosing components to design the board, since the literature only mentioned specific part #s for the main components of the board, but not all of them.
- Devise new design considerations, such as implementing a control switch that would individually control the pouches, which would allow for different types of individual movements.
Literature mentioned:
Week 1
CERVA with Annie
This week I learned the fundamental background of the CERVA project I will be working on with Annie, and how we aim to build the prototype. We hope our project will be miniaturized later on, such as already done in various papers (Do et al., Yuan et al.), in order to fulfill clinical needs.
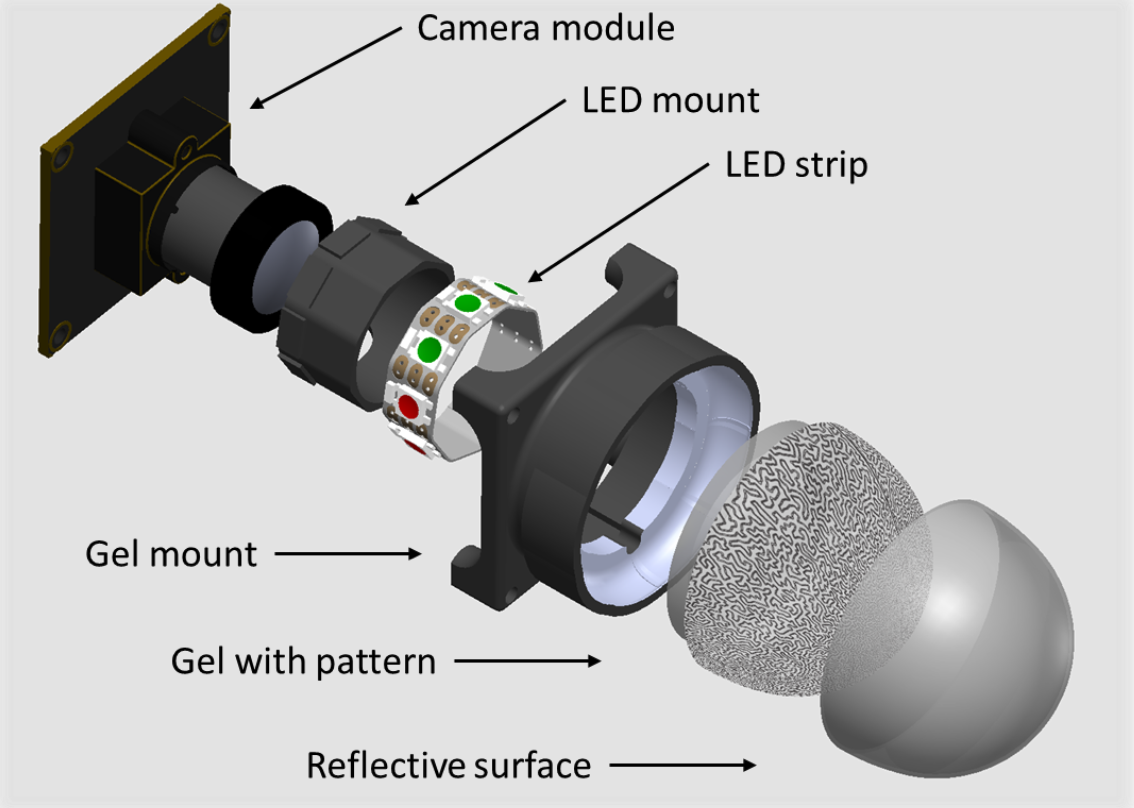
The images to the right are presented in Do et al, "DenseTact 2.0: Optical Tactile Sensor for Shape and Force Reconstruction", and they are the frameworks we will be working around.
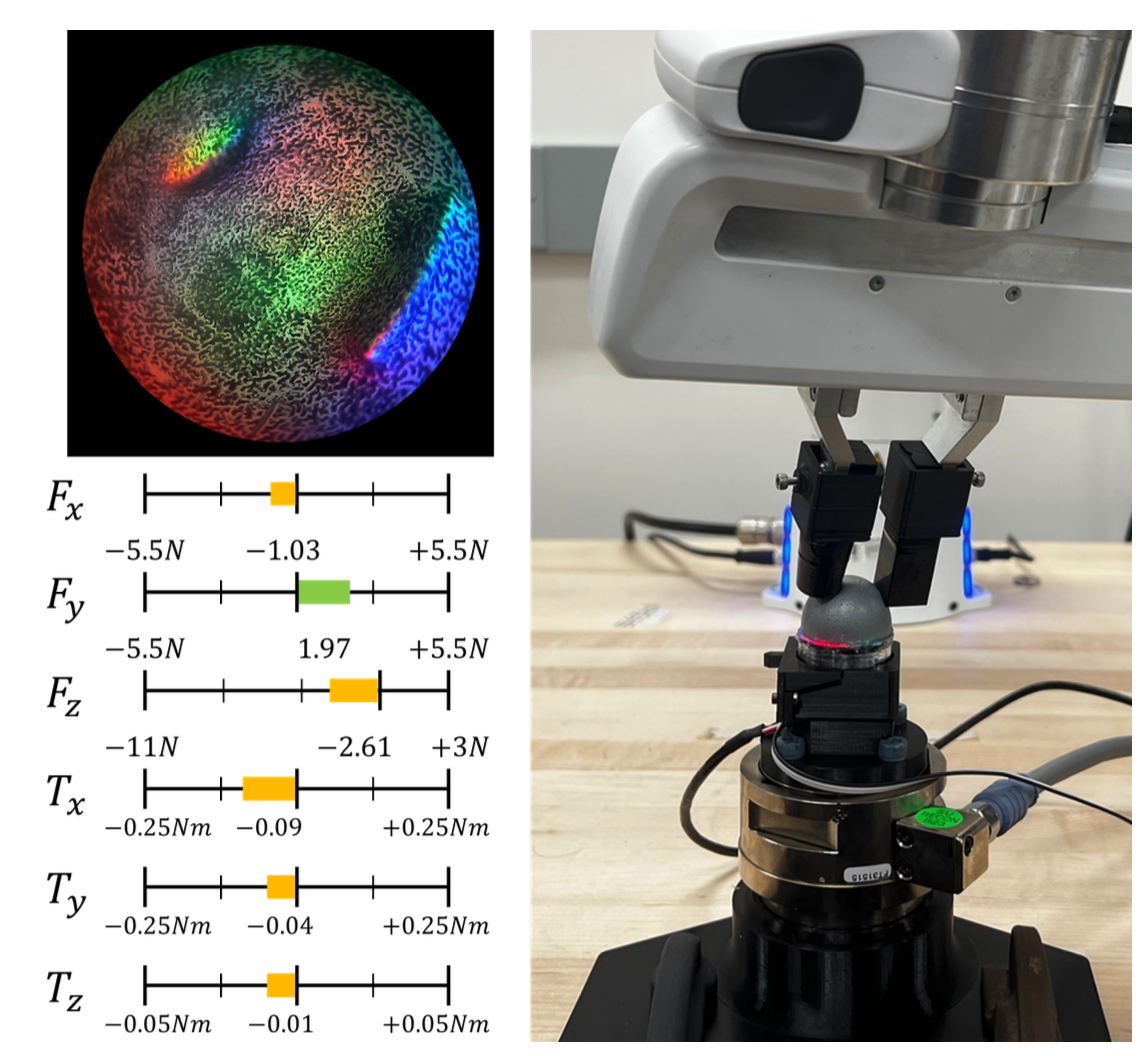
Our goal is to create a tactile sensor that can visualize the deformed surface, and use a neural network to perform shape reconstruction.
How it works:
- By applying the gel with the pattern on the end of the reflective surface, we can track changes as the sensor moves around a surface using neural networks, but I'm not sure we'll get that far during this summer.
- The reflective surface with an LED light will allow us to visualize the different forces applied to the sensor, in the X, Y, and Z directions.
Literature mentioned: