9 June
Today was my first day of work in the lab, thus most of my time was spent getting acquainted with the lab setup as well as meeting the people who aren't currently at ICRA. I went and set up key card access to MERL and should be able to get my lab key on Wednesday.
After much deliberation, it looks like I will be working on JumpGliding this summer with Morgan. I've never worked on a jumpglider before, so I spent a good amount of time reading the BDML's prior works and other relevant papers. It's definitely an interesting topic and I look forward to learning more about it.
Tomorrow I look forward to brainstorming and hopefully beginning work on my first jumpgliding (or just gliding) prototype.
10 June
Began brainstorming different methods of gliding and found two potential methods. The first is to build a sugar glider inspired glider. What's a sugar glider? Check out the video below.
The second could be similar to a current project known as the EPFL jumpglider
I'm beginning to make some Solidworks models to show what I envision might work for the jumpglider.
11 June
Today I began building gliding prototypes to further my understanding of gliders. My first prototype of a sort of X-shaped glider (attempting to model a sugar glider) was admittedly weak. It wasn't nearly heavy enough to stay stable in flight, and didn't really generate much lift. I'm not ready to say it won't work, but it will take a bit of time to flesh out the idea.
After the failed sugar glider prototype, I decided to move on build a more traditional glider. Morgan challenged me to try to achieve a glide ratio of 8 or more (which would win me the grand prize of $1), so I set to work. I decided to make the wing out of packing tape because I anticipate we will have to use some sort of plastic film when we design a collapsible wing for the new jumpglider. My glider unfortunately fell short (literally and figuratively) but I still learned a lot about glider design. Also, the plastic wings seemed to hold up well.
12 June
Designed and prototyped a new design for a scissoring wing. The prototype wasn't very robust, but it definitely looks like a viable option. It is a simple mechanism that could be powered either by a slider-crank mechanism or linear actuator. When the time comes, I'm hoping that someone can teach me a bit about Arduino programming to control the wing timing.
In the afternoon, Matt took me over to the TLT and refreshed me on how to use the laser cutter, as I'm anticipating using laser cut parts for a more robust scissoring wing. It had been a long time since I'd laser cut, so it was a much needed lesson.
16 June
Today was a day less about work and more about patriotism. I spent the majority of the morning working on a new prototype for the scissoring wing. This meant heading to the TLT multiple times to cut and recut parts (when I wasn't happy with how the different versions were shaping up). By the time I had a useful design, it was time for the day's main event: USA vs. Ghana in their opening round World Cup match in Brazil. Many of us headed to Treehouse to take in the event with a big crowd of people. The US players put forth a truly heroic effort and snatched the 3 points at the end of the match, finally ending their streak of losses against Ghana.
17 June
Big lab clean up day. Lucky for me, I didn't have to go work out after work, as I spent most of the day lifting and carrying heavy objects. Although it wasn't the most fun of days, the lab is much more organized and there are many more spaces to work. We also claimed the adjacent room in MERL, which could be useful once the rest of the SURI students arrive and we need more space. Highlights of the day include successfully moving a massive metal table and eating pizza with the crew.
18 June
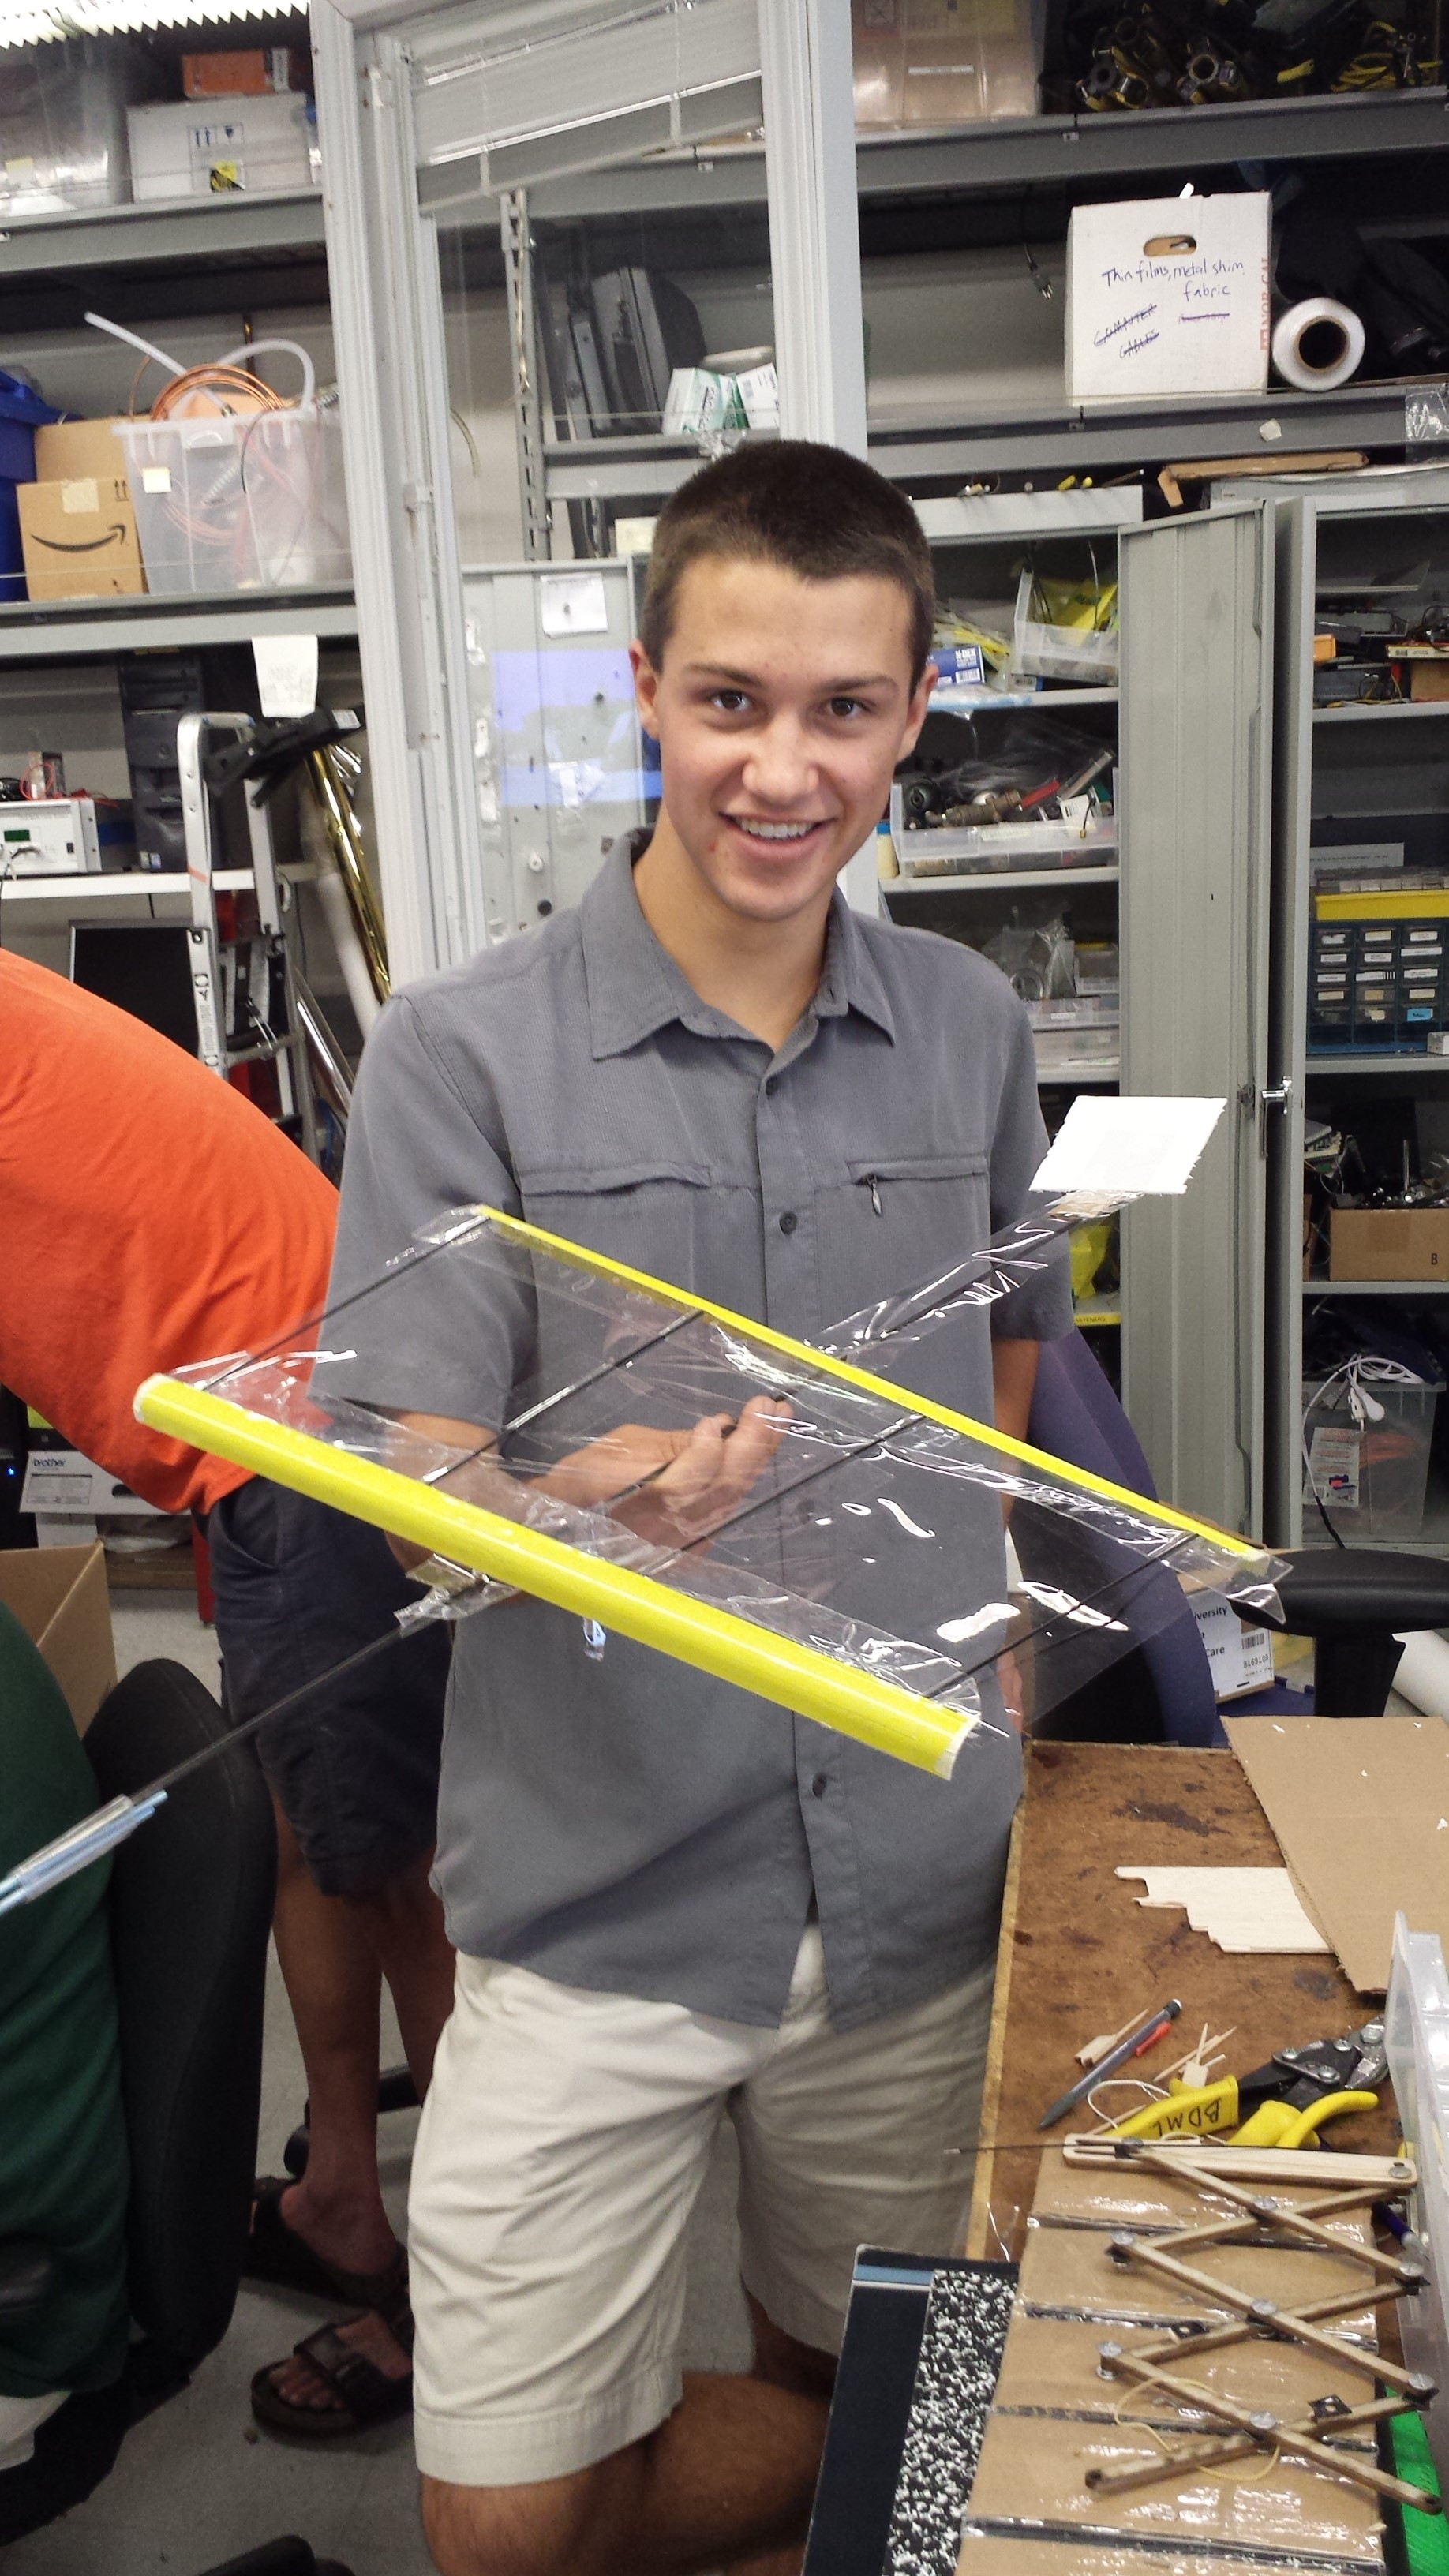
Fellow SURI student Mark joined the crew today, who joined me in working on jumpgliding. It was nice to get a second set of eyes on the project, and we generated many new ideas as a result. We spent the majority of the day making prototypes of all of our ideas and decided on pursuing further a design using measuring tape as the main structure. Measuring tape is a remarkable material, as it is reasonably light, quite strong, and bistable, which allows it to fold up well. Here's a picture of Mark with the first working model.
And the first toss...It glides!
Finally, here's a cool slo-mo video of the wings unfurling after it's tossed
19 June
Started off the day assessing the potential of all of our possible retractable wing designs. This delved into more engineering analysis as we looked into how long the wings could be in each design as well as what materials we could possibly use. I finally got to use beam deflection analysis for something useful!
After, Mark and I made our "Roll-a-Wing" model more robust by increasing the wing aspect ratio as well as making the glider elevator adjustable and more rigid. We tuned everything and got it gliding pretty well. Our next step was to design a method of rolling up the wing and unfurling it at a good rate. Check out Main.MarkSummerBlog? for nice images of what we came up with!
20 June
Mark and I did further work on what is now being called the "roll-A-wing" (patent pending, TM). Our final goal is to make the wing able to roll up and then shoot out, like a reverse tape measure. We designed and laser cut parts for our rolling mechanism, then assembled everything. Some aspects of our design worked well (we got it to roll up nicely), whereas other aspects were not as good (when the wing was released, it wanted to expand rather than shoot out, which meant that the friction of the walls was too much to overcome). Our plan for Monday is to buy and open up a tape measure from a hardware store and see if we can make it shoot out. We'd like to take a step back from making an extensible wing and focus on making an extensible tape measure.
23 June
We had the great fortune that the CDR decided to put on an Arduino workshop this week. I had been telling Matt on Friday that I would love to learn Arduino over the summer, and but a day later I had learned about the workshop.
We busted through basic types of sensors and getting things to work with Arduino sketches (what the scripts are cutely called) and were even given an accelerometer. Mark and I hooked everything up and wrote robust programs in Arduino and MATLAB. In the end, we were able to track the system's movement and output its position (although the noise in the accelerometer made it look kind of weird). Looking forward to more Arduino-ing tomorrow!
24 June
More Arduino! Mark and I made some light games to practice writing Arduino sketches. Fun fun fun...
25 June
Even more Arduino!!! We also researched hackable quadcopters that the lab is planning on buying for Main.OperationOperationalQuadrotor.
27 June
Lab retreat!!!!!1!!!!1 We headed to Sam MacDonald Park with the whole gang. It really was a great way to cap off a great week. There was tons of food to eat (and Buddy said we couldn't eat it all...) and good company as well. Natalie introduced us to a Swedish (?) tailgating-type game called Kubb, which involves throwing wooden sticks at other wooden sticks. Despite my poor explanation, it really was enjoyable (especially since my teams were undefeated through the afternoon :), but so I digress). Mark and I also kicked the soccer ball around and worked on some tricks (possible video to come?).
After we finished eating, we took some time to write down what we'd like to accomplish over the summer. I had thought about what I'd like to do off and on, but hadn't explicitly written everything down, so I found the exercise quite useful. I also found out that Matt and I share many of the same summer goals, so it looks like I'll be working with him to characterize a successful quadrotor landing.
1 July
Made updates to Matt's perching code to test whether or not a successful perch has been made. The final set up will include accelerometers on the quadrotor and perching gear, and a high speed light that will allow us to visualize the timing in the high speed video. After watching the US' heartbreaking loss to Belgium, I was ready to start experimenting, but unfortunately, on the first toss, the landing gear broke. It's fixed, but experiments will be delayed until tomorrow...
2 July
It seems that my repairs to the landing gear didn't go as planned; the dummy quad now will not stick to the glass. Morgan helped attach a different adhesive and I was able to get some data.
3 July
Decided to get new data,but the accelerometer on the landing gear is too large and keeps getting in the way of landing, which means that it is essentially acting as an infinitely stiff spring and that the landing spring is obsolete. Not good for perching. Also, it looks like there is something wrong with one of the accelerometers. It keeps telling me that the dummy quad has an acceleration of -8 Gs. This is flat out wrong, so I'll have to see if I can diagnose the accelerometer and try to fix it (which also means that the new data I took is now garbage). Anyway, here is a fun video I took of the perching:
7 July
I stripped the Arduino of the wiry mess and went for a barebones approach to test the functionality of the accelerometers. As I suspected, one of the accelerometers ( the one that was used to take the previous data) is broken, so I tossed it in the trash. Fortunately, the other one was still functional, so I fixed it to the quadrotor to get some useful data. Matt ordered new, smaller accels, but for now we've deemed it worthwhile to test things out with the remaining accel. Also, we had a perching meeting, where we discussed Operation: Operational Quadrotor. The inital steps will be to determine if we can sense whether or not we've perched with accelerometer data, and to buy a suitable quadrotor. I presented the options that Mark and I researched before, and we are also in the process of getting advice from the Stanford UAV club.
8 July
Morgan taught Matt and I how to use the Adept arm to throw the dummy quad at the test glass, which should give us repeatable throws and a higher success rate. Below is a photo of the quadrotor set up ready to go on the Adept arm.
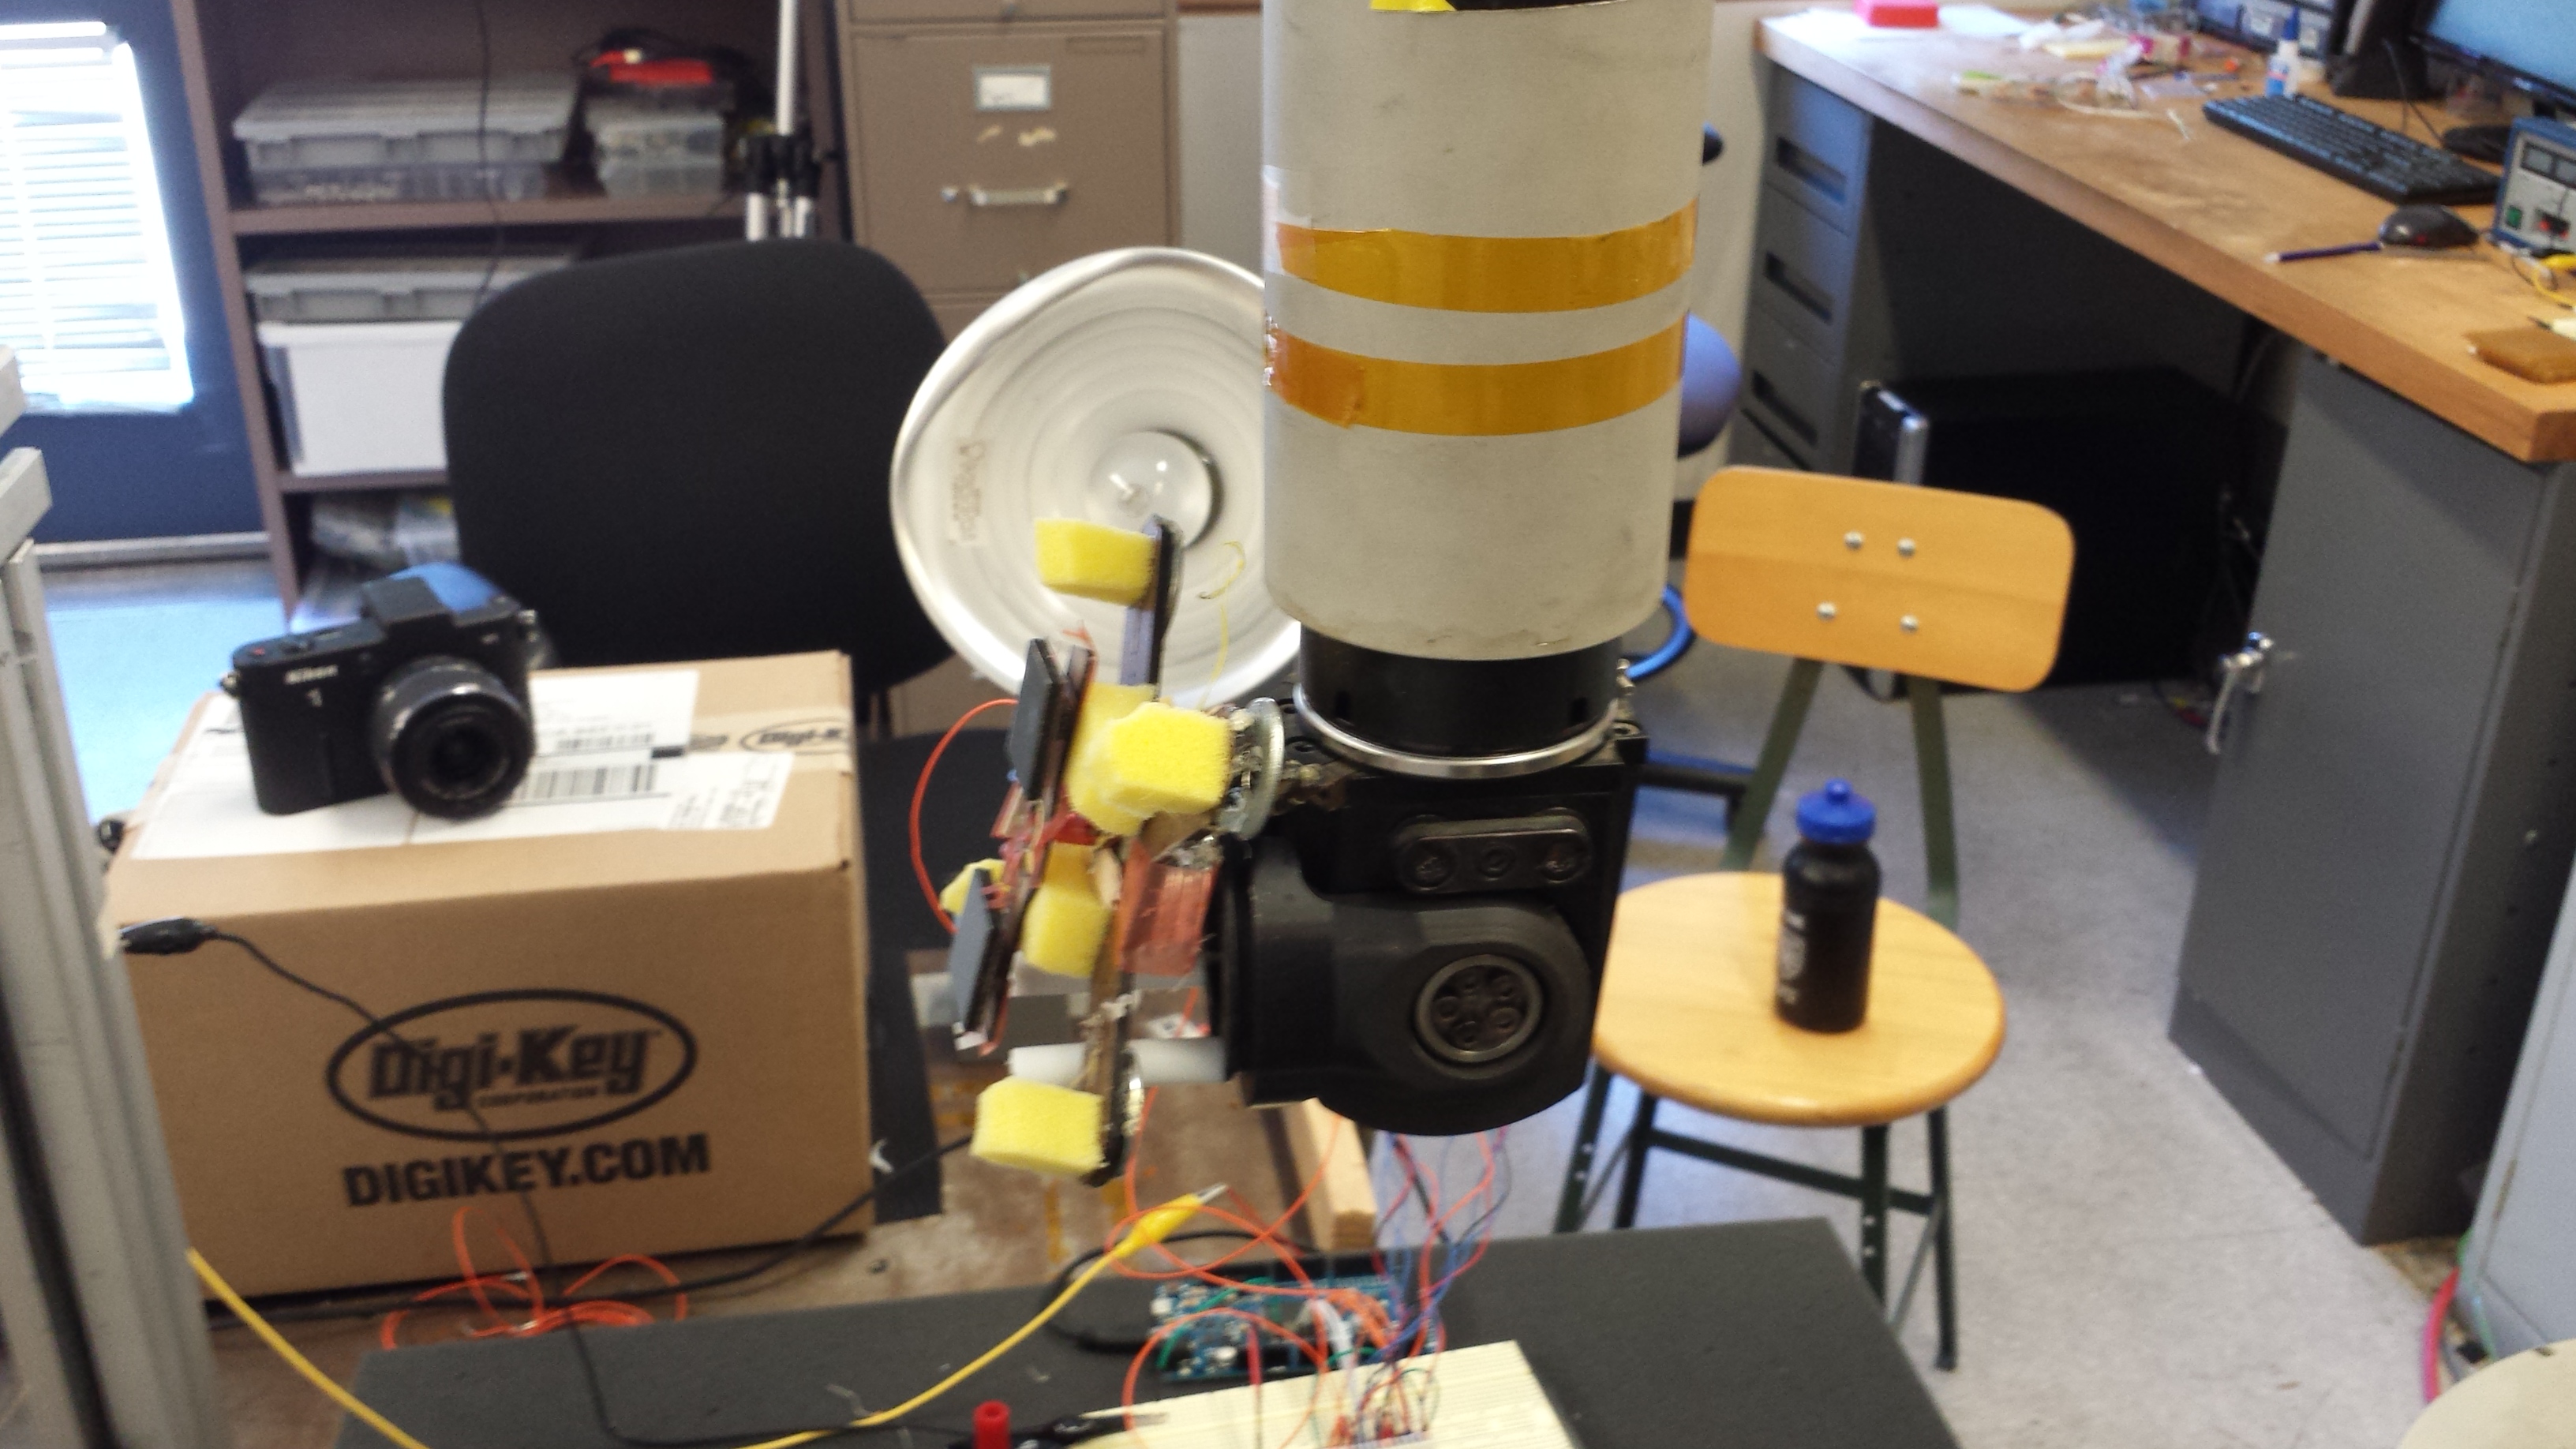
We were able to start testing and had quite an unbelievable success rate. By my estimates we were around 90% or so. Even when we cranked up the arm to throw at around 3 m/s, we were still successfully perching. This is is a testament to the robustness of the gripper, but it's still important that we get failure data as well, which we were able to do by orienting the pads horizontally. I went through the accel data and corresponding videos, and the results look promising.
First, see an example of a success.
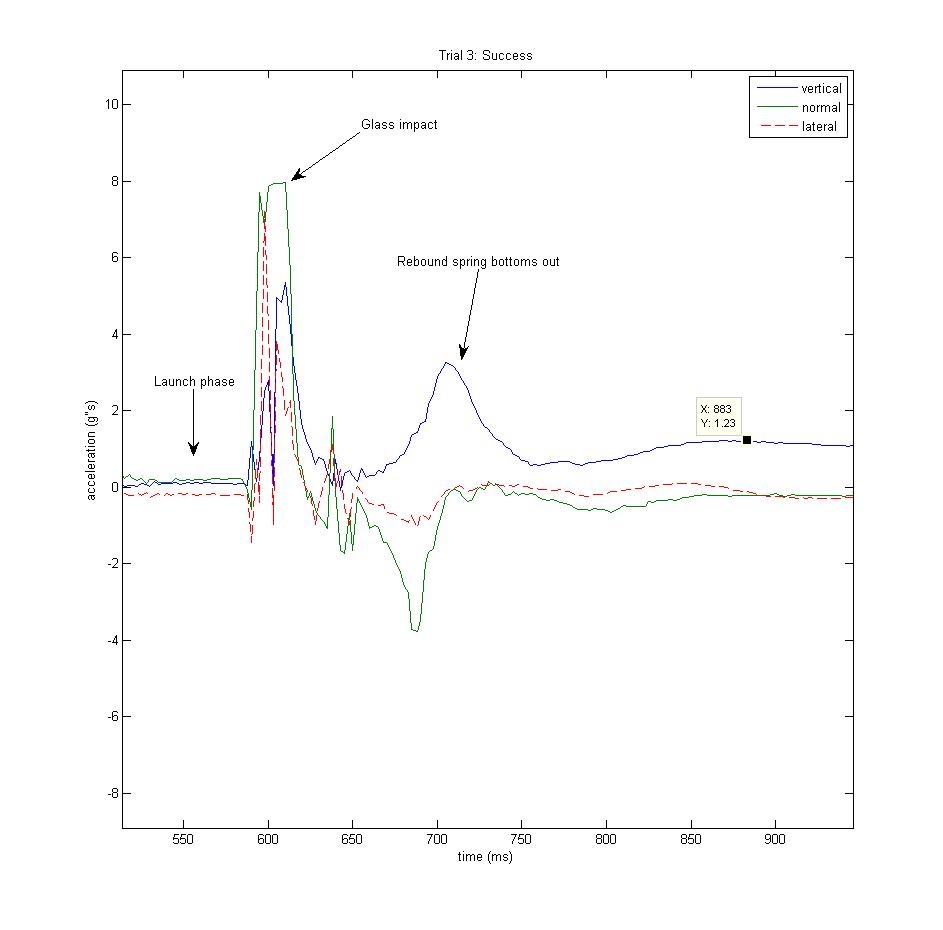
Excitingly enough, the data seems to make sense! We see 3 distinct phases: launch phase, impact, and quadrotor settling. The time from when the quad contacts the glass and finally settles is around 200 ms, which could be sufficient enough to detect a successful perch. Also, notice the spike representing the rebound spring catching the system. This occurs roughly 100 ms after initial contact in every success case, which could also be a reasonable indication of a successful perch.
Now let's take a look at a failed perch.
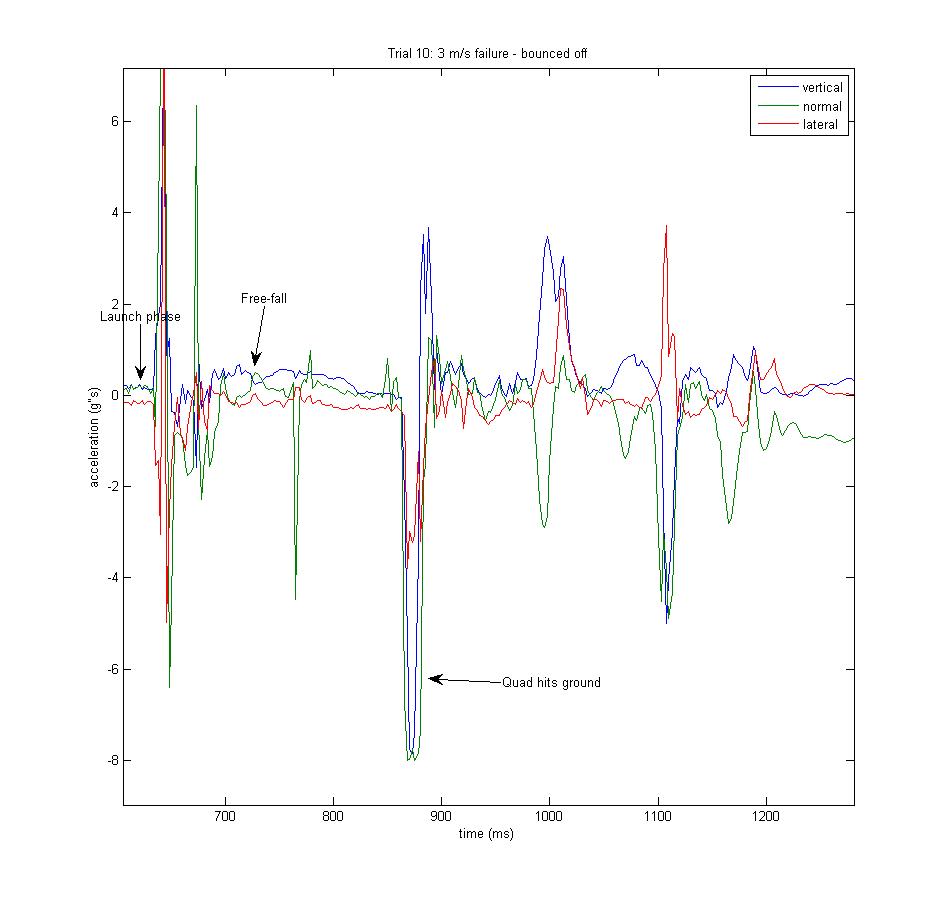
We see a similar impact spike in this scenario, but we don't experience the rebound spring catching the quad. Instead, the quad begins to go into free-fall about 100 ms after initally contacting the glass. This could mean that we may be able to sense a success or failure in as little as 100 ms!
9 July
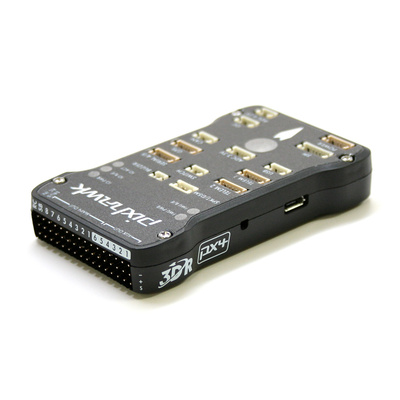
Matt and I did more research for potential quadrotors that we'll buy for the next step of the project. Long story short: we're struggling to find a quadcopter in our weight range (200-500g). It seems like they are either really big or really small. The good news for now is that the UAV club responded to us and they've recommended the Pixhawk controller (seen below). It weighs 38g and is apparently the next big thing in RC vehicle controls.
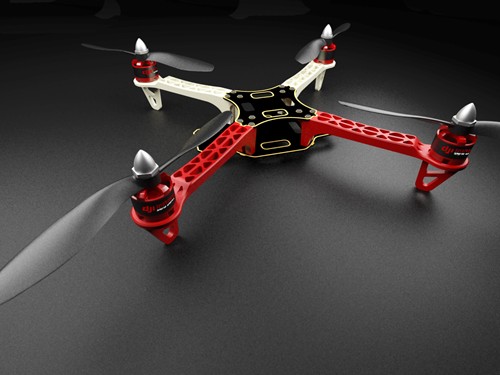
The quadcopter that we've been eyeing is the DJI Flamewheel. With the motors and everything all assembled, we could probably get the weight down to a little more than 500g. We'll get more input of whether or not this is too heavy before we make a purchase.
Also, the new tiny accels came in, but we had some trouble getting them to work. We will take a look at them tomorrow and hopefully get them up and running.
10 July
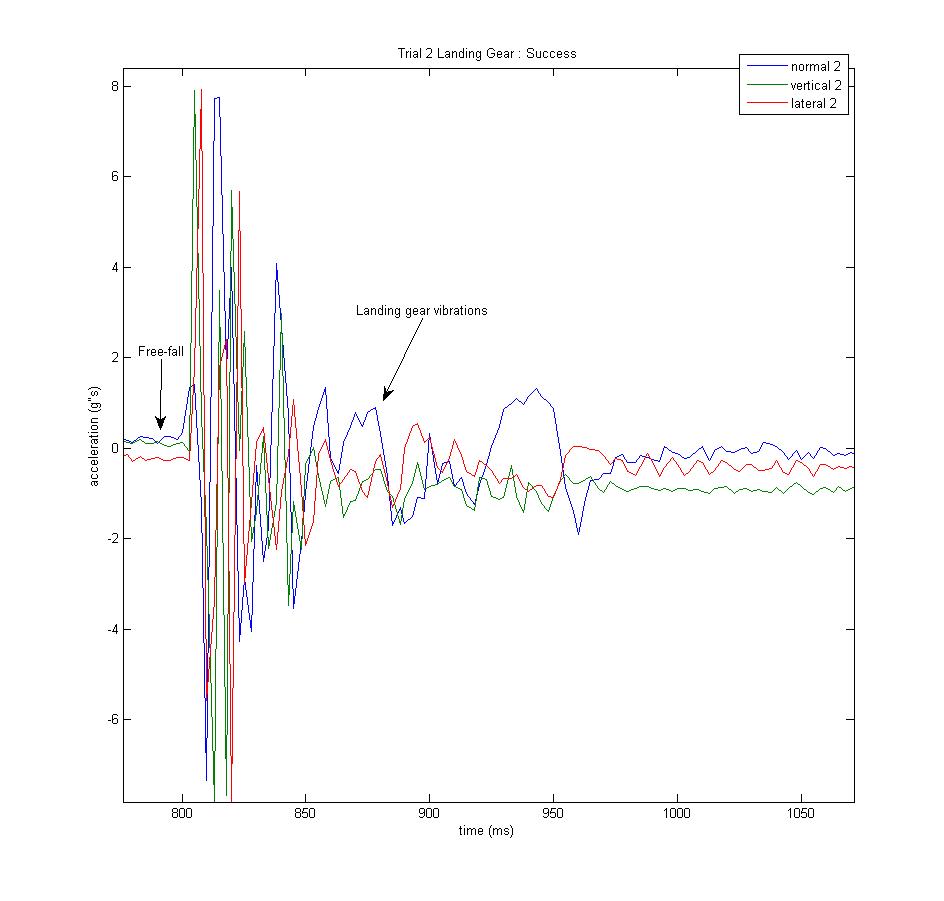
After a bit of debugging, the accels are now functional, so Matt and I were able to set up our testing rig. Here's a video of one of the tests. Notice that there are accels attached to the landing gear and the quad body. The point of this was to compare the readings from each of them.
Reading from landing gear:
Reading from quad body:
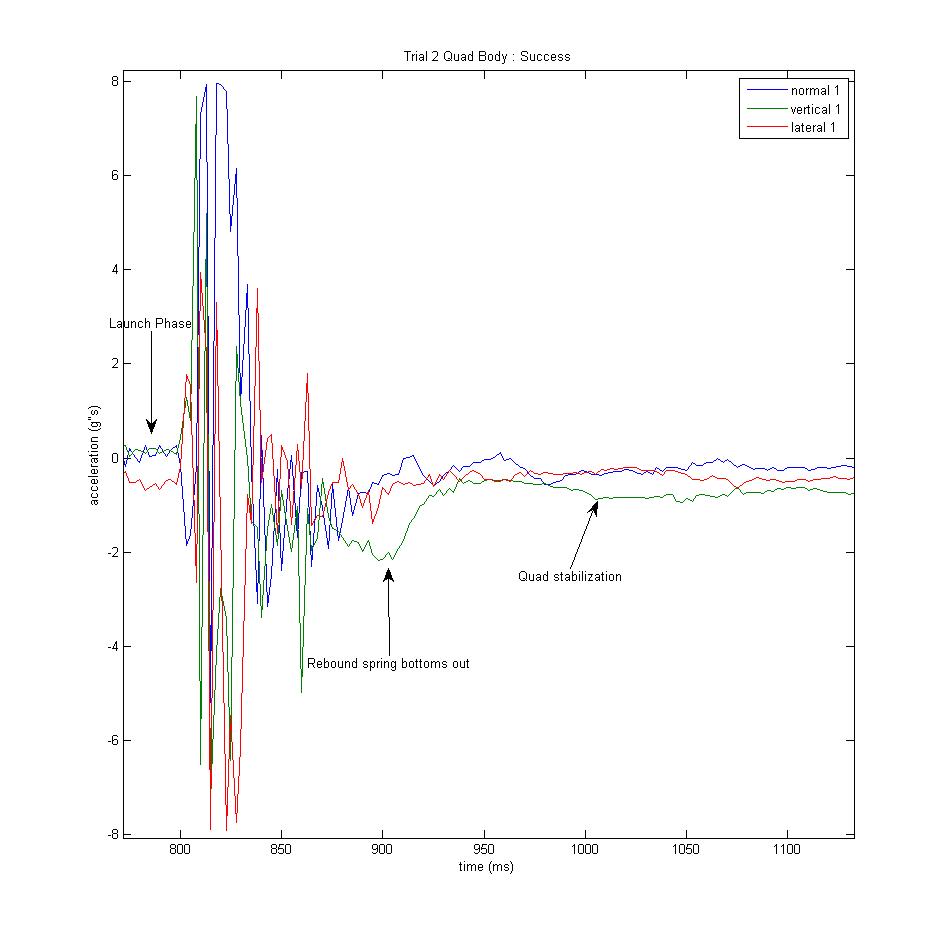
As we'd hope the accelerometer on the quad body has a similar reading to our previous tests. We see a launch phase, impact, rebound spring engagement, and then settling. With the landing gear, everything is pretty similar, however we pick up the landing gear vibrations that are damped out in the quad body data. Look closely in the video - the landing gear shakes after it contacts the glass.
11 July
Matt and I did more research about possible quadrotor kits that we could buy. The main issue I've experienced with the kits is the shear weight of the quadrotor parts sans the actual body. From my research, I've found that the regular sized motors are at least 50g and the ESCs are 20g at the least. This means that even without the frame, we're already pushing 300g. Add on the Pixhawk flight controller and we're around 350g, which means that our frame must be extremely light. So light, in fact, that it doesn't look like there are frame kits available that put us in our desired weight range.
On the other hand, there are smaller parts available. On Hobbyking there is a micro motor that weighs 2.3g, but can only produce a maximum of 25g of thrust, which of course means that we probably couldn't lift much payload.
We messed around with the possibility of just making our own quadrotor, and the customization prospects look more promising. We set up a spreadsheet to start thinking about quad parts:
Within this spreadsheet is a better spec sheet set up by some hobbyists on an RC vehicle community website
These people surely know more than I do, so I was happy to come across a robust motor sheet before I spent too much time compiling possibilities. There also is a tab that includes some reasonably light frames (we could also make our own). Matt and I will present to the group on Monday and if all goes well, we will compile an order to make our own quadrotor. As a quick briefing, necessary parts would include:
- 4 motors
- 4 Electronic Speed Controllers (ESCs)
- Pixhawk flight controller
- Battery
- Body
- Propellers
14 July
My task for the day was to try and use the double accelerometer data to write a MATLAB script to determine whether or not we've made a successful perch. After looking at so much data, I had become pretty good at using my human pattern recognition to determine a success or failure, but I found that it was difficult to put this into computer logic, especially with my eye on making these decisions real time (I can recognize patterns looking at the complete set of data, but it is significantly more difficult to determine things real time, especially since our goal is to decide within ~100 ms.
I fiddled around with the smooth function in MATLAB, which uses various filtering methods to make the data smoother. I had issues, however, with this command over- or under-filtering data, as important events would be filtered out. Matt should be around tomorrow, so I'm planning on brainstorming with him and hopefully tag teaming this problem.
15 July
Natalie and Mark taught me a lot about signal processing and how it may be useful for this type of sensing. The first thought was to do a Fast Fourier transform on the accelerometer data to find a dominant frequency. The thought was that there would be a dominant frequency when a successful perch has occurred.

Unfortunately, this wasn't the case. I did learn a lot, though, and if anyone ever asks me about the Nyquist frequency, I can nod like I know what they're talking about.
The second order of business was to apply a low pass filter on the data to remove the noise. I relearned about Butterworth filters, Bode plots, bandwidth, noise, and drift. Low-pass filtering made it much easier to distinguish perching events.
Finally, Matt and I made the decision to move on from using our two accelerometer idea. I think that we wanted our initial design to work so badly that we didn't realize that there are probably better methods out there. Mark (the Elder) and Natalie introduced me to flex sensors, which change resistance as you bend them. Matt and I decided to buy a couple. Our next plan is to put one of these flex sensors onto the rebound spring. We hypothesize that we should be able to detect a successful perch by looking at what the rebound spring is doing. If it stretches, then settles, we have a success, and if it stretches then returns to its original length, it has bounced off.
16 July
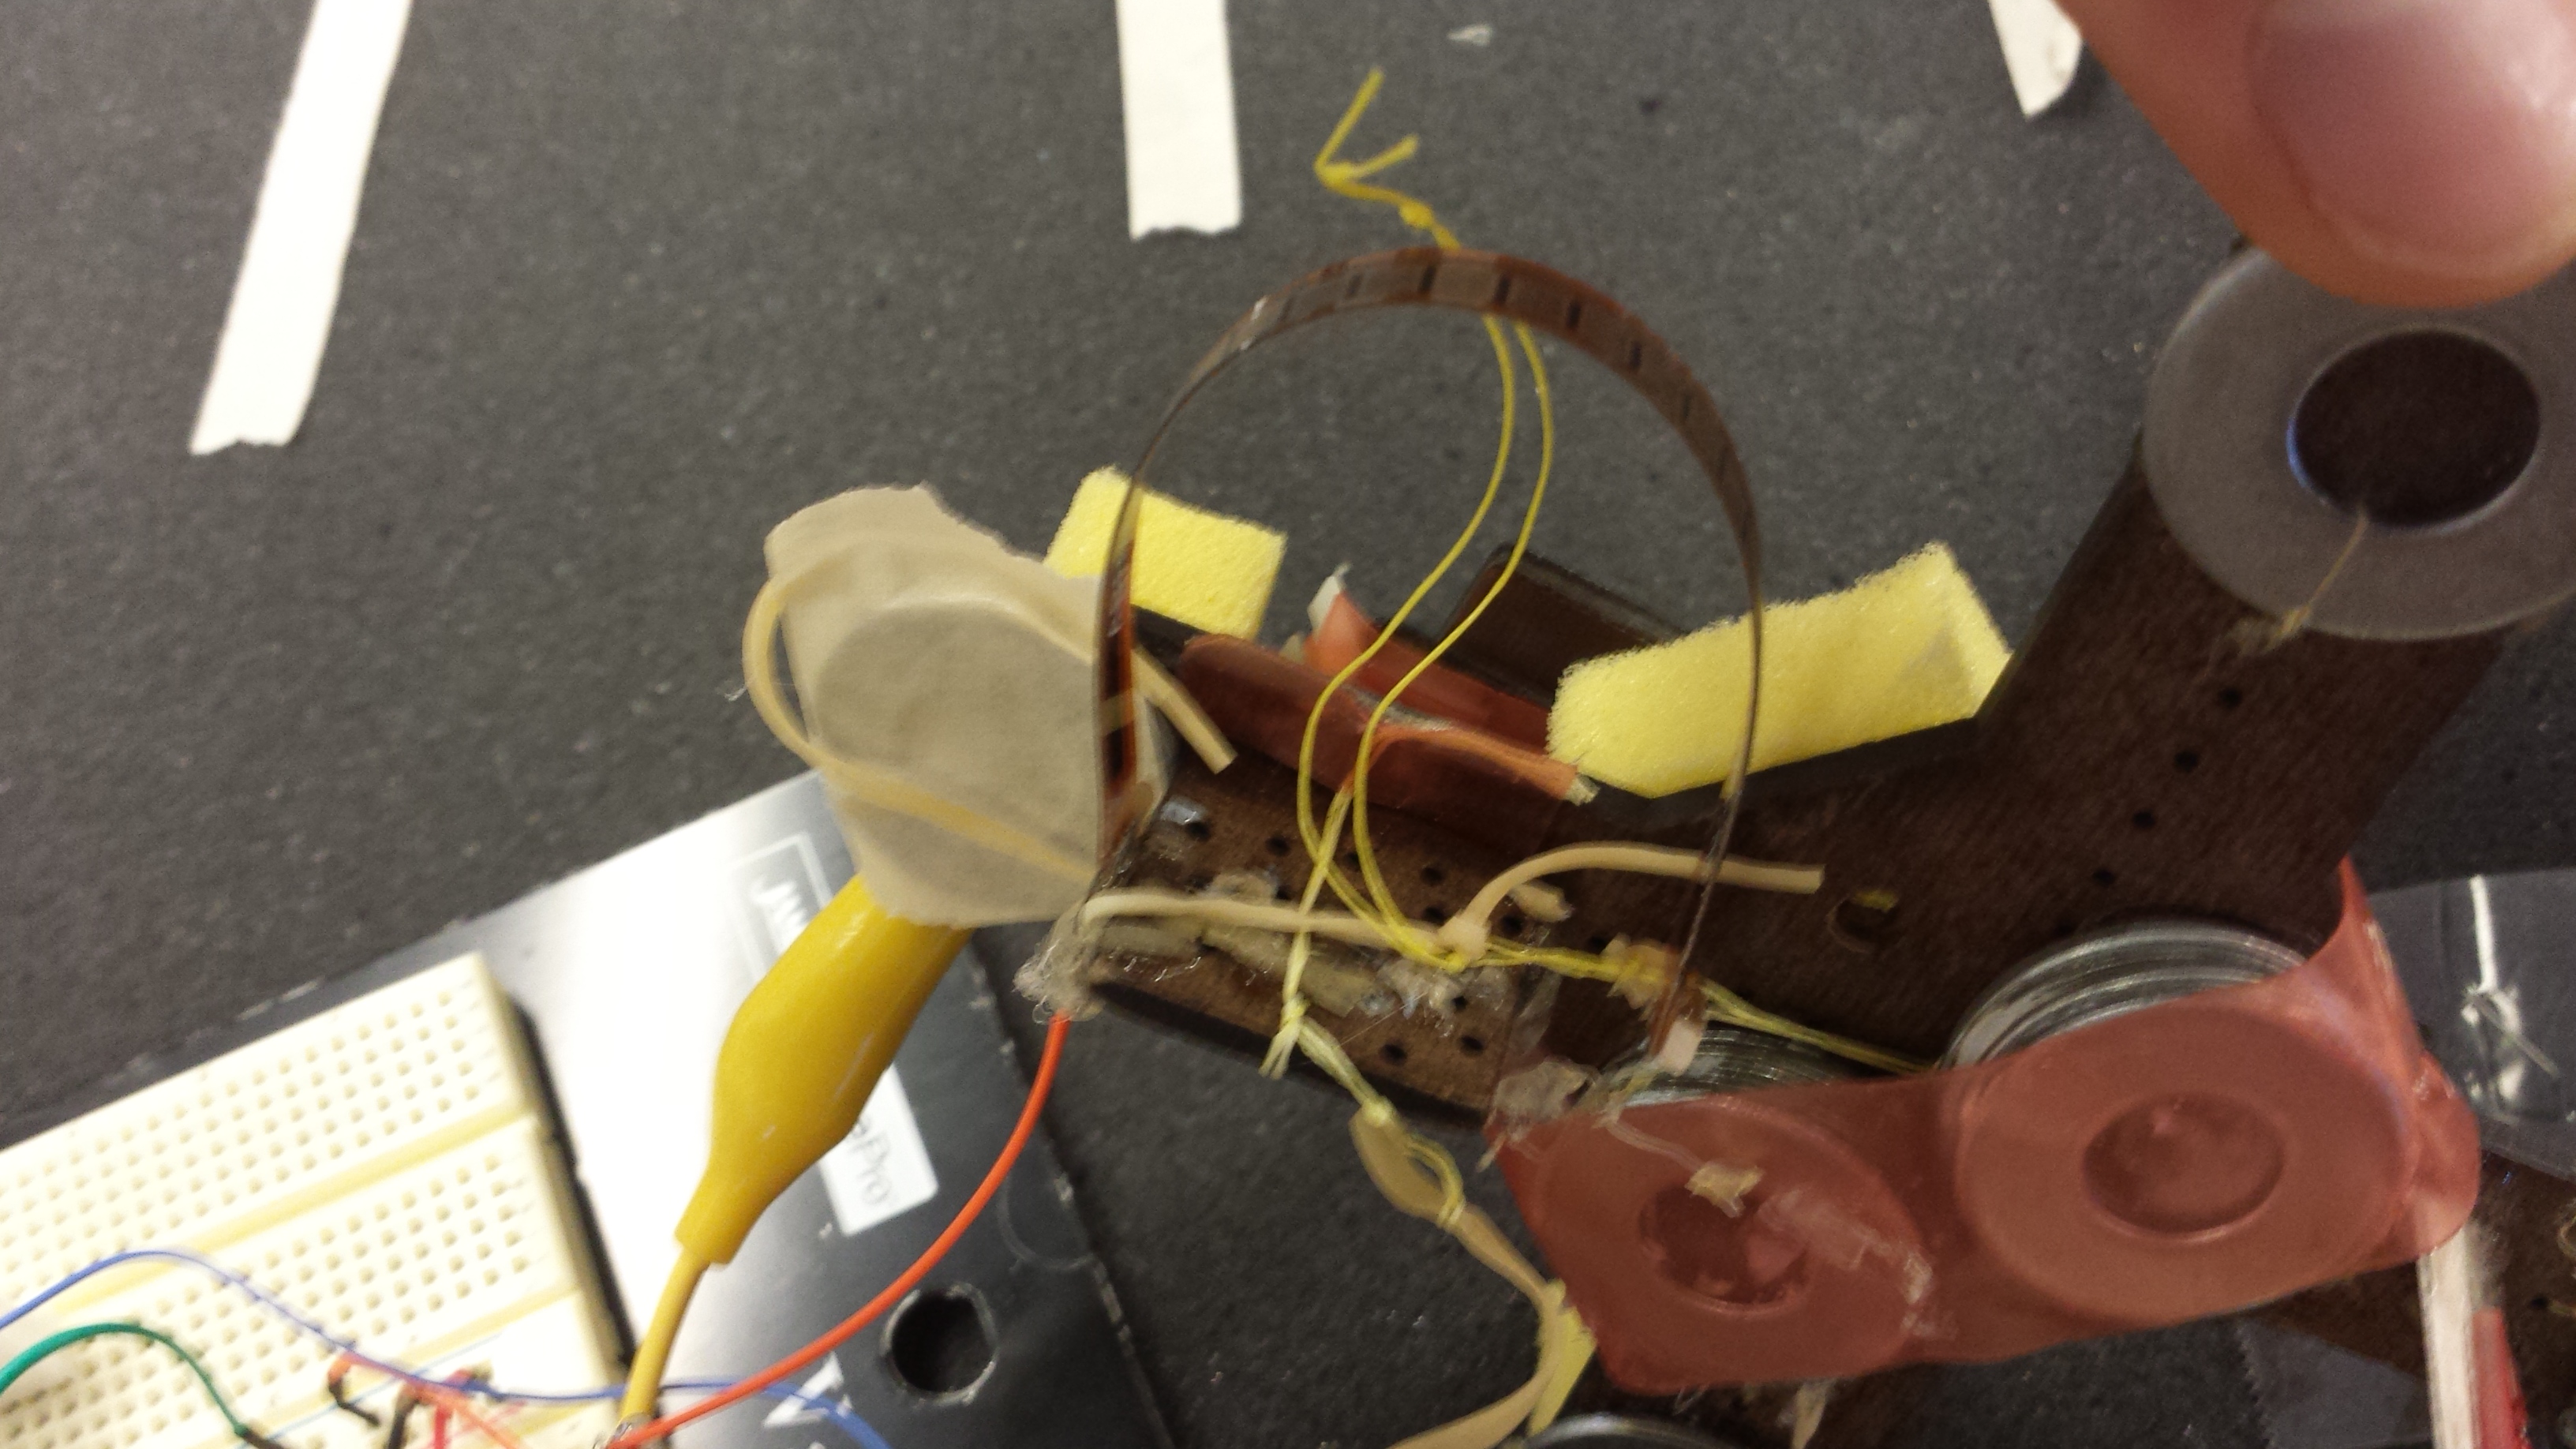
Mark (the Elder) luckily found a couple of flex sensors laying around, so I won't even have to wait at all to get started! I decided to test the sensors before trying to put them onto the dummy quad and they seemed to work well. I hooked them up to a multimeter and was getting good resolution. Even when I bent it slightly, the resistance was changing on the order of kilo-ohms. This made me confident in installing the flex sensor onto the quad rebound spring. I did a quick test where I took a resistance reading with the spring relaxed and maxed out, and to my dismay the readings were very close. I figured that with noise from the Arduino these readings would be difficult to sift through. Thus, I decided to install a softer rebound spring so that it would extend more and hopefully give me an obvious reading.
I was happy with this new set-up, so my next task was to configure the flex sensor to the Arduino. This proved to be difficult, as I kept getting maximum readings no matter how much I flexed the sensor. After some internet digging, I figured out that I needed a voltage divider so that the Arduino would be able to calculate resistance. I set this up , but was still getting garbage data, which turns out to be because the sensor was broken. I hooked up the other one, wrote an Arduino sketch, and was good to go.
This is what my final set-up looks like
Matt and I tossed the quad with the Adept and got promising results. I'll let you try and figure out which is a success and which is a failure. Also, the y axes are incorrect; it should says that it is a measure of rebound spring stretch...
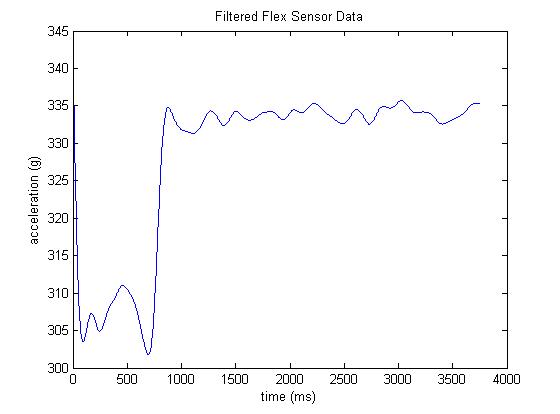
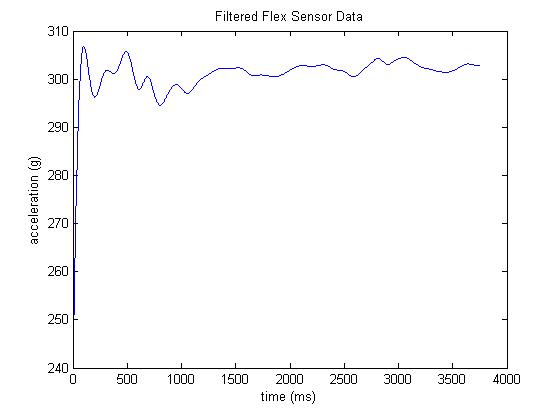
If you guessed that the first was a success, you were correct! With this in mind, we've now decided to combine the flex sensor with the quad body accelerometer to do our success detection. We'll use the accel for event detection and the flex sensor for rebound spring detection. I tried combining the two set ups, but it was a huge mess. I'll clean it up tomorrow.
17 July
I took apart the tangled mass of wires
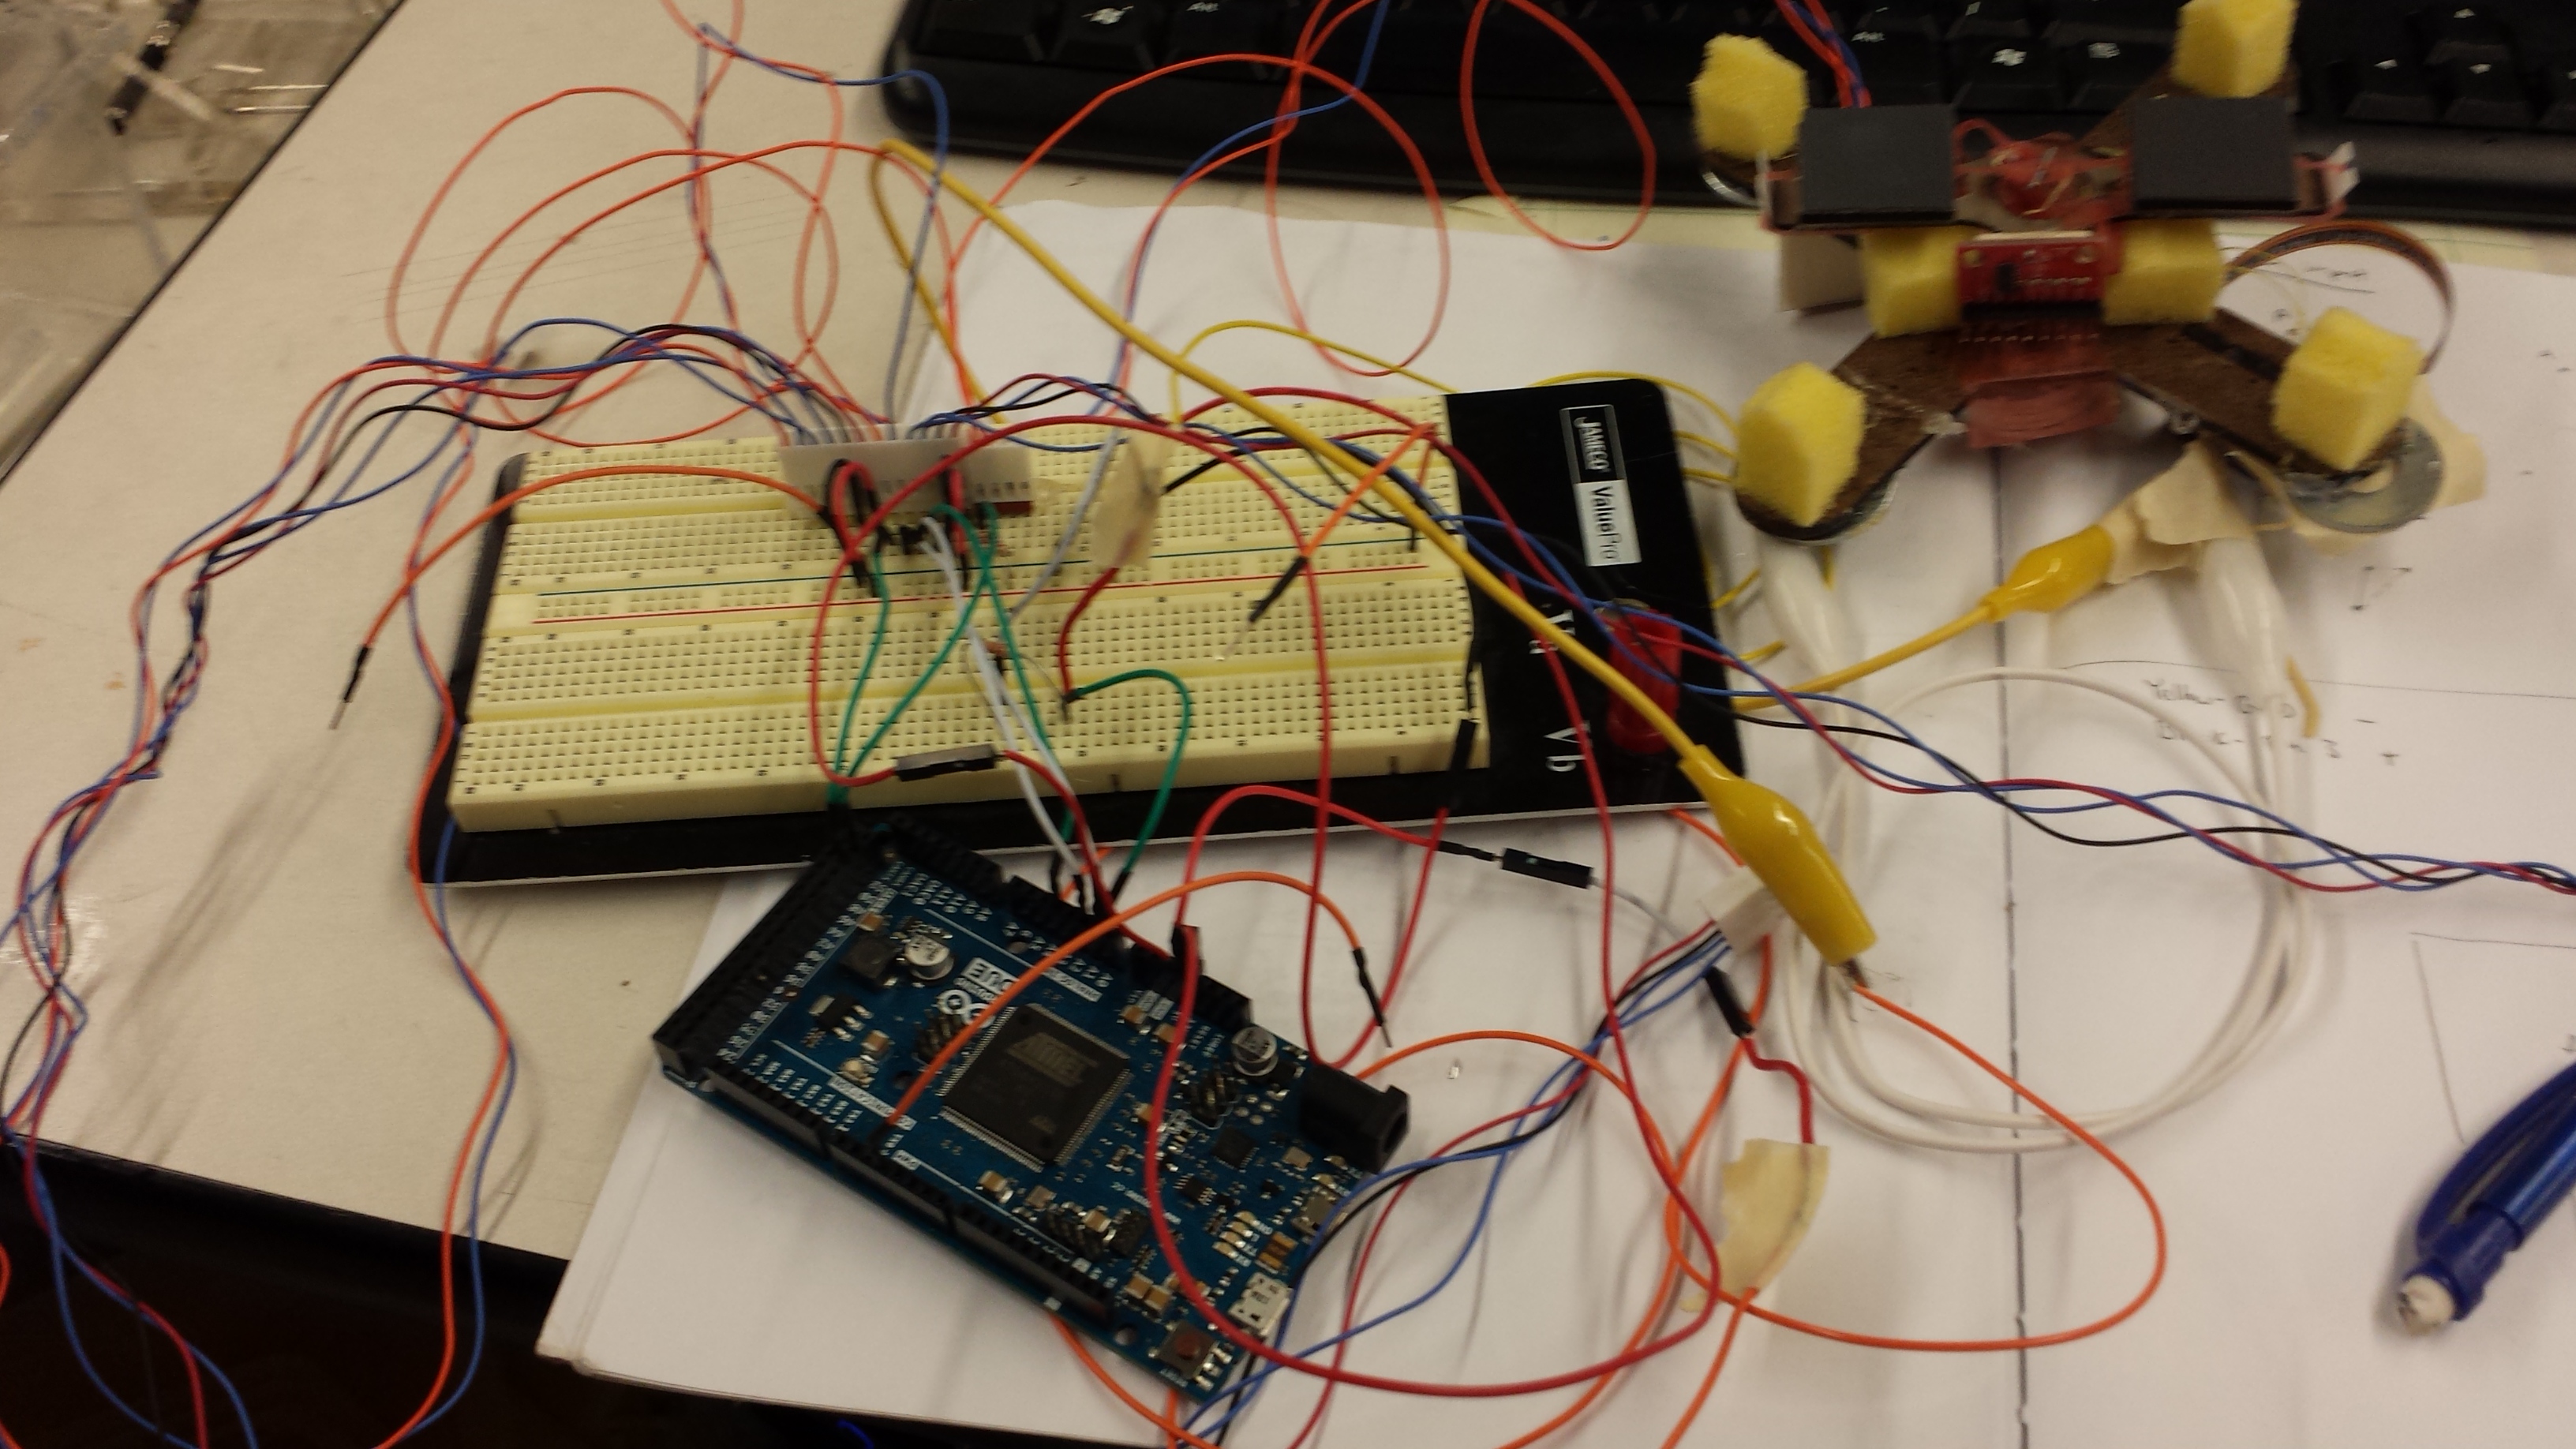
and started rebuilding my circuit, which I drew a nice circuit diagram for ( something I should have done long ago)
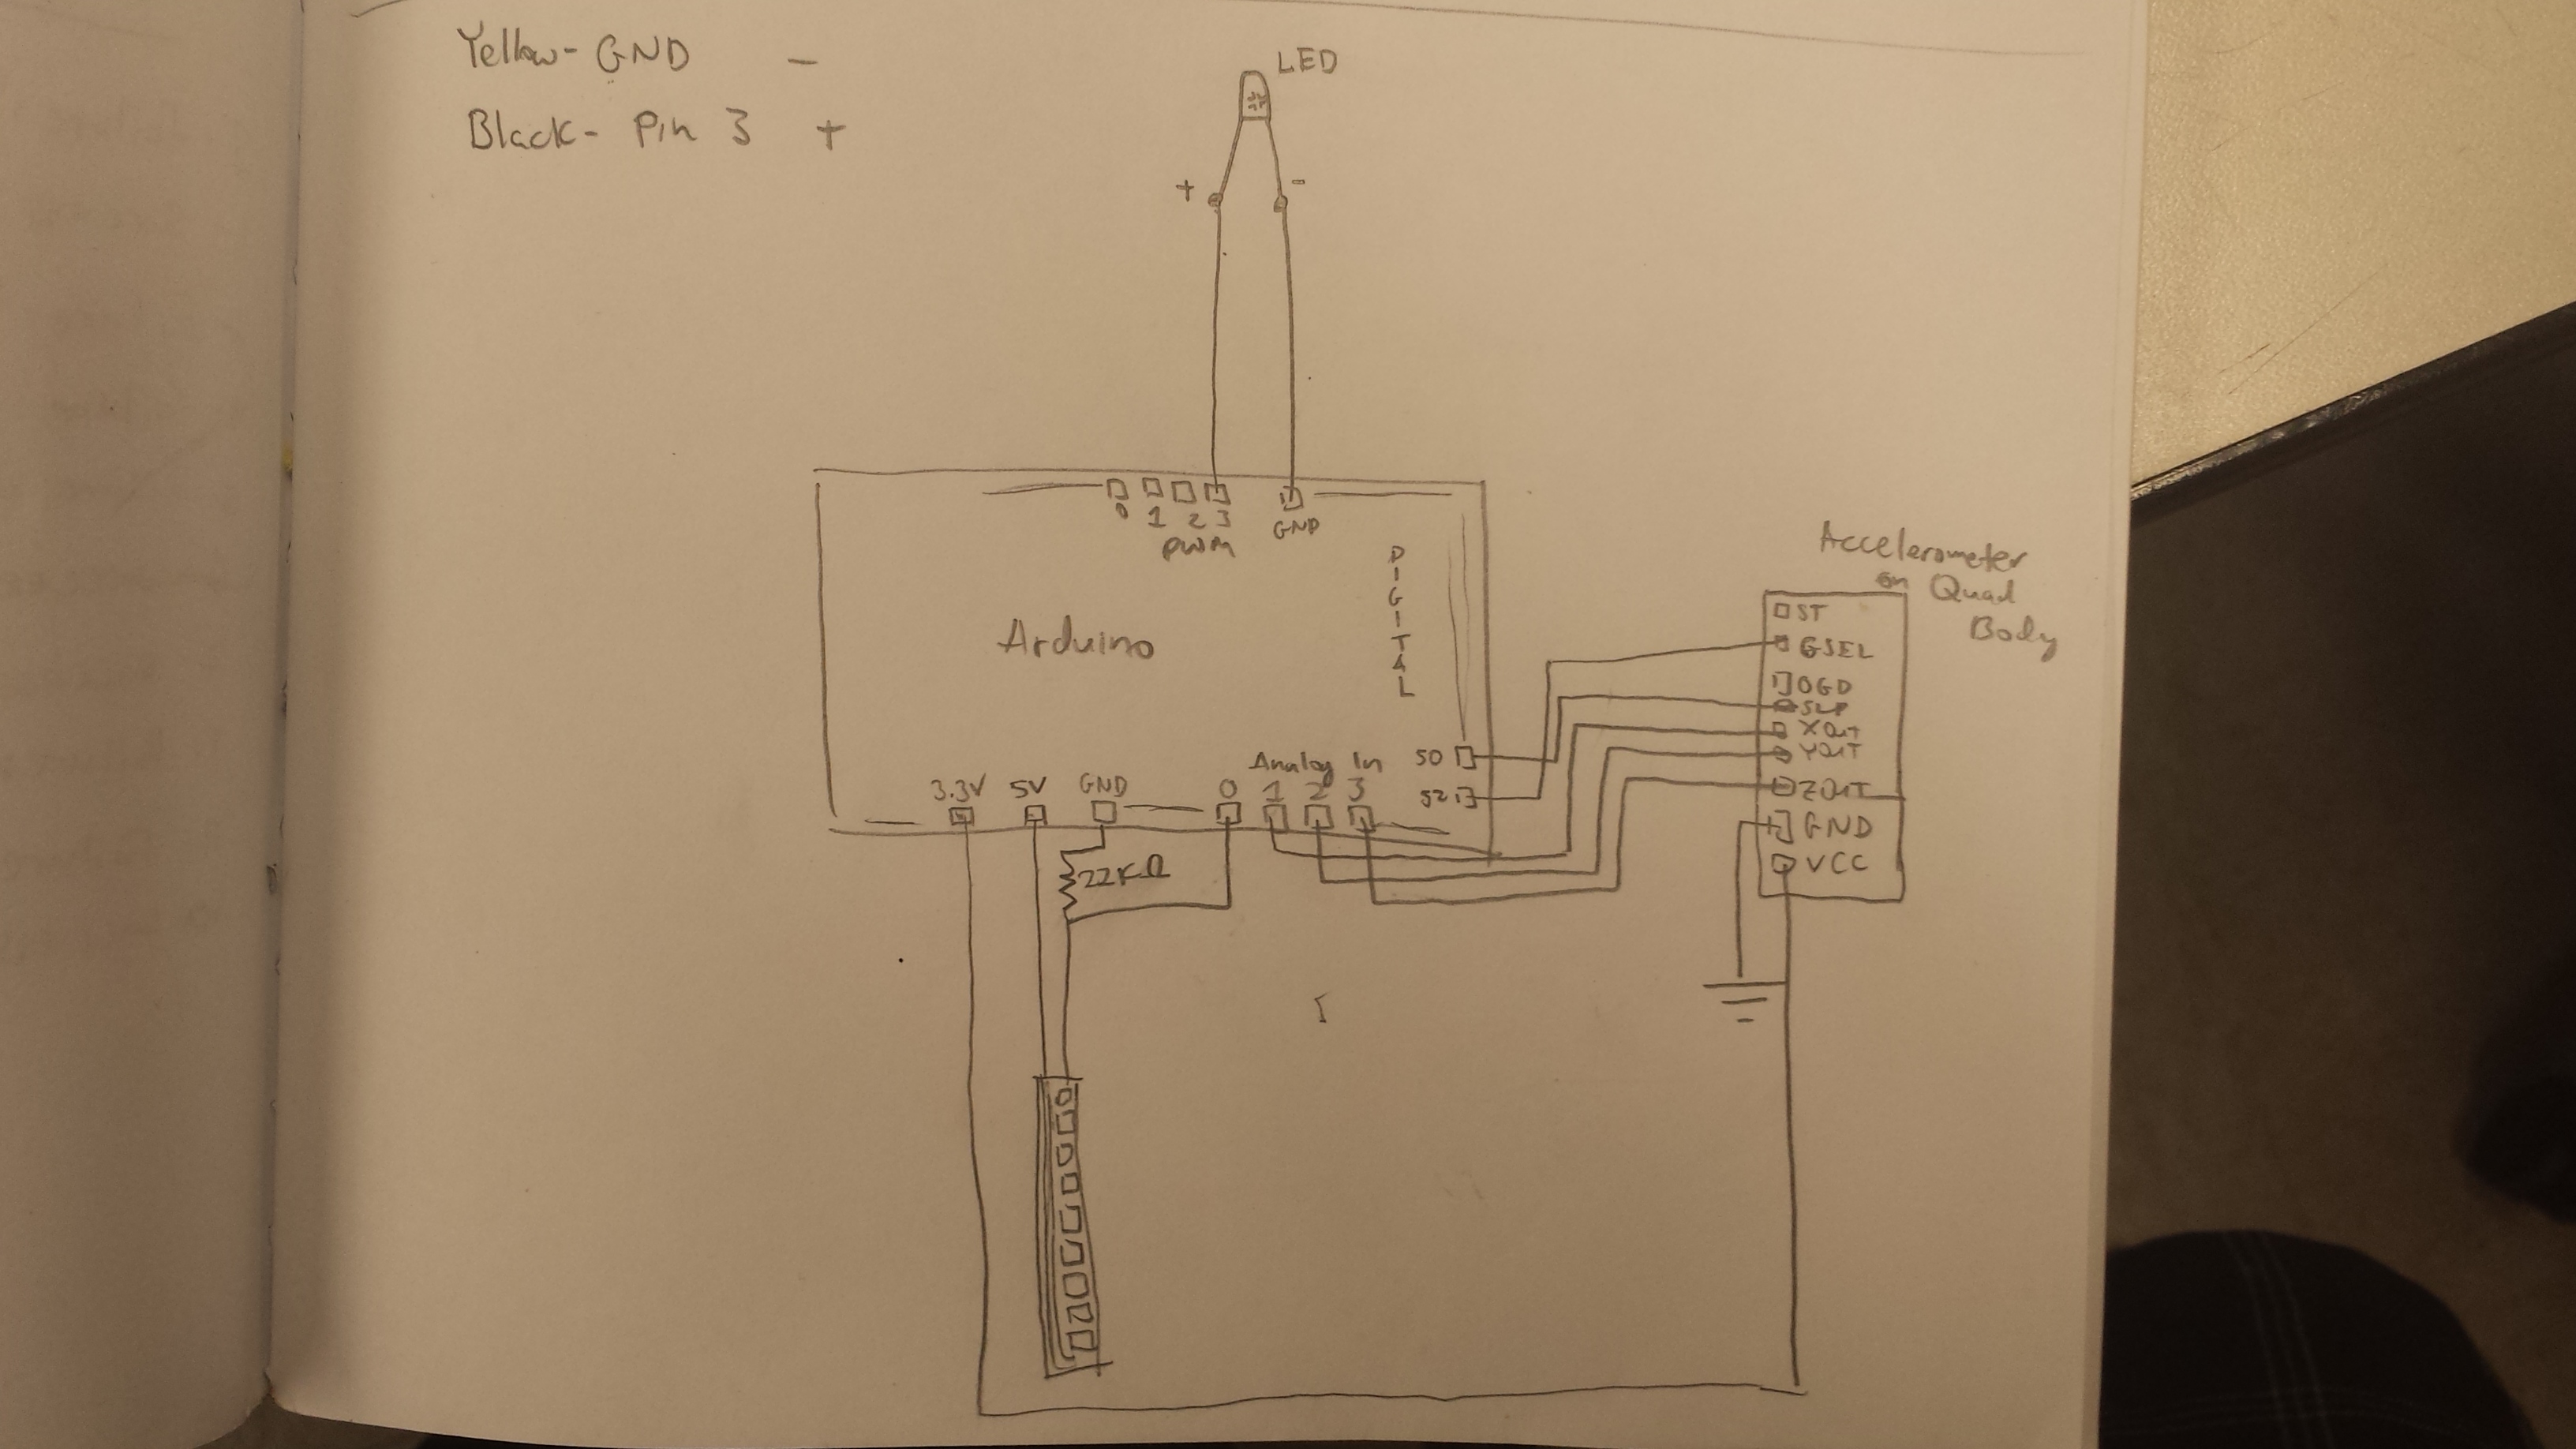
Now I'll easily be able to rebuild things easily if I need to and be able to plan when we try perching the Crazyflie.
18 July
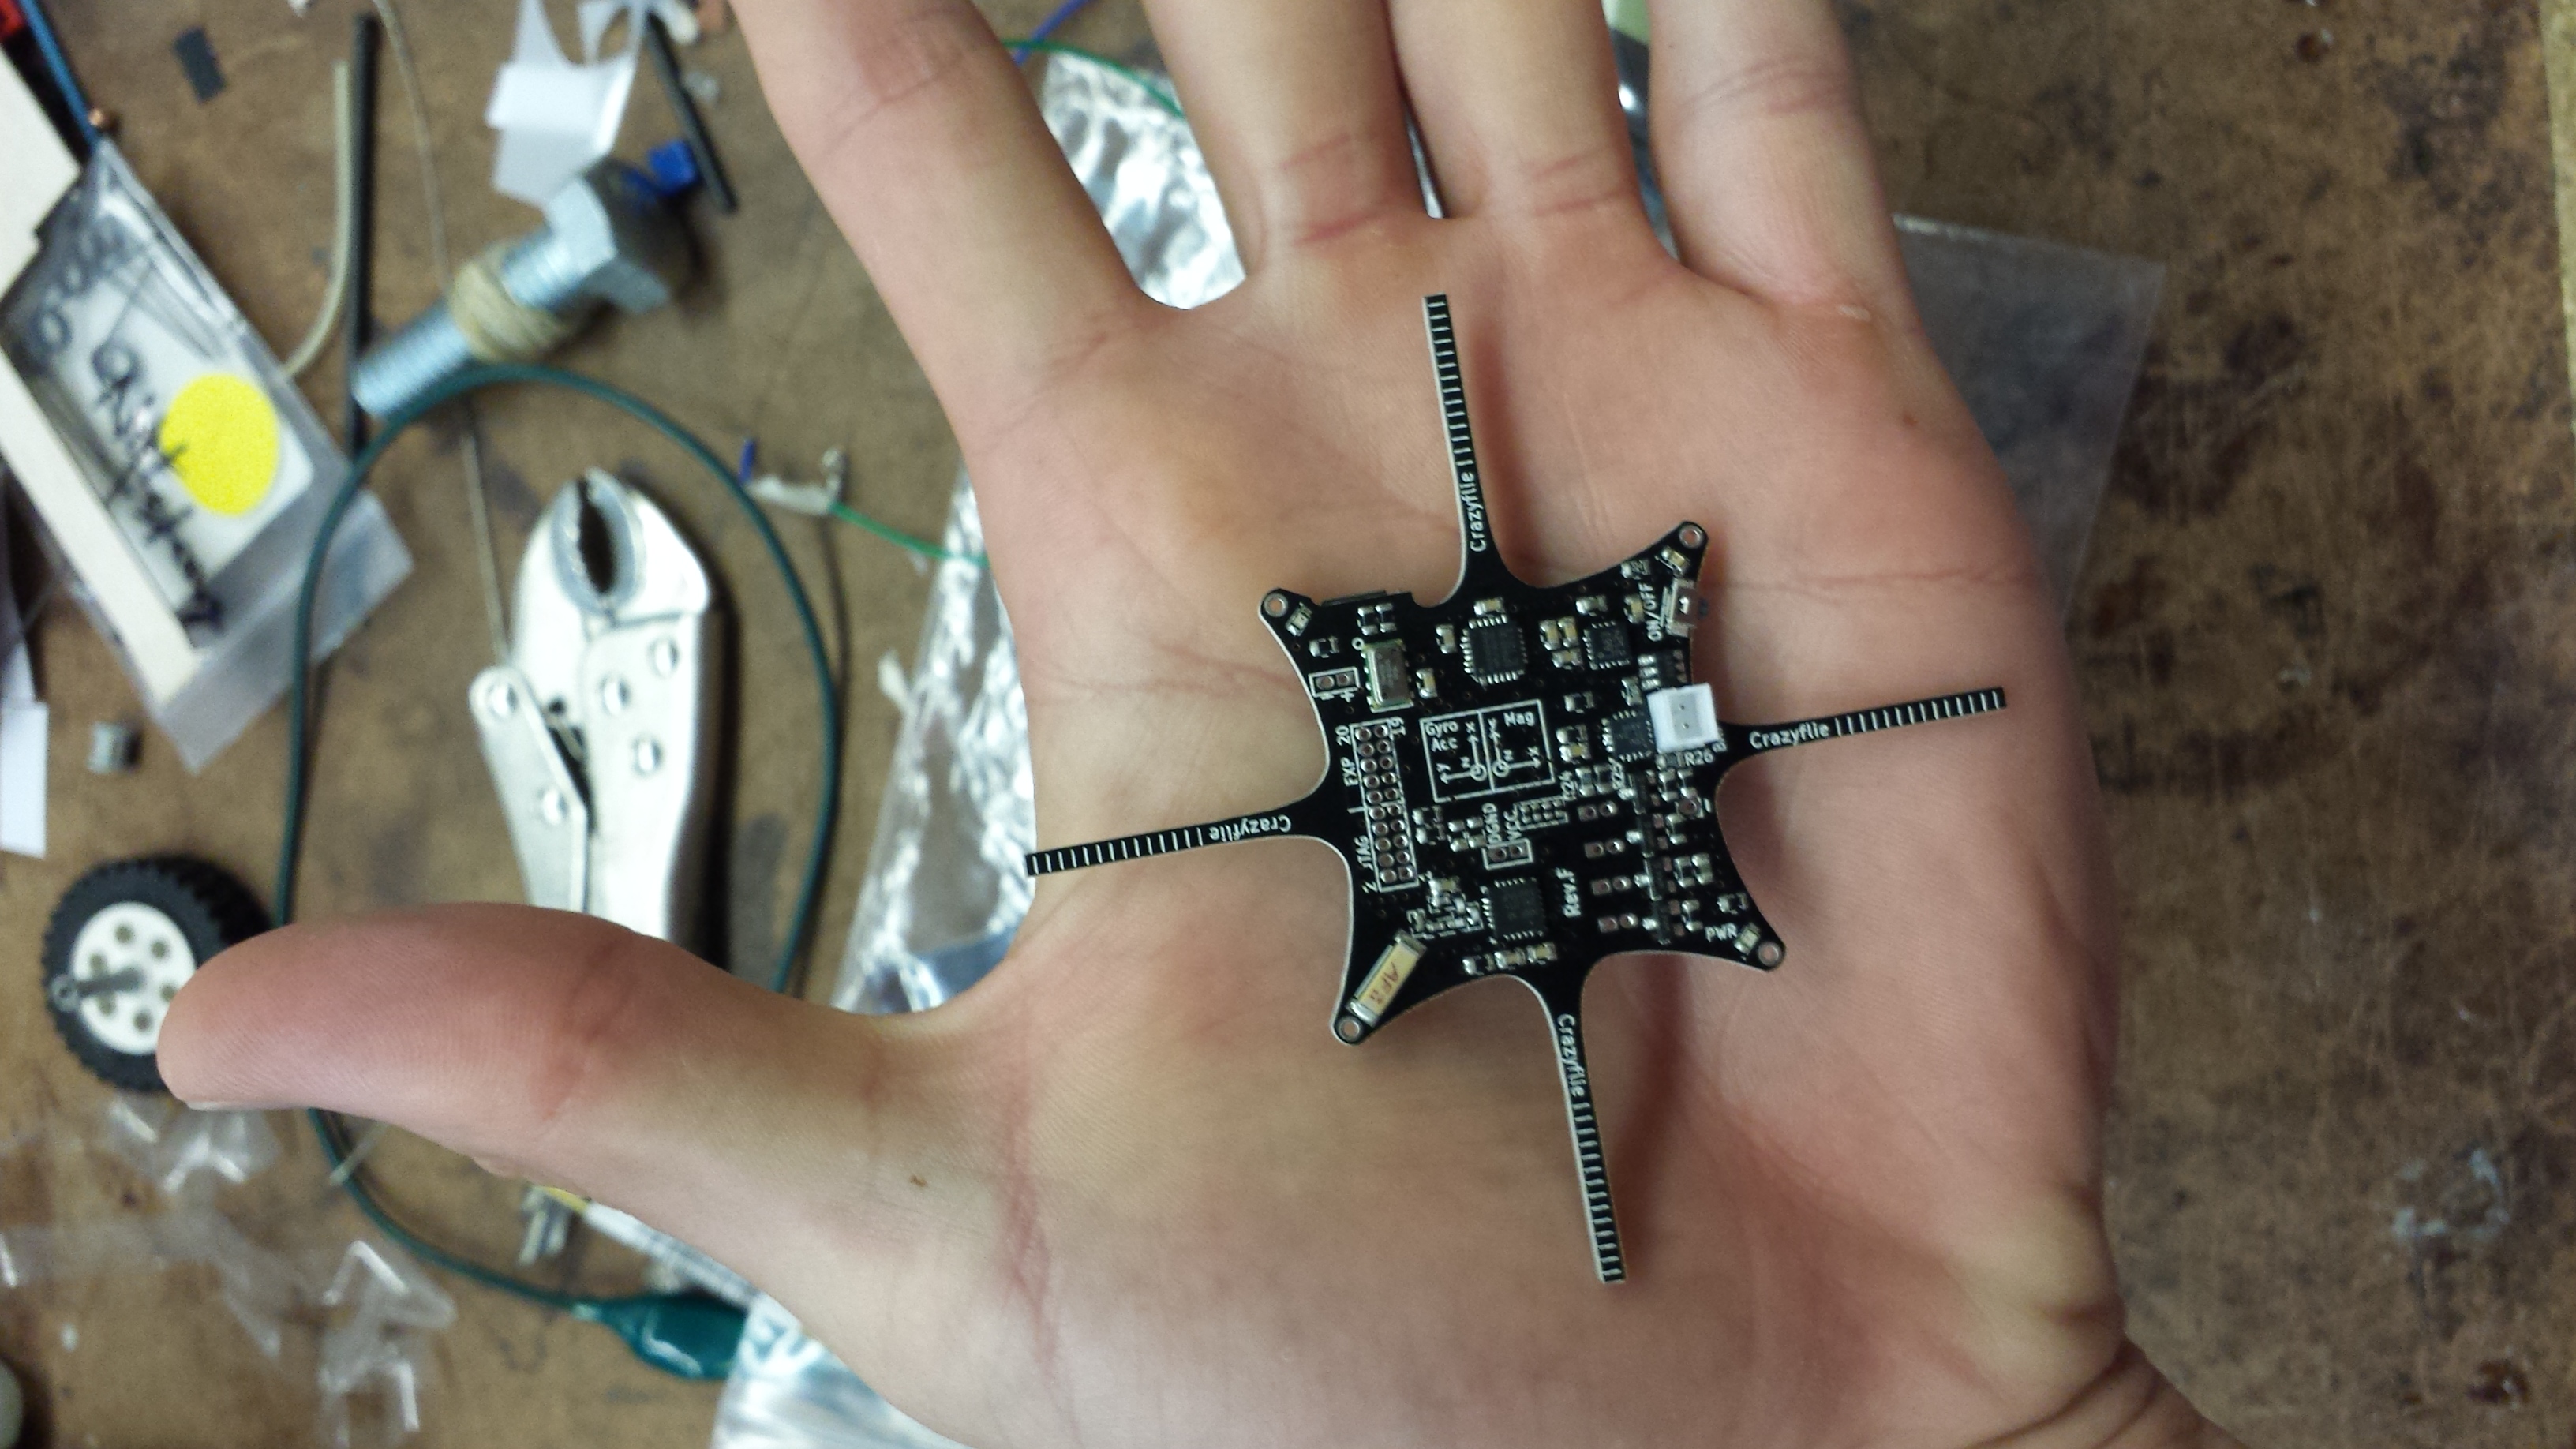
Big news of the day was that the Crazyflie arrived! It's a lot smaller than I had imagined...
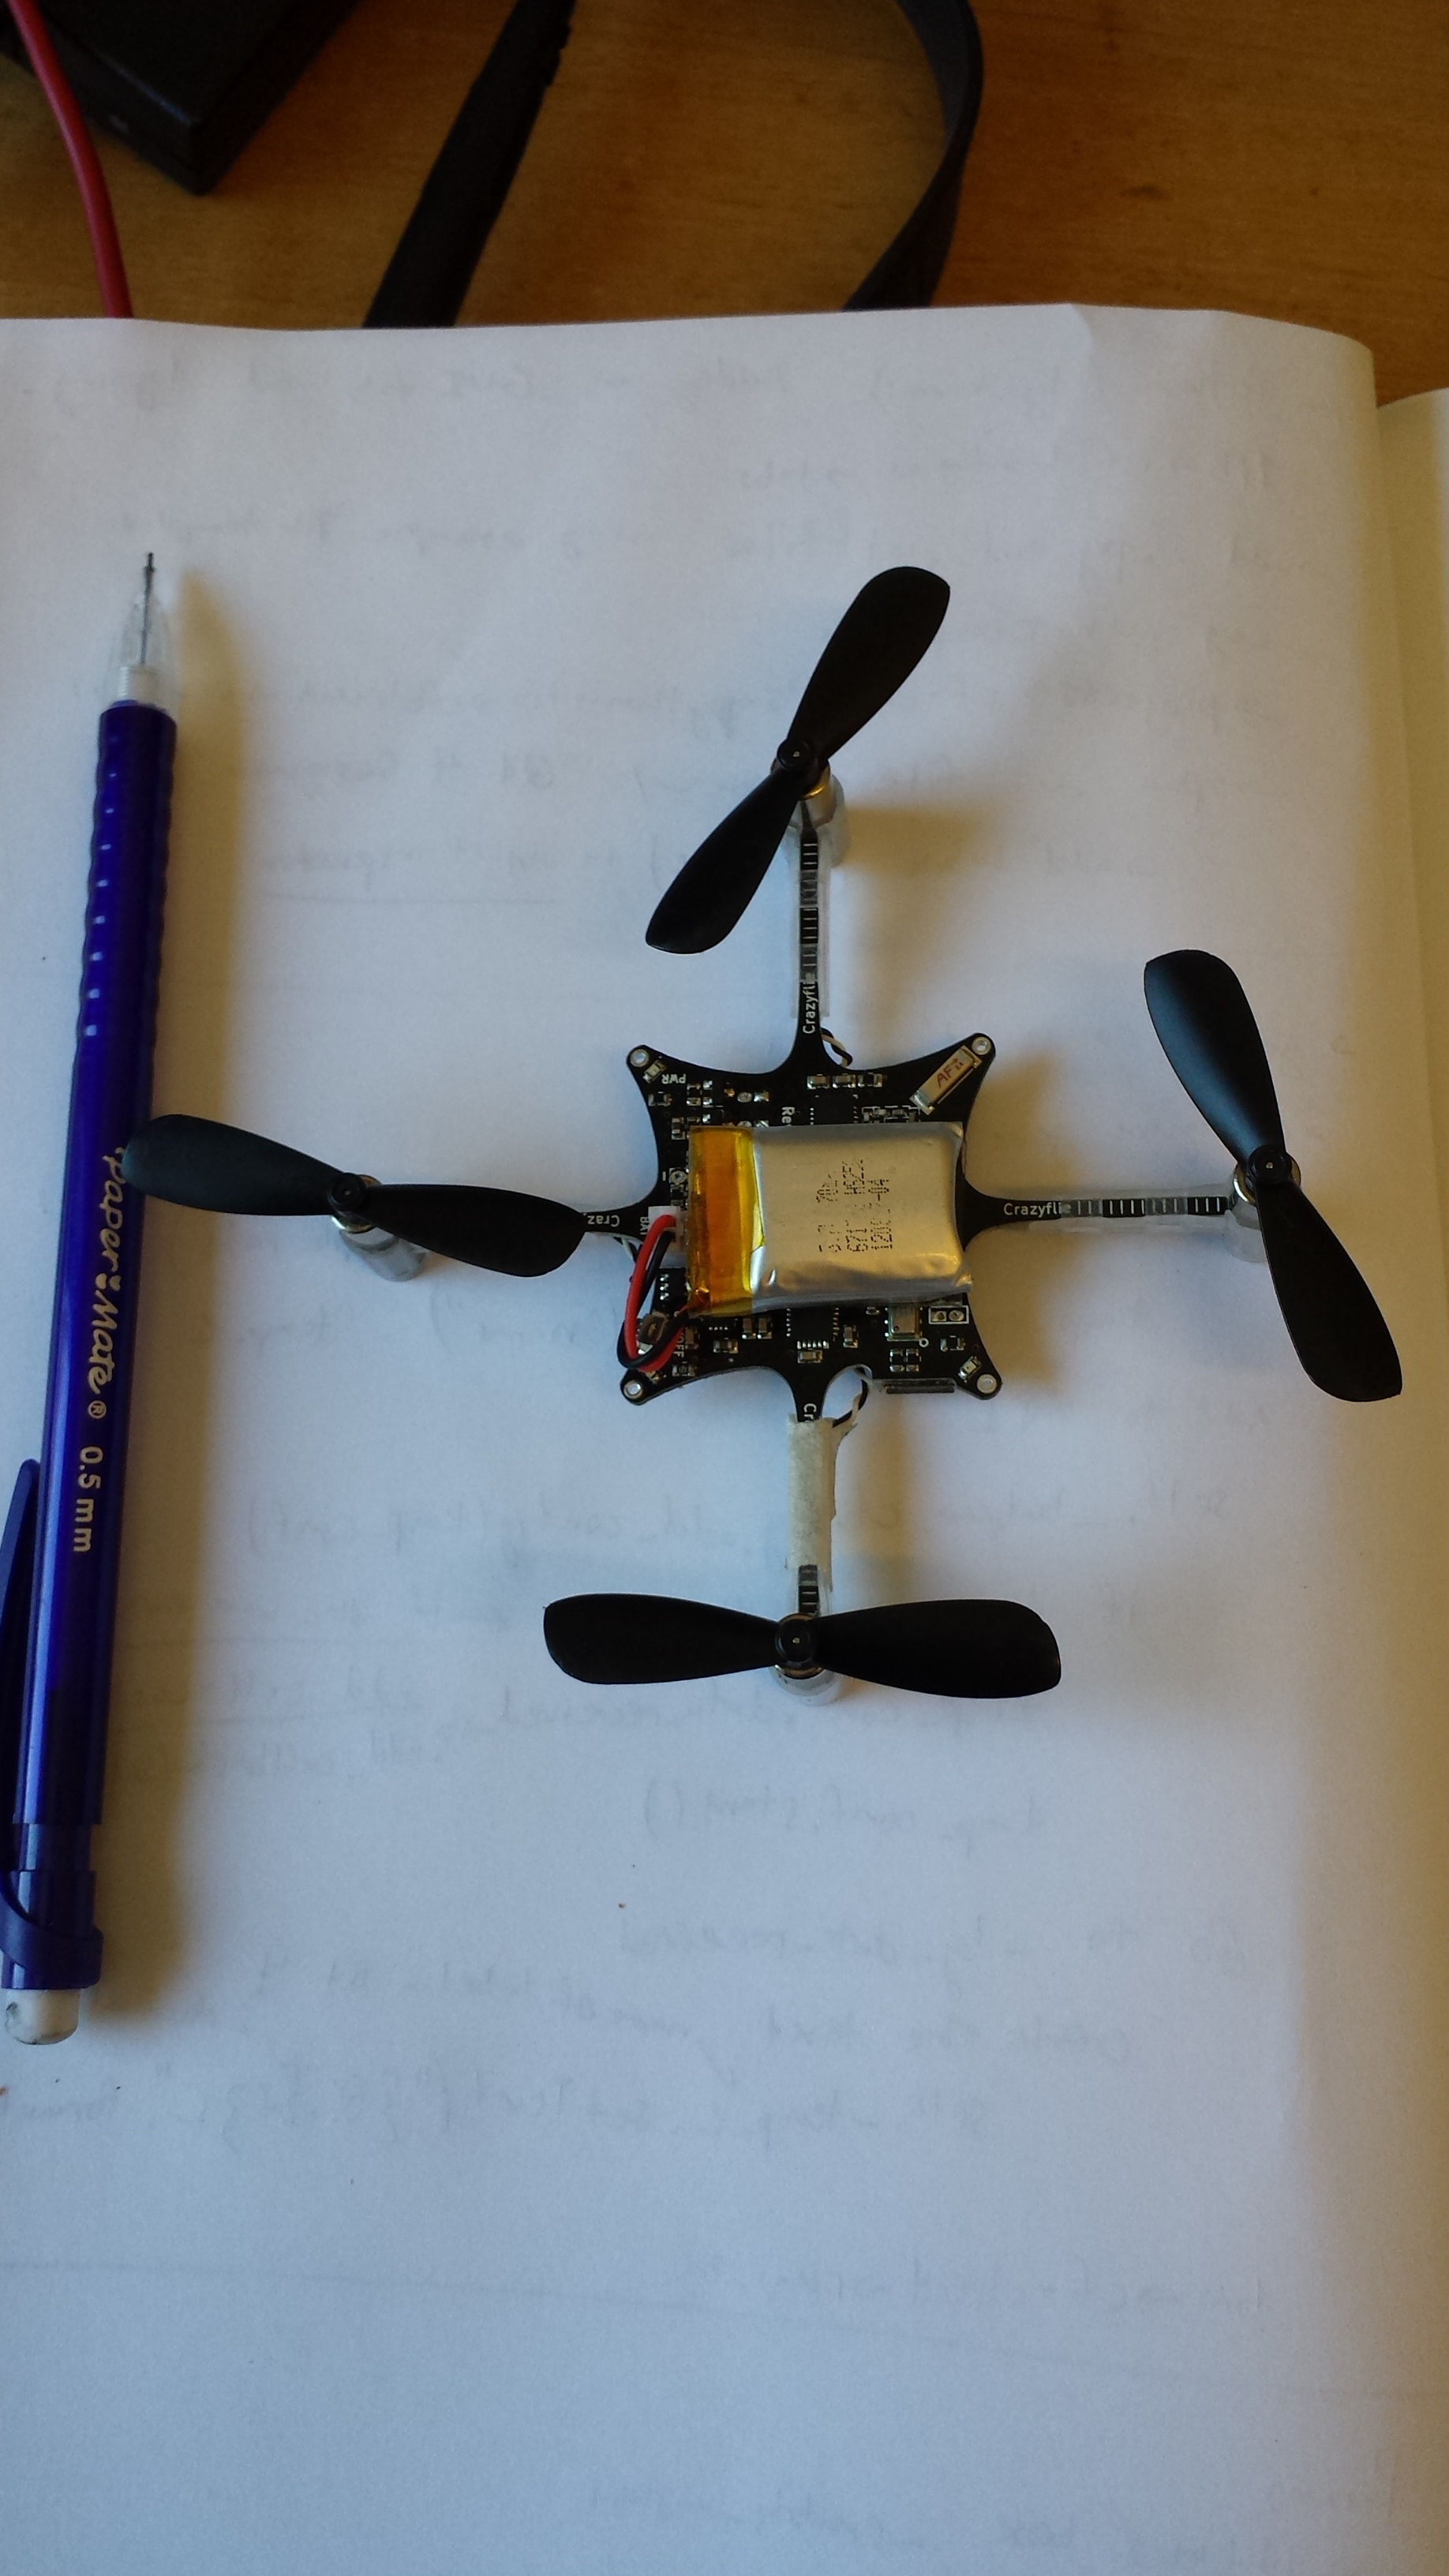
Matt and I assembled it and started to download all of the necessary software to make it run. We soon realized that we need some sort of controller (not a flight controller, but an actual RC) which Matt will buy this weekend. Hopefully we will be flying on Monday!
21 July
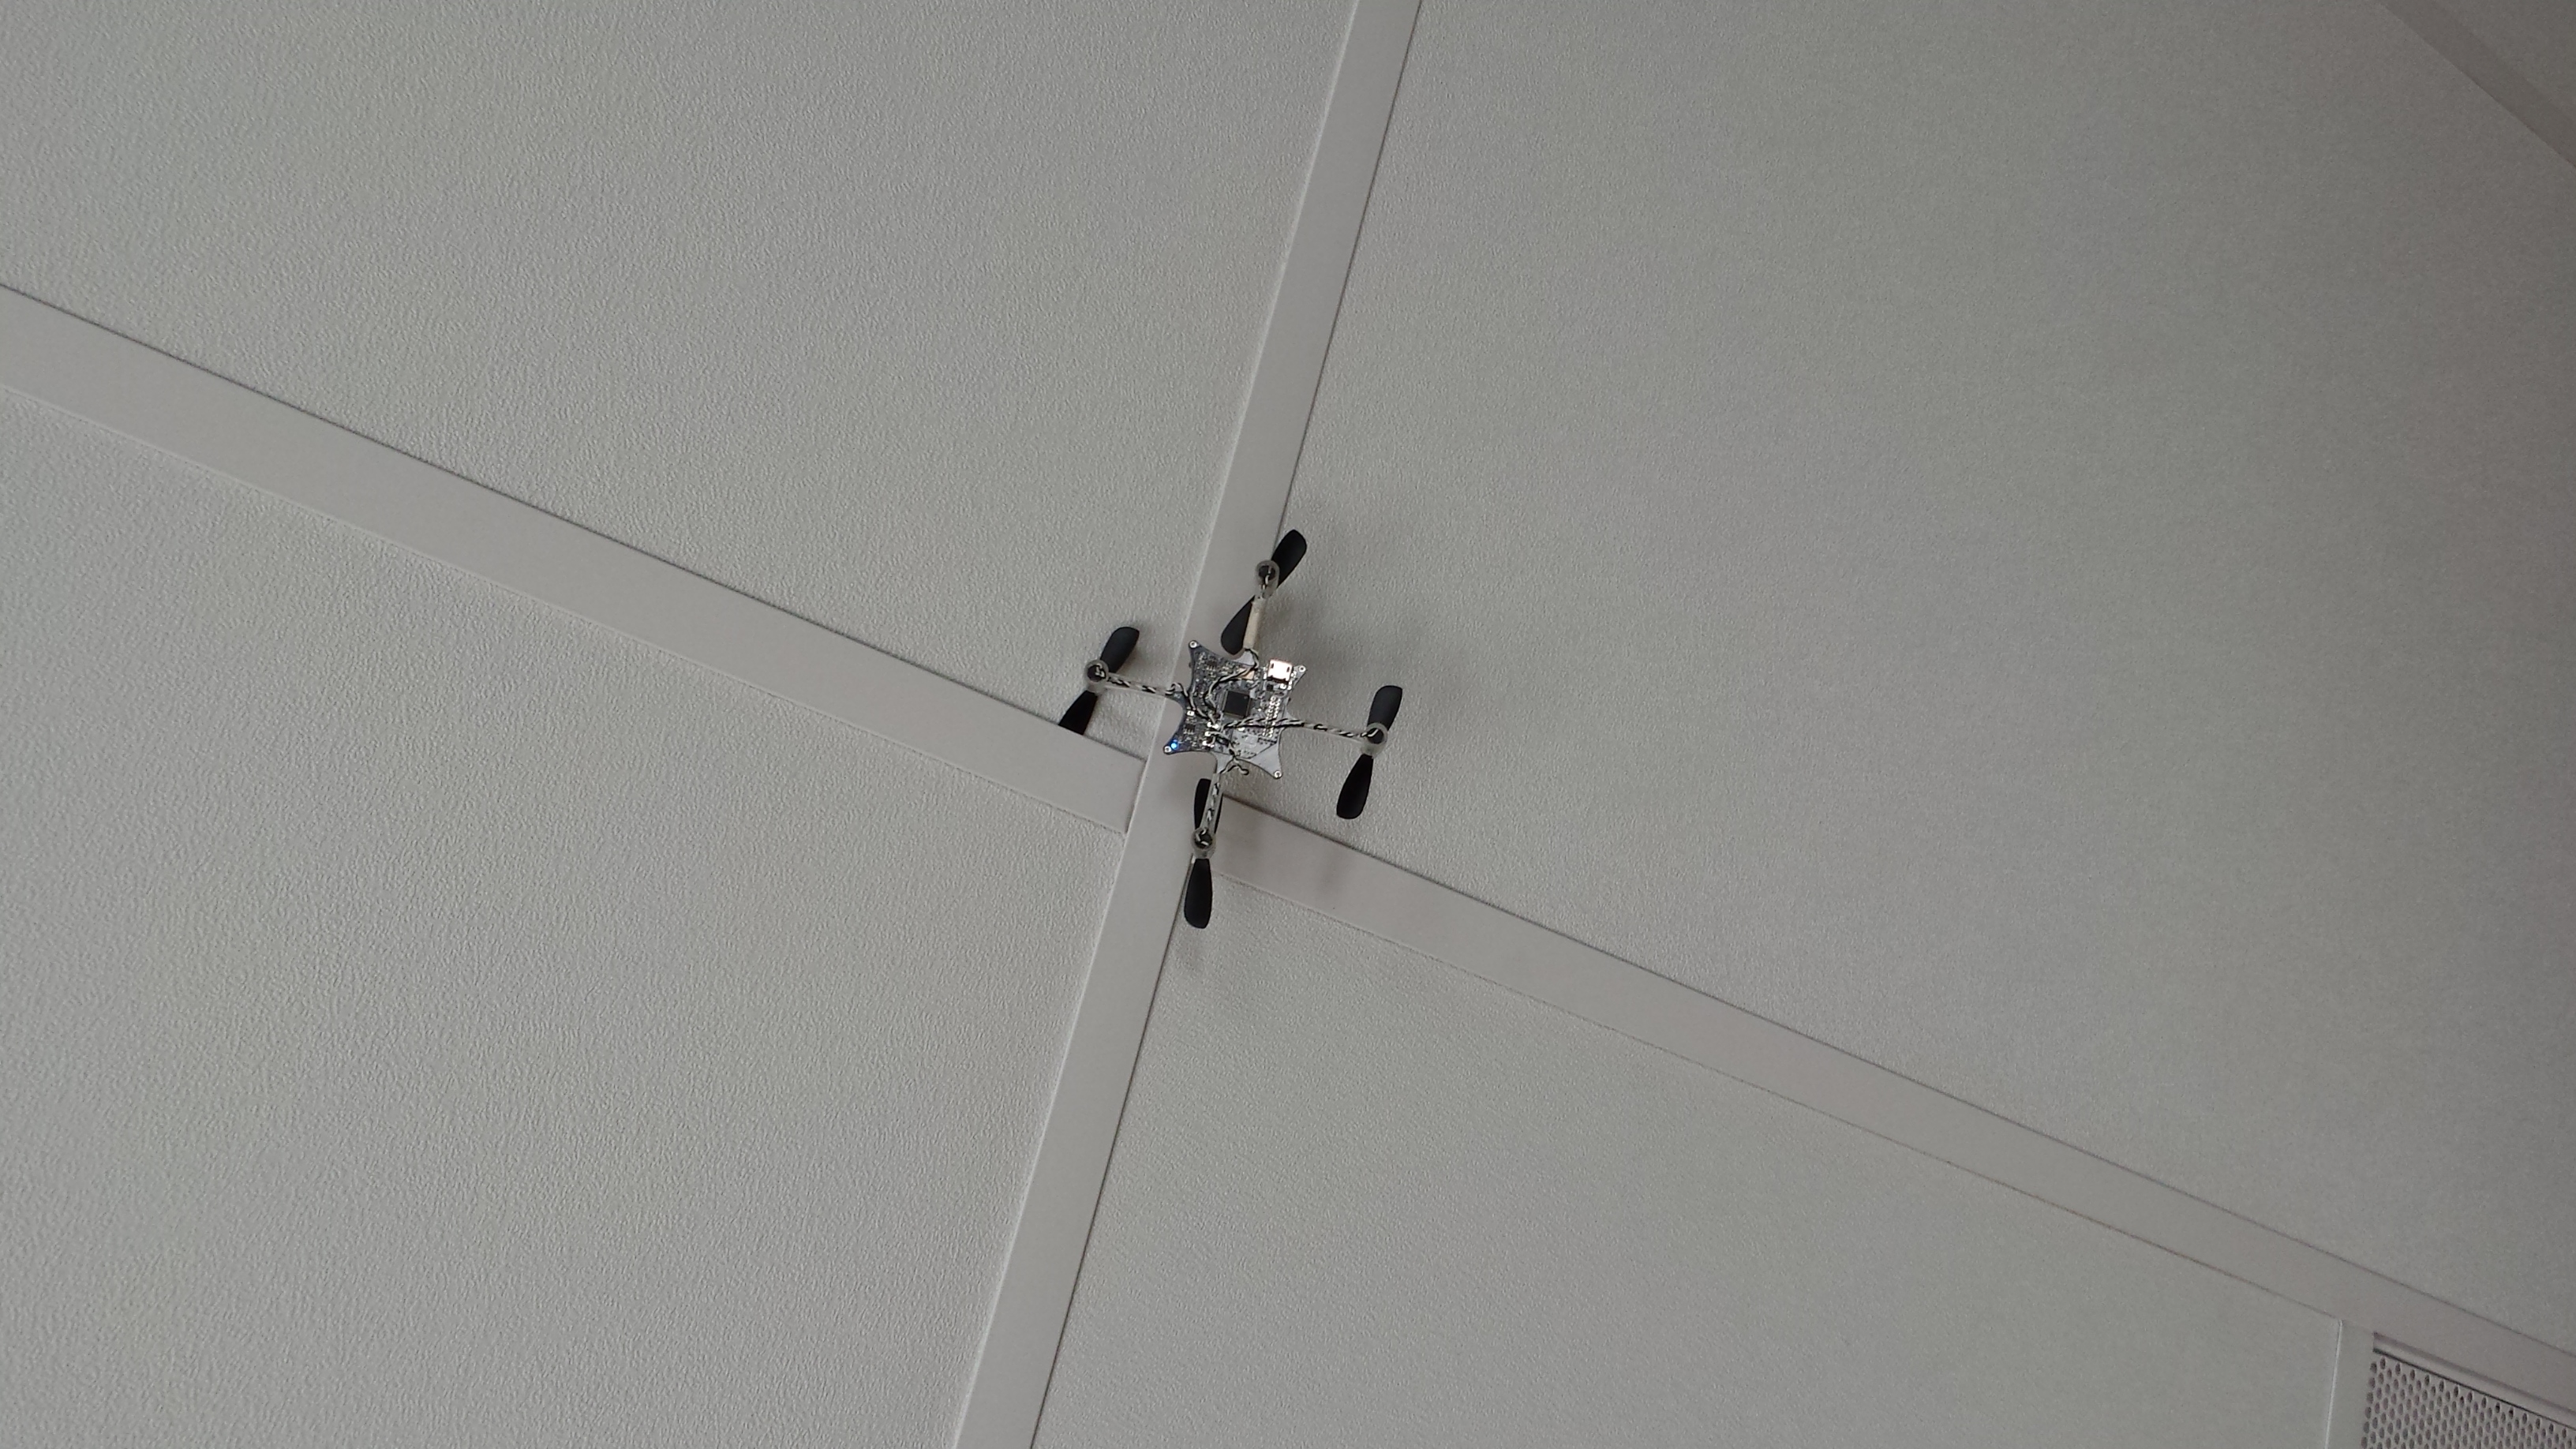
Crazyflie is up and running. I downloaded all the necessary software to operate it as well as installed the PS3 controller that Matt bought over the weekend. The main takeaway from today is that it is very difficult to fly! We all had a good time flying around though!
I started doing forum research to figure out more about the quad and was overwhelmed by the amount of information our there. There really is a big crazyflie community out there. I tried to download the correct software to start hacking this thing, but kept hitting dead ends no matter what I tried. Luckily Matt gave me a fresh set of eyes, and we were able to get things working by downloading the Bitcraze virtual machine and passing the USB items into it.
22 July
More forum browsing to the point where I must have had 20 internet tabs open. Learning a lot about the crazyflie but still confused as to how to hack it.
23 July
Found the mother lode of crazyflie tutorials and started Crazyflie Hacking Page to teach people how to operate and hack the Crazyflie. Check it out for more info.
24 July - 1 Aug
The BDML website has been down for quite some time, which is why I'm lumping all of these posts into one big one.
Nearly all of my time this last week has been devoted to continue figuring out the Crazyflie. In fact, we made our first successful perch, although it wasn't what we had intended...
My primary goal with the CF is to be able to perform open loop routines by pressing a button on the controller, then continue flying in a normal fashion. To this point, I've been able to perform open loop maneuvers, but haven't been able to integrate them with the normal flying code. I've successfully programmed the Crazyflie to do flips...
...as well as a pitch up that will be used for perching.
Essentially, you can send the CF pitch, roll, yaw, and thrust commands for set periods of time, and it will use its stabilizer to go to those specific orientations. The difficult part is figuring out which orientations work, and for how long you must do each.
I contracted Matt's help and we really took a good look into the Python code. Within the Bitcraze VM there are multiple CF firmware folders: one in a C library and another in Python. My understanding was that they were somehow linked or performed different actions and quite frankly I'm still unsure as to what the C library does, but Matt and figured out that we can control the CF exclusively using the Python library. We reasoned through the Python scripts and found a certain script that sent commands to the CF.
After hours and hours of work, I finally figured out how to integrate open loop movements into the flying client. It's pretty neat, I can be flying around, tell the CF to do a flip, then fly off again. That was essentially what I had set out to finish before I leave; everything now is a bonus.
In other news, Mark and I ran the BDML BBQ for all of MERL. We planned and prepared food for 150+ people, which was really quite difficult. We also went away from the classic hamburger/hotdog BBQ and opted to get here early in the morning to smoke 30 lbs of pork tenderloin, which was a blast and super tasty. Watching those porkloins cook was like watching my kids grow up: from buying them at the store to ultimately watching them be sliced and served to the masses.
4 Aug
Got to impress everyone at the perching meeting today with my obedient crazyflie. I flew it around then surprised everyone by flipping it and continuing to fly. My next objective is to figure out how to acquire the sensor data during flight. First, I'd like to get the battery voltage before performing a maneuver so that we can adjust the thrust value to ensure that each move is identical. When we're perching, we'd like to hover a certain distance from the wall and then command the CF to do its perching maneuver. The issue is that if the voltage isn't always the same, the maneuvers won't be identical, which is why I'd like access to the voltage (to adjust the thrust command).
5 Aug
More sifting through code and more frustration...the virtual machine crashed and the file I've been changing has apparently been deleted. It's back up and running, but I'm going to back up the files.