Abigail's Summer Diary
Week Eight (Aug 12-16)
- On Monday and Tuesday, I participated in two studies at the CHARM lab. Study 1 I wore a VR headset and navigated a ring perpendicular down a wire. Study 2 I wore a pneumatic haptic device on my first finger and thumb and rated which of two stimuli was larger.
- On Wednesday I attended Grace and Jazm�n's research presentations for the SURF program. It was nice to see the culmination of all their hard work this summer.
- I shared my protocol draft with Billie and she gave me helpful feedback and suggestions, one of which was to organize the bill of materials by which part of the assembly they should be used for, to include the approximate time each step takes, and include more tutorials for different equipment.
Week Seven (Aug 5-9)
- On Friday last week, EmJ and I discussed making hand-drawn illustrations for the protocol paper! For example, an exploded view of the main mechanism, step-by-step diagram and close-up views of assembling the tadpole, etc.. I'm excited to work on this because I love art and practicing technical sketching.
- On Monday, we went to the frog lab to do another TadBot installation (moving 2 TadBots from one terrarium to another). EmJ had me do one on my own. Both installations had issues: the end of one of the wires was worn out, so it was very difficult to insert into the rail carriage. The screw had been screwed in too tight, so the piece on the carriage broke and we had to replace it with an intact one on one of the other unused TadBots. On the other install, the cam connecting the motor to the rod was worn out and it jammed the whole slider mechanism. Again, we took a piece from the other TadBot to solve it. The Particle Argons weren't connecting to the internet/showing up on our devices after everything was finally set up, but that was also eventually solved by EmJ.
Week Six (July 29-Aug 2)
- I added more detailed instructions to the protocol paper I've been working on and linked more tutorials to skills (3D printing and soldering). EmJ went through the draft and made suggestions for edits (i.e. a slightly more detailed bill of materials, including more tutorials and manuals accompanying different processes).
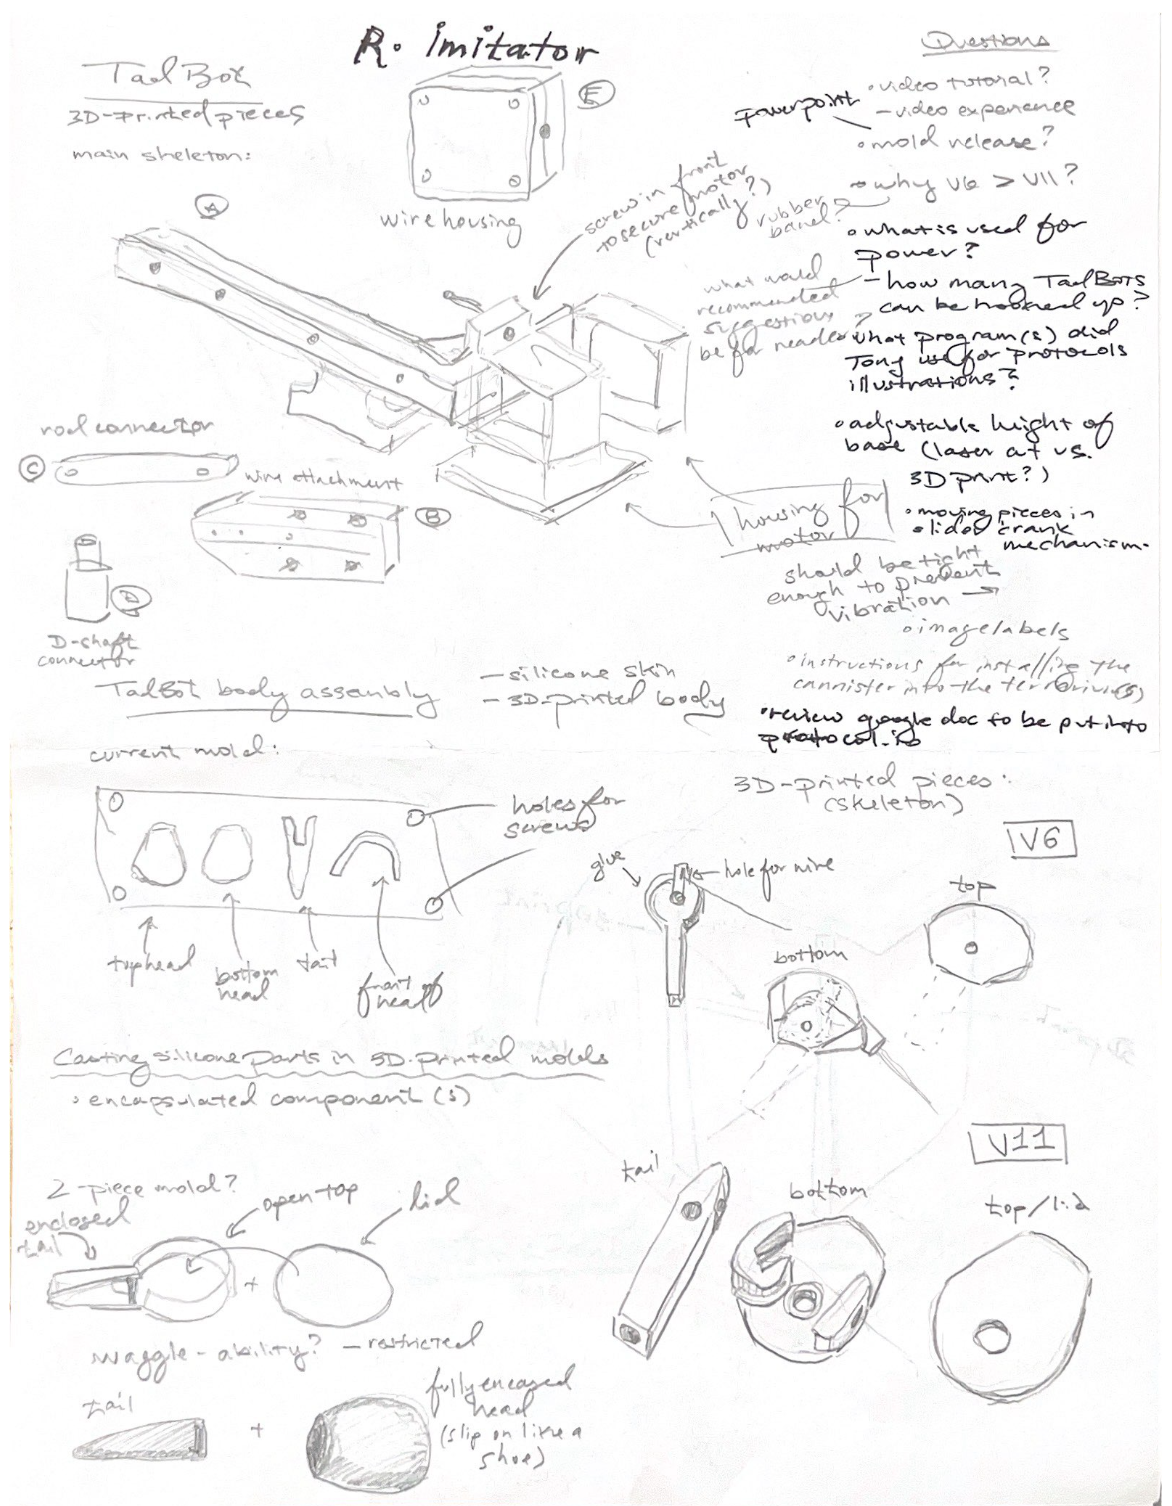
- To make the TadBot body easier to assemble, I'm redesigning the 3D printed "skeleton". The current design requires quite a bit of sanding down the hole to insert a tiny metal rod, and the silicone cast is actually intended to fit an old design (v11 versus v6). I studied both designs and am making a new one, combining the best parts of both.
- I dug through a folder of all the old TadBot CAD files and found ideas for an assembly rig and a better mold for the silicone casting. I'm working on reusing these ideas to fit the current design.
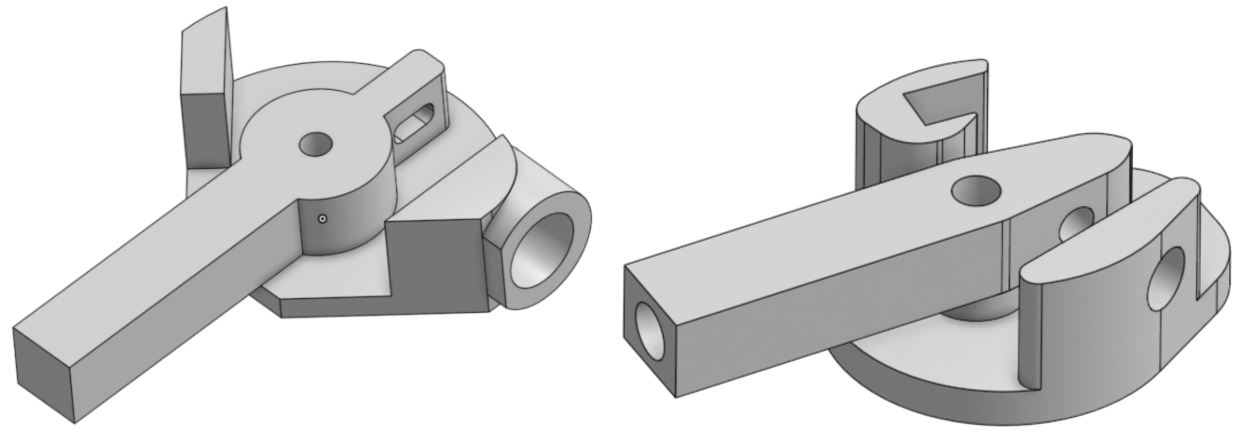
New and old TadBot versions.
Old rig design for assembly.
Week Five (July 12-26)
- On Monday I presented my research project at the SURI weekly meeting. I brought a couple of the molds and one of the out-of-commission TadBots for visuals because their projector wasn't working.
- I continued sketching new solutions for a height-adjustable base. Some of the designs I came up with would have to be 3D printed. The current base we use is laser cut, which is much faster to produce, but the kerf needs to be dialed down and the vertical height is not currently adjustable. These are a couple of the potential designs I have right now:
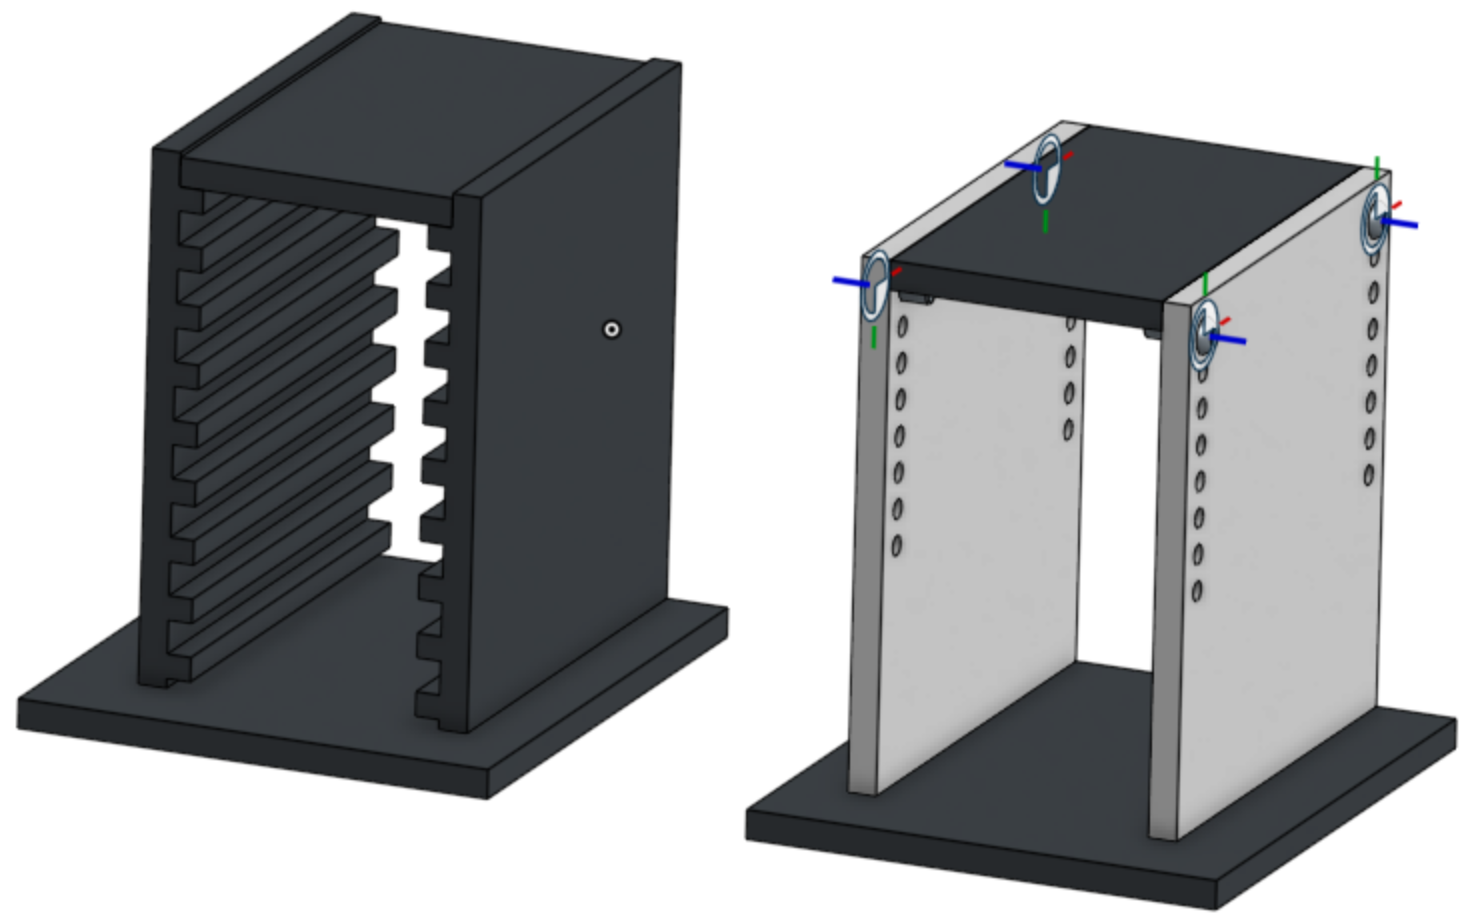
2 new adjustable base designs.
- I'm figuring out a way to reduce the 4 separate silicone molds into 1 or 2 molds. I spent some more time researching silicone casting and discussed possible alternatives with EmJ. An idea she has is to embed the 'skeleton' of the tadpole inside of the mold and cast the silicone around it. This will be a challenge because we also have to find a way to protect the swivel joint from getting gummed up.
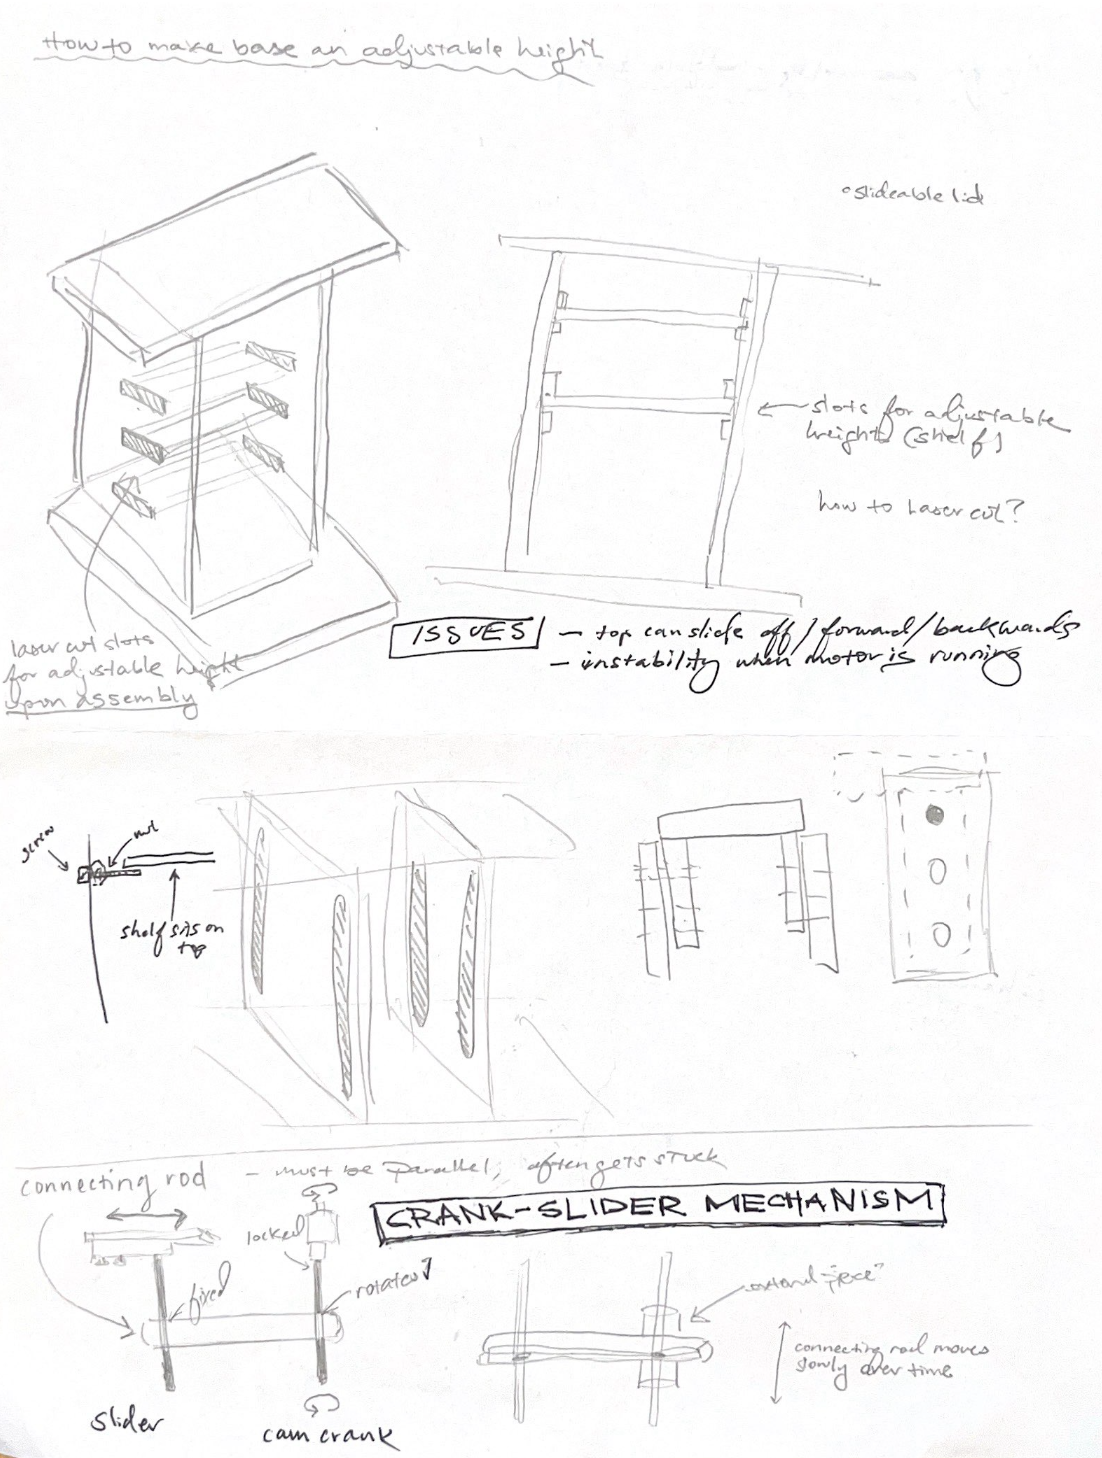
Base sketches
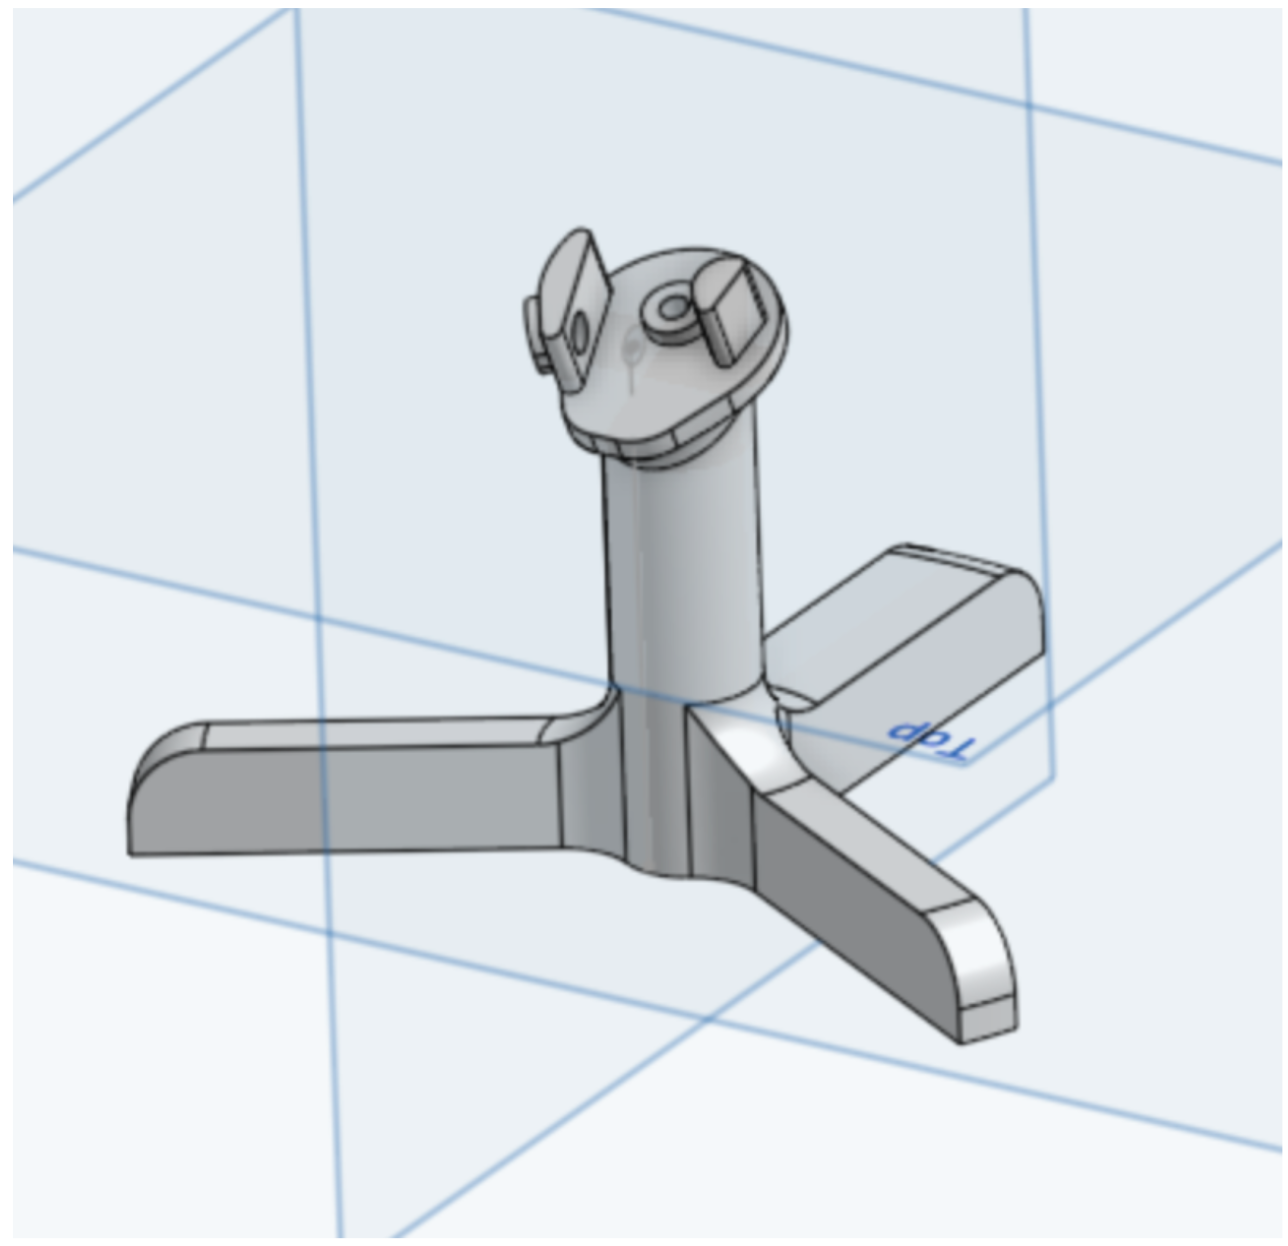
TadBot sketches
- I scanned through the particle.io program for TadBot's tail waggling understand it and eventually rewrite it using non-blocking code, and to make its movements more natural-looking by adding more randomized elements.
- I finished typing up the basic protocol for TadBot Fabrication in Google Docs and will spend some time next week going over it with EmJ and Billie before I transfer it into protocols.io. I'm using one of Tony Chen's old protocols on "Optimizing image resolution of wyze camera trap recordings" as a template. I'm also taking pictures of the fabrication process and making illustrations to make the process easier to follow.
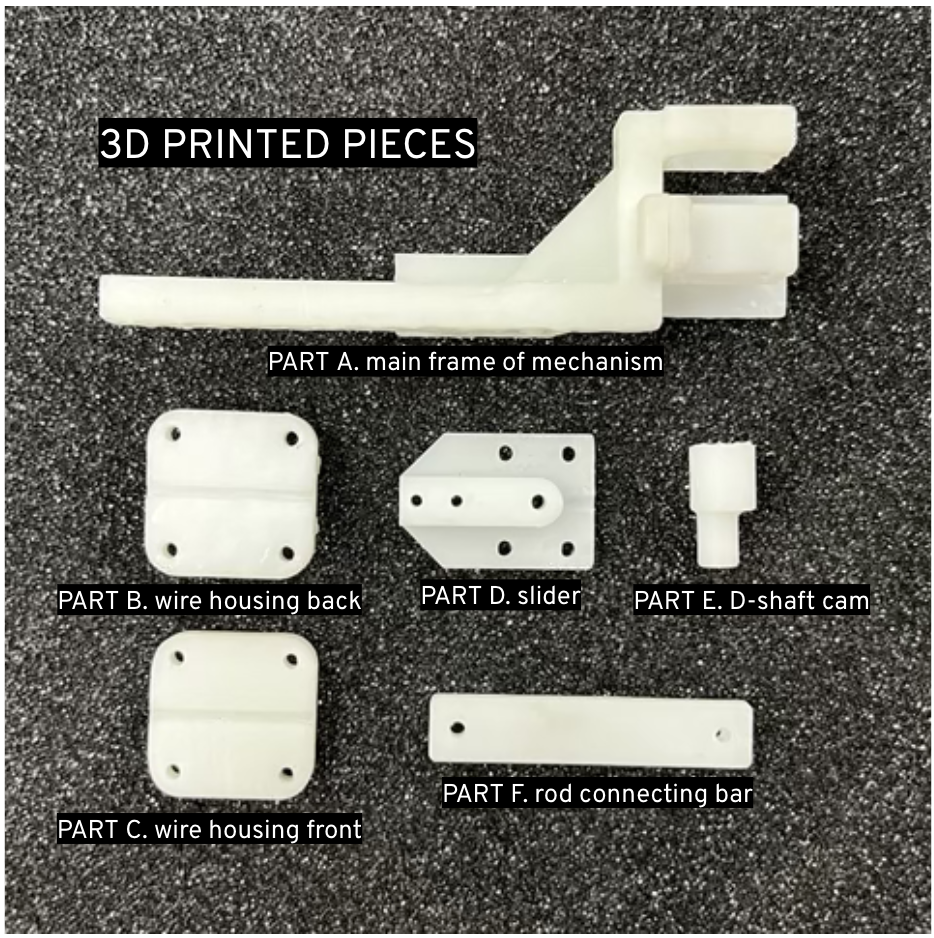
Labeled 3D printed pieces.
- One of my current design challenges is finding a way to reduce friction in the crank-slider mechanism. The bars must be perfectly parallel, otherwise the mechanism jams. One solution could be creating a piece opposite the rods that stabilizes/holds them in place.
Week Four (July 15-19)
- I combined the 4 individual silicone molds into one mold tray with a cover and holes in each corner to screw the mold together instead of using a glass slide and a weight. I read up on silicone casting in general and found a useful article by FormLabs: https://formlabs.com/blog/casting-silicone-guide/.
- I sketched out the TadBot CAD with paper and pencil and realized it's much easier to come up with solutions to design problems by having them drawn physically on paper than staring at them on my computer screen. The previous 3D printed front brace for the motor would constantly break off when trying to insert the motor, so I sketched out a way to screw it in to secure it and translated it into the CAD model. After printing and testing it, I moved it from the top to the side. I also redesigned the piece which keeps the wire tube in place.
- Other design problems to solve: make a height adjustable base, make a piece which keeps the 2 rods parallel to prevent jamming, replace glued areas with holes for screws.
- In attempting to assemble TadBot on my own, I realized how difficult and finicky the process really is - the thin 3D printed parts kept snapping and I kept getting super glue between the tail and the head, which prevents the pivot mechanism from working altogether. I plan on designing some kind of rig that makes it easier to assemble, and possibly redesigning the silicone mold and 3D printed pieces themselves to make things easier to glue.
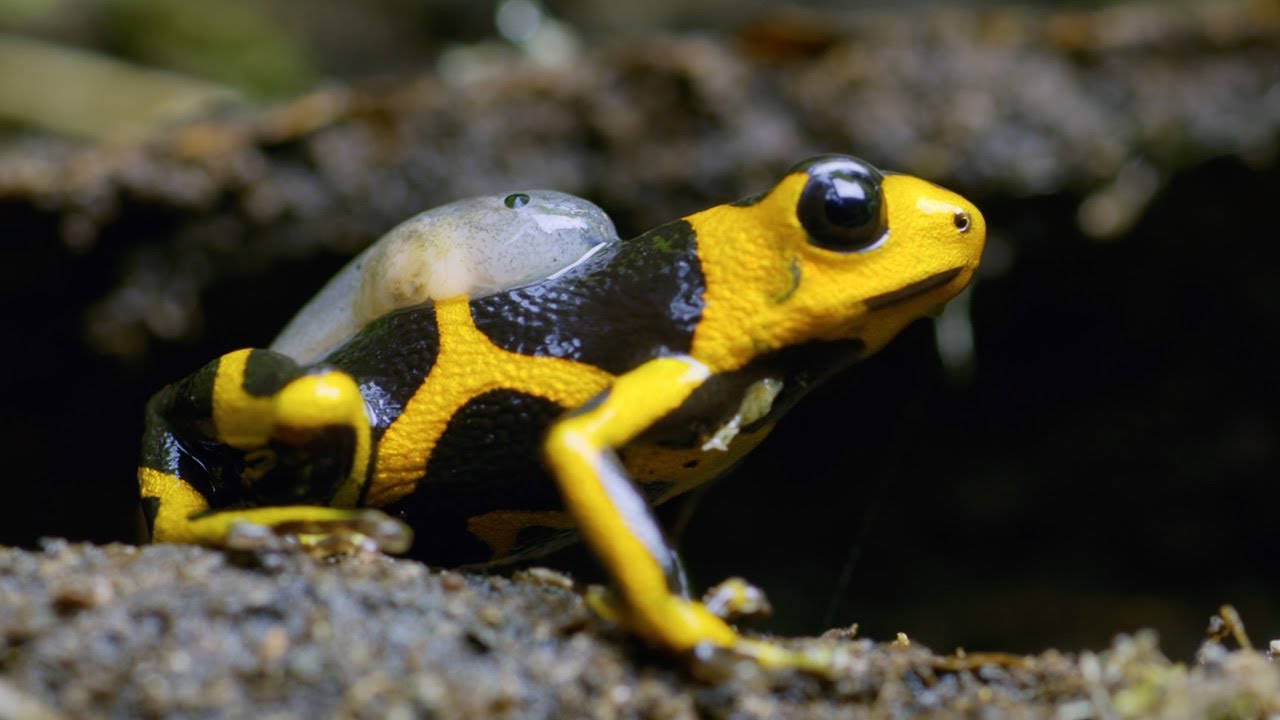
On Friday I attended the O'Connell lab's weekly lab meeting and listened to the PhD students talk about their poison frog research. Here is their website detailing all the frogs they study in their lab: https://oconnell.stanford.edu/animals/animal-colony.
Week Three (July 8-12)
- Monday: I worked with the rest of the SURI/SURFs on a serial communications tutorial with Mark on Arduino. This'll be helpful for later this week when I recreate the TadBot program on a Particle Argon controller. I then listened to a research presentation on 3D metal printing strategies during the weekly SURI meeting.
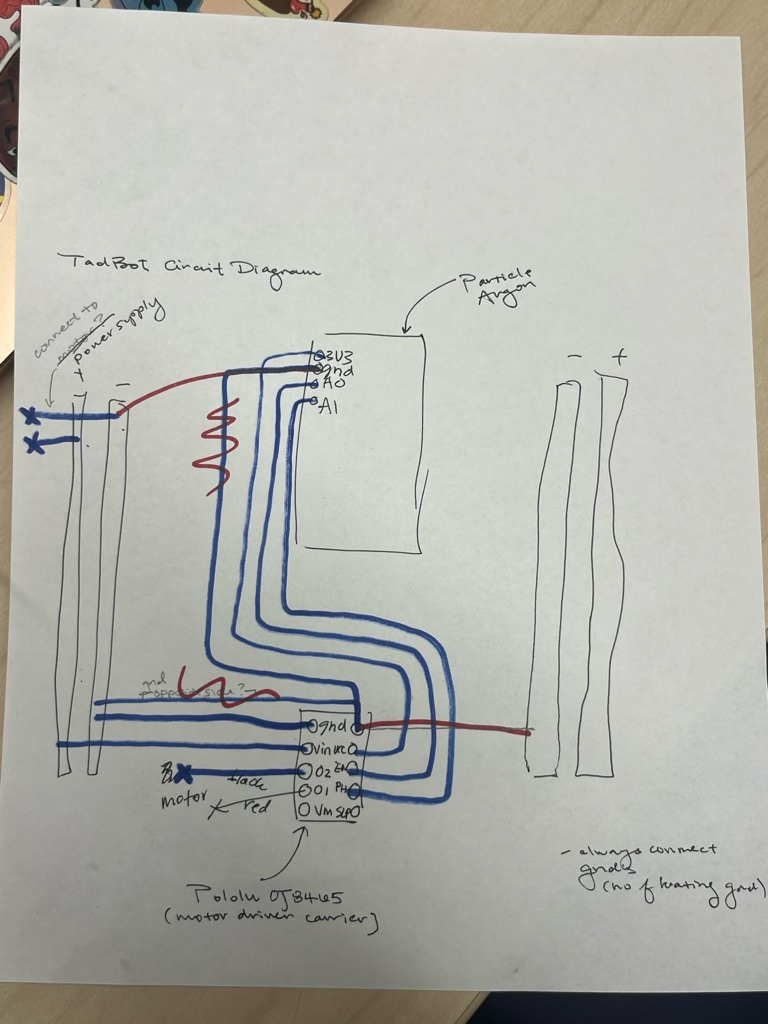
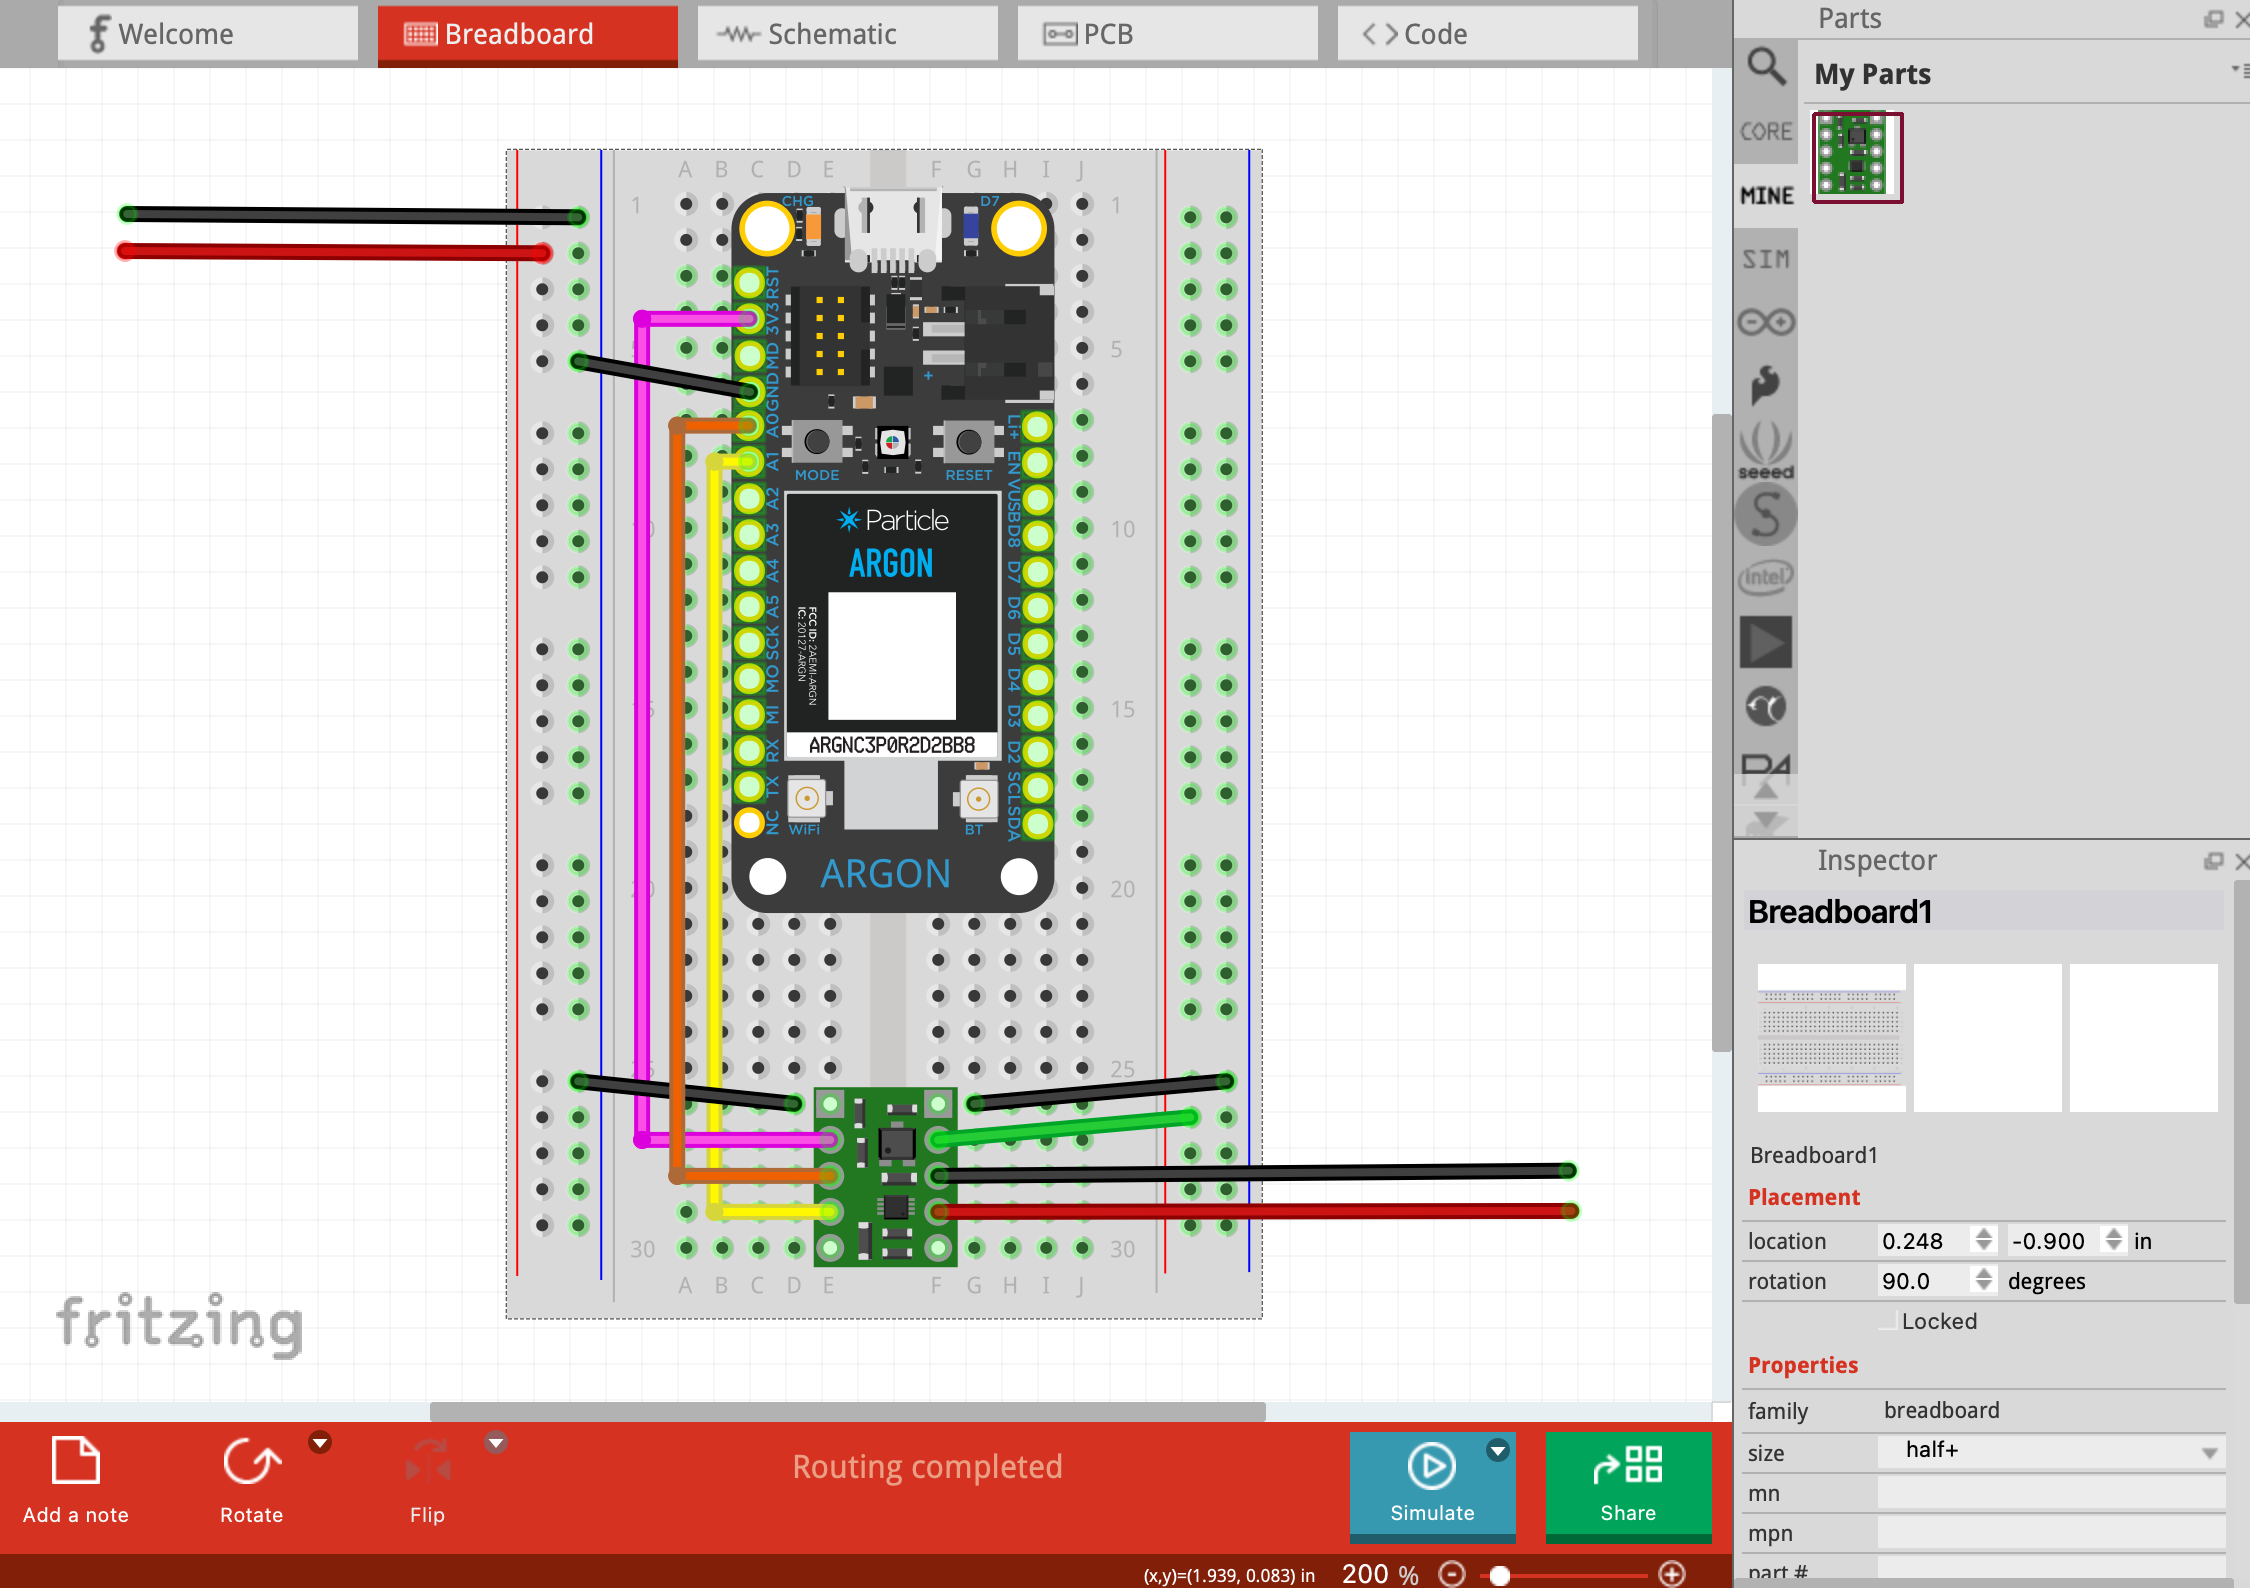
- I watched some tutorials on soldering and started putting together the TadBot board with the help of EmJ. I studied 2 of the old designs and sketched out a circuit diagram connecting the Particle Argon with the motor driver carrier and mini breadboard.
- Tuesday: I created a diagram of the circuit on Fritzing because Tinkercad didn't have Particle controllers in their database, whereas I was able to download both the Particle Argon and correct motor driver carrier into Fritzing. This made it so much easier to create a clear diagram. EmJ and I took a trip to the med school to get ID access to the O'Connell frog lab in Gilbert.
- Wednesday: This morning I did some work on my presentation of biomimetic robots, then I soldered a TadBot board. I took it slow because it's still one of my first times ever soldering, but I'm growing to enjoy it. I started identifying specifically what on the older TadBot versions and CAD could be improved. EmJ informed me that several pieces in the original design ended up being unnecessary, so I'm working to strip it down to its most essential parts and see what can be changed. EmJ showed me how to do silicone casting for the tadpole body. I learned that there were also a lot of opportunities to make changes to the molding process, so I'll spend some time editing the mold cast in OnShape as well.
- Thursday: Removed tadpole pieces from molds and assemble tadpole body itself, finish soldering the last 2 wires onto board, optimize casting process (turn 3 separate molds into one easy-to-bolt tray), start prints of old mechanism design and see why they failed/how they can be improved, finish design of new adjustable base, finish presentation for Friday.
- Friday: Presentation on examples of biomimetic robots used for biology research
- Things I learned: how to solder my first circuit board, what serial communication is and how to set it up on Arduino, how to use Fritzing,
Week Two (July 1-5)
- Monday: I completed a couple more lab trainings to gain access to the biology lab where they keep TadBot and the frogs. I started going through some Arduino tutorials -- it's my first time working with them! I also attended SURI's weekly meeting and listened to 2 ME PhD candidates talk about their experience doing research and give advice to undergraduates considering to go the same route.
- Tuesday: I completed more OnShape tutorials to familiarize myself with the interface. Soon I will find the current TadBot's weak points (friction is a big issue) and tweak the CAD to make it run more smoothly. I also started putting a presentation together on biomimetic robots for biology research and organized the CAD for TadBot to make it easier to navigate and edit. EmJ helped me use the Formlabs printer for the first time so I can construct a TadBot from scratch.
- Wednesday: I continued organizing the CAD files and made a Bill of Materials list, finding all the hardware on McMaster and linking it in a table. EmJ and I retrieved an out-of-commission TadBot from Gilbert (the biology lab where the experiment is being conducted) so that I can figure out how to make it better. I spent some time curing and sanding my first Formlabs 3D print -- the tadpole body pieces are way smaller and more delicate than I realized!
- Thursday & Friday: Travelled for the 4th
Week One (June 24-28)
- This week I: helped organize and clean the lab, started prototyping designs for EmJ�s �Flat Surface Two-tile Gripper�, visited the biology lab utilizing TadBot, and attended the lab retreat to Butano.
- Things I learned:
- Where things exist in the lab.
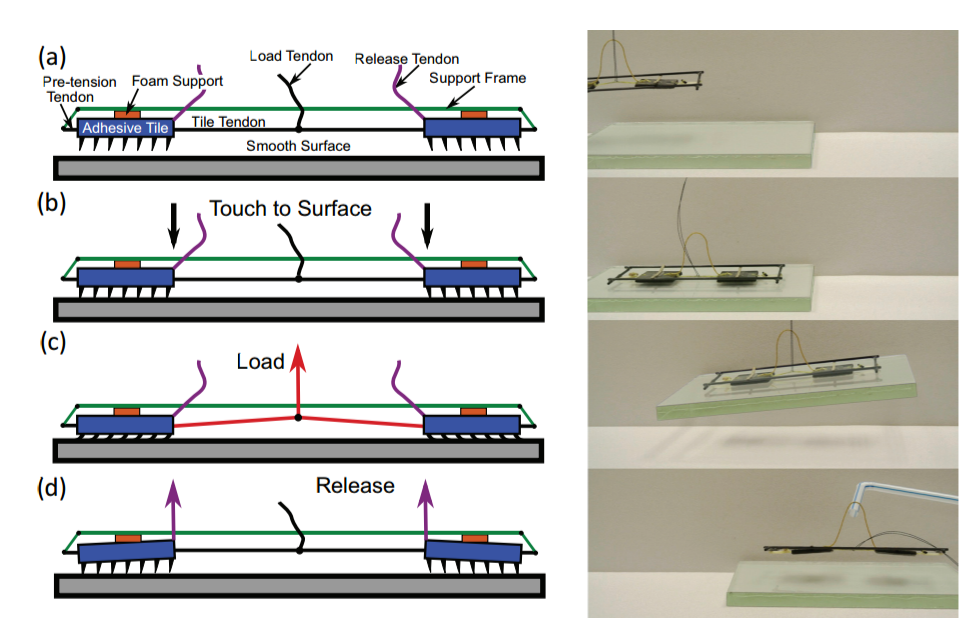
- How the Gecko Adhesive is manufactured and the conditions it requires to activate against a flat surface (constraints for the Gripper project, which will be a difficult but fun challenge).
---> (Hawkes EW, Jiang H, Cutkosky MR. Three-dimensional dynamic surface grasping with dry adhesion.)
- What TadBot is, why Billie is using it for her research, how the mechanism functions, and the direction the project is going in.
- commonly used instructable in Biology research
- Highlight: Getting to know more people in the lab and the cool projects they�re working on this summer!
Page last modified on August 14, 2024, at 01:59 pm