new web: http://bdml.stanford.edu/pmwiki
TWiki > Manufacturing Web>ManufacturingHome > ManufacturingEquipment>MachiningOnTheHAAS (31 Jul 2010, DanAukes)
|
Contents:
Sub Pages (Full WebMap) |
Machining on the HAAS
General Comments:
Notes on dealing with wax blocks:- Keep metal bottom of attacher mechanism cleanrest it on a paper towel when you put it down. Blow it off with air before attaching to HAAS.
- The pedal on the floor releases the locking mechanism. To place a wax block down, first position the metal holes over the pegs in the HAAS. Then push the foot pedal to open the locking mechanism, and lower the wax block the rest of the way down. Release the pedal.
Turning on the HAAS
- Check the compressor outside the PRL to make sure it is on and functioning. The HAAS needs a pressurized air supply to run.
- The compressor is the yellow machine attached to the outside of the PRL near the foundry.
- A green light should appear next to both the lightning symbol and power on symbol, if this is not the case, ask for assistance from someone in the PRL.
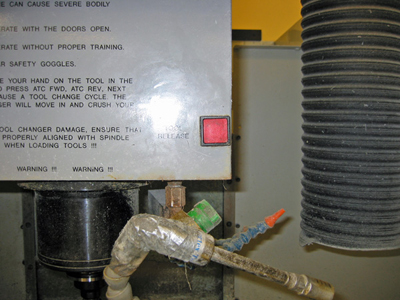
- Return to the HAAS, press the green "Power On" button in the upper left part of the control panel.
- Press the "Alarm Message" button in the "Display" section on the control panel.
- The only alarm you should see is "102 Servos Off."
- Ask for assistance if you see another alarm.
- Clear hoses from around the tool spindle to allow the spindle to access the tool changer.
- Press "Power Up Restart"
- The HAAS will run a homing procedure, wait for it to complete.
- Press "Offset"
- Press "Page Up" to navigate to the G55 line.
- Verify that the G55 coordinate is set correctly for the wax block you are using as in the "Running a real program" section of this Twiki page.
Turning off the HAAS
- If there is no tool in the spindle and the palette is in an acceptable location, skip to the last step.
- Otherwise, clear the air hoses out of the way and press power up restart to get the wide plane tool back in the spindle and to place the palette in an acceptable location.
- Press "MDI DNC" once
- Press "ATC Rev" to change the tool to an empty slot. There should be no tool in the spindle.
- Press "Power Off"
Leaving the PRL
- The Haas and the area around it must be kept clean.
- Use compressed air to clean the tools, spindle, ways, palette clamp, windows, etc.
- If chips have reached window level on the Haas, they must be cleaned out. Ask Craig for disposal instructions. If he is not around, place the chips in sealed plastic bags and leave them behind the Haas. Email Craig for instructions.
- Sweep the area around the Haas.
- On exit, lock all doors to the PRL unless it is an open shop session.
Planing on the HAAS
How to plane a wax block: (make it smooth on top)- Push Offset. Scroll up to where the G55 line is (the G55 coordinate system). DONT CHANGE the x and y values ever. (If you ever change these numbers by accident, there is a program called "Numbers" on the HAAS that contains them). We will here change the Z coordinate to be the height of our wax block after it is planed. First figure out the height of your wax block, either by looking at what is written on the surface of it, or measuring it yourself with calipers. We will be planing off 2mm of wax at a time, so we should type in a height that is 2mm less than the current (original) height of our wax block. To type in the new desired number, highlight the Z entry and type in -NN. using the keypad, where NN is the height of your wax block. Be sure you have a period at the end! Push F1 to change the value. So, suppose our wax block is height 64. We want to change the Z offset to -62. and the wax block height will be 62mm after running the plane program.
- Push List Prog to select the planing program. Highlight Program #9002, Wide Plane 2mm. Push Select Prog to select it.
- Push Mem to be able to run programs in general. Then, when you are in the Mem screen, we have to check a bunch of stuff before running the program. In particular:
- SPIND = spindle speed. Push the +10% or -10% buttons if you'd like to adjust the speed. In general, you can push 100% Spindle to set the speed to 100% if anything is displayed on the screen. If it is 100% no notification will show on the screen.
- FEED RATE = how fast it moves when it is actually cutting the part. Set this in accordance with your bit size. For planing things, set it to 100% for the initial passes and 60% for the final pass if you want a better surface finish.
- RAPID = how fast it moves through the air between cuts. Set this to 5% for starters, then you can increase it to up to 25% or 50% later. (100% is way too fast).
- Push Single Block to make SINGBK display on the screen. This means that it will only execute one line of code each time you push the green start button. Keep it in SINGBK mode to see whats going on, until it has gotten a ways into the program, then you can push it again to turn it off. Try hitting the "single block" button a few times, it will toggle the mode on and off as indicated by "SINGBK" turning on and off on the screen.
- Push Reset to highlight the first line of the program. This is IMPORTANT because it will start stepping through the program at whatever line is highlighted.
- Make sure the AIR HOSES are where you want them to be. Make sure they are back and wont run into the grey tool housing.
- Close doors of HAAS.
- Finally, we can push the green Cycle Start start button to begin stepping through the code. Keep your hand over the Feed hold button to stop the machine at any time. Push the emergency stop button to stop everything immediately, including braking the spindle. The Reset button stops the tool and spindle, but more slowly. The Feed hold button stops the translation but the spindle continues. You can push this at any time to pause in the middle of a program, and then push the start button to resume where you left off.
- You usually will have to do multiple planing passes on a wax block. You can do this by repeatedly running the "Wide Plane 2mm" program or selecting a wide plane program that is set to cut to a deeper depth and it will automatically tell the machine to cut multiple 2mm passes until the depth of the G55 Z coordinate is reached.
Running a real program:
- Go to the Ofset menu. Go to line G55, and change the Z entry to -nn., where nn = the actual height of your planed wax block in mm. YOU MUST HAVE A NEGATIVE NUMBER HERE, and you must have a DECIMAL POINT! If you just enter -115, the Haas thinks you mean 0.115mm! Not good! Press F1 to enter the value. The nn value you will have is the last height you used when planing your block as described above.
- Transfer program from computer to HAAS:
- Push MDI DNC twice to select DNC mode. It will say DNC RS232 Waiting....
- Log on to the computer in there using name BDML, and the standard lab admin password.
- Open the haas.py program. Choose your *.tap file, it will be sent to the HAAS when you say "OK."
- If you get an alarm on the HAAS when transferring the program (the lights will flash and it will say something on the screen), push Alarm Mesgs to see the alarm. Push Reset to clear the alarms. An alarm at this step usually indicates an RS232 error. In this case, quit the downloader program, then go to the Haas and hit RESET, then MDI DNC twice. Then try to send the program again.
- Back on the HAAS, it will display the program on screen. DONT PUSH RESET or it will clear the memory, and youll have to transfer it over again.
- Note that the program may not load completely onto the HAAS because the memory buffer on the HAAS is quite small. The computer will continue to send program information as machining progresses, so it is essential the laptop stay connected to the HAAS until this process is complete.
- Once the program starts loading onto the HAAS, you're ready to start machining. Before starting, always check the following:
- Make sure "SINGLE BLOCK" mode is on. Leave it on until the mill has started cutting into the wax, then you can turn it off.
- Keep the AIR HOSES clear of the tool and off to the right to allow for tool changes. You should not need to stop and reposition air hoses is they are placed carefully to begin with.
- Set the RAPID speed to 5%
- Set the SPINDLE SPEED to either 100%, or up to ~130% for 1/32" or smaller bits. Note, that ProE? can also control spindle speed, and it may be preferable to update the ProE? tool parameters rather than adjusting spindle speeds manually at the machine.
- The FEED RATE should be set correctly by ProE? but you can manually adjust it if you like.
- Step through the program by hitting the Start button to run each line. Keep your hand over the "Feed hold" button, ready to hit it if anything looks funny. In one of the early lines in the program, it will say Z10. Make sure at this point that the tip of the cutter is actually 1cm above the wax block. Any errors you will likely get will all be Z-offset errors. This is a very important step to make sure you do not have an offset error.
- Once you're sure everything's ok, you can turn off Single Block mode and let it run. Can change Rapid speed to 25% or 50%.
- As you are stepping through the program, you can push Curnt Comds to see a different view of the program. The up/down arrows give you different coordinate systems on the bottom. The Work system is best, because the z-coordinate is the height above the wax block surface, which is useful for debugging. (+) = above block, (-) = into block.
- If you want to check the status of the part while machining, you can do the following:
- push feed hold (note try to do this when the tool is not in a location that will affect final finish) .
- push Coolant which will stop the air.
- push Stop, which is next to the CW, CCW, and Spindle buttons.
This will stop everything so you can open the door and check on things. To restart the program, do the following in this order: - push Coolnt to restart the air flow.
- Push CW to start the spindle.
- push the green start button to resume the program.
Summary of what to do on HAAS:
The preceding information has been summarized below. Also, for the summary in a form that is good for printing, please see SummaryofhowtouseHAAS.doc.Planing a wax block:
- Push OFSET: On G55 line, set to "-NN.", push "F1" to change.
- Push "List Prog", Highlight Program #9002, Wide Plane 2mm. Push Select Prog to select it.
- You may alternatively select another program that will plane to a deeper depth.
- Push Mem. Check the following:
- SPIND = spindle speed: Set to 100%.
- FEED RATE: set it to 100% for the initial passes and 60% for the final pass if you want a better surface finish.
- RAPID: Set to 5% for starters, then you can increase it to 25% or 50% later.
- SINGBK should be displayed on the screen. Turn it off once you're into the program.
- Push Reset to highlight the first line of the program.
- Make sure the AIR HOSES are where you want them to be. If it will switch a tool, make sure they are back but still pointed where the cutter will be.
- Close doors of HAAS.
Running a real program:
- Ofset : Line G55, change the Z entry to -nn., "F1" to change. MUST BE NEGATIVE, must have a DECIMAL POINT!
- Transfer program from computer to HAAS:
- Push MDI DNC twice to select DNC mode: DNC RS232 Waiting....
- Haas.py on attached PC to load *.tap program
- Back on the HAAS, check the following:
- No alarms = good. Alarms = Press Alarm Mesgs then "Reset" then try loading program again (Press "MDI DNC" twice...)
- DONT PUSH RESET or it will clear the memory
- "SINGLE BLOCK" mode should be on.
- Check the AIR HOSES
- Be sure to move them back if there is a tool change!
- RAPID speed to 5%, can increase to 50% later
- SPINDLE SPEED to 100% for most bits, or up to ~120% for 1/32" or smaller bits.
- FEED RATE: Start at 10% then increase once program starts: 1/4 = 200%; 1/8" = 100%; 1/16 = 40%; 1/32 = 20%.
- When it says Z10., make sure it's 1cm above the wax block.
- Once program is going, turn off Single Block mode, change Rapid speed to 25% or 50%.
- Can push Curnt Comds, then up/down arrows to get to Work system. There the z-coordinate is the height above the wax block surface.
- Pausing the HAAS:
- Wait until mill bit is in air.
- Push "Feed hold".
- Push Coolant which will stop the air.
- Push Stop, which is next to the CW, CCW, and Spindle buttons.
To restart the program: - Push Coolnt to restart the air flow.
- Push CW to start the spindle.
- Push green Start button.
Cleaning up the HAAS
After using the Haas, you must do a quick clean-up. Use the compressed air to spray the chips off the mounting block, the slide covers, the tool changer, the inside of the doors, and the back and side walls. Basically we want to keep all surfaces fairly clean (except for the bottom where all the chips are). When chips reach the level of the windows, they must be cleaned out. This can be done by sliding open the side panels and scooping the chips out into a garbage bag. Contact Craig for disposal instructions (they are not determined at the time of this update).Changing a tool on the HAAS
Removing a broken tool
- Switch to the tool you want to use. Do this either by running the first part of a program that switches to that tool, or execute the following in MDI mode: "T# M06" where # is the tool number, for example "T5 M06". If you are in MDI mode, BE SURE YOU'RE IN SINGBK MODE!!!
- Put the HAAS in Handle Jog Mode.
|
|
|
|
|
|
Installing a new tool
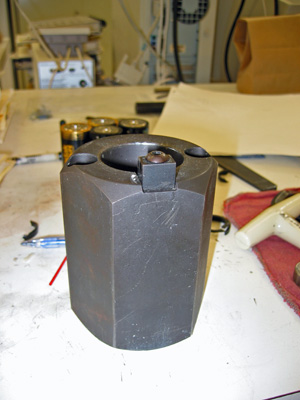
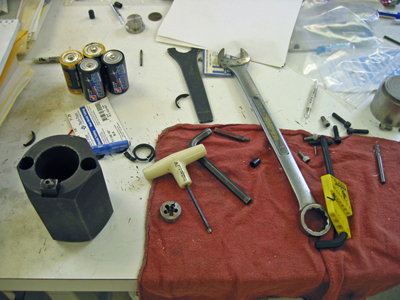
- With the chuck still in the hexagonal metal thing, put in a new mill bit.
- Tighten the chuck--but you don't need to overtighten it! Also, be very careful when moving the wrench around the newly-installed bit, don't smack the wrench into it and break it by accident.
- Remove the chuck from the hexagonal metal thing.
- Clean off the conical part of the chuck with a paper towel, and clean off the inside of the conical tube inside the HAAS that the chuck fits into.
- On the HAAS, push "MDI/DNC", then "Orient Spindle" which is in the same row as "MDI/DNC". This will align the spindle appropriately.
- On the chuck, you will notice that there is a lip with two cut-out sections on it. One of these cut-out sections has a little square with rounded corners indented into it while the other one does not. The side with the indented-rounded-square should be on the left side as you are facing the HAAS--it should be towards the tool changer rack in the HAAS.
- With the chuck oriented as such, put the chuck into the socket for it on the HAAS and push the "Tool Release" button. This will suck the chuck into the spindle and keep it there.
Setting the height of a tool
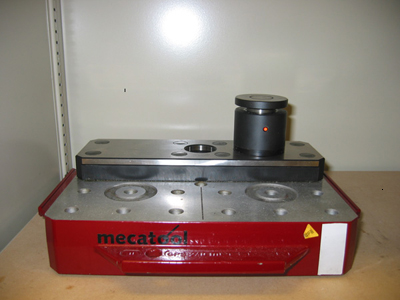
This must be done after you change a tool, or can also be done for an existing tool if you want to re-set the height (length) of it.- Clean off the metal surfaces that are on the palette-aligner thing. Make sure they're really clean, or this will make the tool height wrong.
|
|
- Put in the HAAS with the cylinder on the right-hand side, with the "0 degree" marking in front towards you.
- Clean the end of the newly-installed mill bit if it is dirty, and dust off the top of the cylinder on the red palette.
- On the HAAS, push "Ofset", then go to the G55 line. Set the Z-Offset to 0 by highlighting the Z value, typing "0." on the number pad, and pressing "F1".
- Push "MDI/DNC" to go into MDI mode.
- PUSH "SINGBK" to put it in Single Block mode!!!!!
- Execute the following lines in MDI mode. Usually they are already typed in, so to execute them you just scroll down to them using the wheel and push the green Start button once for each line (since you're in SINGBK mode). If you need to edit one of the lines, it's like editing a program, highlight an entry and type in the new text and push "Alter". I don't know how to add a new line or new entry. Anyway, here are the lines you should execute:
G55 ;
G91 G28 Z0. ;
G90 ;
- Push "POSIT". This displays the Coordinate systems. Check to make sure both the Machine, Work coordinate systems have Z values of 0. If they aren't 0, you did something wrong (I don't know what, I've never seen other values)
- Push "Handle Jog" on the HAAS. We are going to lower the mill bit so it touches the top of the cylinder. Use handle jog mode (adjusting X,Y,Z) to lower the tool so it is directly over the cylinder on the red palette, just a little bit above the surface. Position it above a spot on the cylinder that is flat and does not have "divots" from other tools running into the cylinder in the past. Put the handle jog on the smallest step size (0.001) and very slowly and gently lower the mill bit until it touches the top of the cylinder. Usually using the scroll wheel on the HAAS is the easiest way to lower down the mill bit. When it does touch the top of the cylinder, a red LED will come on on the side of the cylinder.
- When the red LED comes on, move the mill bit up and down one click (0.001) to verify that when you raise up the mill bit, the light turns off, and when you move it back down again the light turns on. If the mill bit or the cylinder are dusty, it will behave abnormally (i.e. the light won't turn on and off appropriately) and you will have to clean them off and try again.
- Leave the mill bit one click (0.001) above where the red light comes on.
- Push "OFSET".
- Using the 'Page Up','Page Down', and Arrows, NOT THE DIAL scroll to the Tool #s page. It lists all the tools and their offsets. Highlight the number under the "Geometry" column (the Z values) using the arrow keys for the tool currently in the spindle. (The tool number for this tool will be highlighted in the far left column).
- Push "Tool Ofset Measur" which is under the "F1" button to measure the Z number.
- With this newly-measured Z value highlighted, type in "-72.657" on the keypad and push "Write/Enter" to add this value to the newly-measured Z value. This "-72.657" value is the distance from the bottom of the palette mounting system to the bottom of a wax block, I think. If you ever forget this number, it can be found in program #0001, "Numbers" (i.e. push "List Prog" and scroll to #0001 and edit it).
- Push Handle Jog again, and move the bit up and off the cylinder by pushing the Z up arrow.
Ideas, requests, problems regarding TWiki? Send feedback